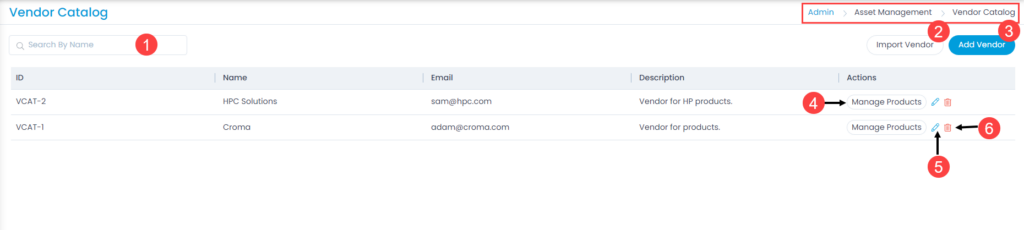
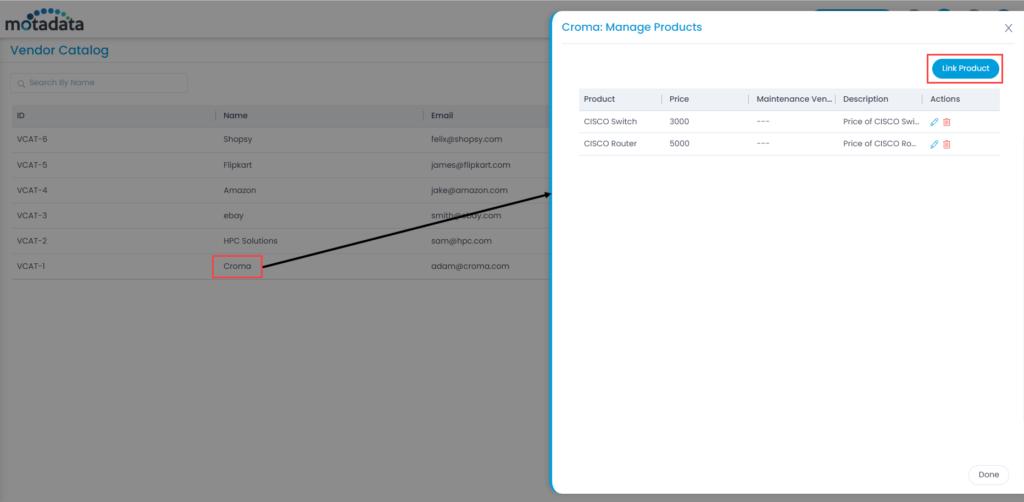
Motadata Docs

Vendor Catalog

A Vendor is a person or an organization that sales the Products. You can maintain a list of vendors in Motadata that you can associate with each Asset and Product.

To view the Vendor Catalog page, navigate to Admin > Asset Management > Vendor Catalog.

Vendors List Page
Vendors List Page

Here, you can do the following:

  1. Search: You can search for the required vendor by name.
  2. Import Vendor: You can import multiple vendors in bulk.
  3. Add Vendor: You can add a vendor.
  4. Manage Products: You can link products to the vendor. The products are created from the Product Catalog page.
  5. Edit: You can edit the vendor details.
  6. Delete: You can delete the vendor if required. A confirmation message appears. Click Yes to continue or Cancel to stop the process.

Add Vendor

To add a vendor, follow the below steps:

  1. Click the Add Vendor button and a popup appears.
Add Vendor
Add Vendor
  1. Enter the below details:
    Parameter Description
    Name Enter the name of the vendor.
    Email Enter the email address of the vendor.
    Contact Person Name Enter the contact person name.
    Contact No. Enter the phone number of the contact person.
    Description Enter a short description about the vendor.
    Address Enter the below address details of the vendor:

    • Street
    • Landmark
    • City
    • Pincode
    • State
    • Country
  2. Once the details are filled, click Add.

Import Vendor

To import vendors,

  1. Click the Import Vendor button on the list page and Vendor Batches page appears.
  2. Click the Import CSV Batch button.
Import CSV Batch
Import CSV Batch
  1. Select the .csv file if you already have it filled with the respective fields. If not, select the new .csv file using Click Here and fill the respective details. Once the file is uploaded, click Next.
Select .CSV File
Select .CSV File
  1. Map the fields as per the requirement. By default it is mapped, only in case of removal or change of some parameters mapping is necessary, and click Save Batch.
Map Fields
Map Fields
  1. The Vendor Batches page appears. It displays the status of the import along with the details like processing time, total records, success records, failed records, etc. as shown below. Once successful, the imported vendors will appear on the list page.
Imported CSV Batches

Manage Products

To link a product to the vendor, follow the below steps:

  1. Click Manage Products button next to the desired vendor name. A popup appears.
  2. Click Link Product to link to the vendor. For example: Here, Lenovo Tablet Product is linked to the Croma Vendor.
Manage Products Popup
Link Product
Link Product
  1. Enter the below details:
    • Product: Select the product that you want to link with the vendor. For more details, refer to the Product Catalog page.
    • Price: Enter the price of the product.
    • Maintenance Vendor: Select the maintenance vendor.
    • Warranty Period: Enter the warranty period in years and months.
    • Description: Enter a short description about the vendor.
  2. Once done, click Add, and the product gets linked to the vendor. You can link multiple products. Once linked you can also edit or delete it if required.
List of Linked Products