Motadata Docs

System Preference

System Preference provides configurations based on the various modules. These can be set and applied to the entire application. The system behaves and displays information according to these settings.

To view the System Preference page, navigate to Admin > Organization > System Preference.

It consists of the following tabs:

  • User Preference
  • Request Preference
  • Asset Preference
  • Agent Preference
  • Survey Preference
  • Project Preference
  • Application Settings

User Preference

This tab enables you to set the preference of the users.

User Preference
User Preference

You can set the following parameters:

  • Send Welcome Email to Guest Requester: You can manage if the welcome Email is to be sent to the Guest Requester or not.
  • Allow Technician to Change Do not Disturb mode: You can allow the technicians to configure the Do Not Disturb Mode.
  • Exclude Users from IP Address Restriction: You can exclude the Users from restricting the IP address.

Request Preference

This tab enables you to set the preferences for requests.

Request Preference
Request Preference

You can manage if you want to populate the last conversation in the replies for the request module. This flag will display the last replies in the Request Reply Email.

Asset Preference

This tab enables you to set the configurations for the asset. You can also set the prefix of the barcode, hardware, software, and Non IT assets.

Asset Preference
Asset Preference
Parameter Description
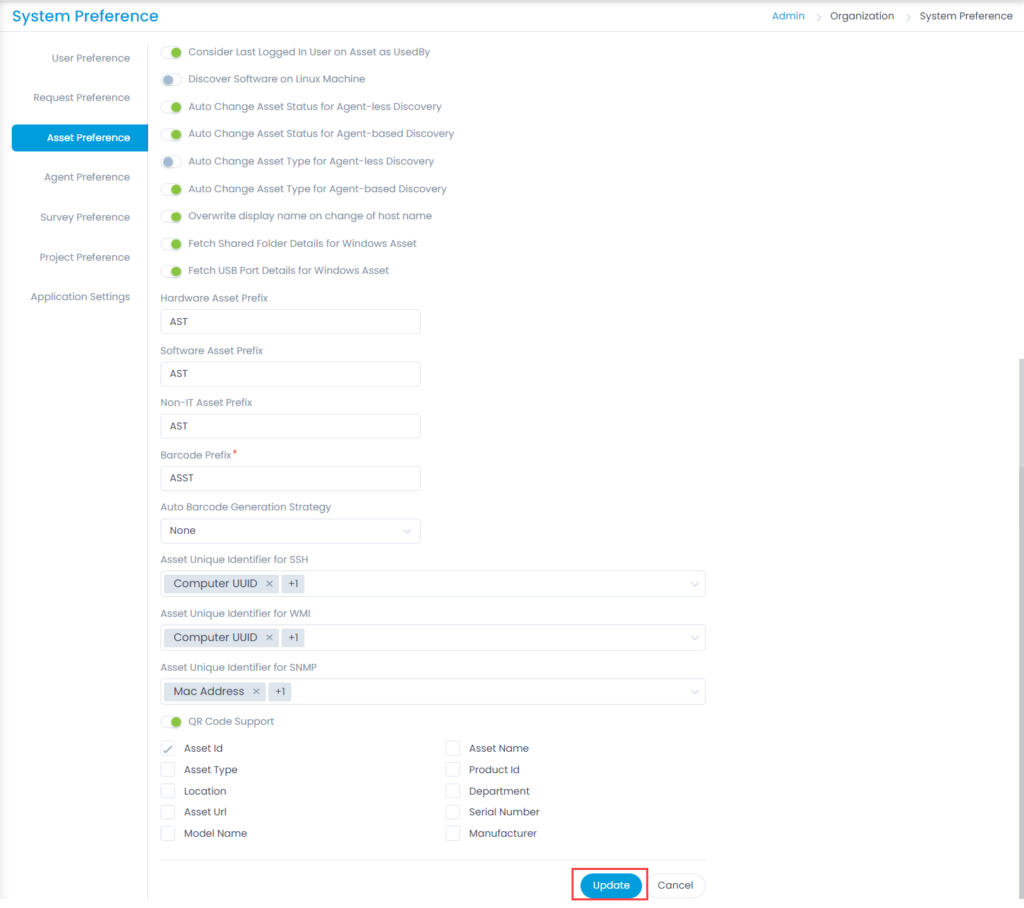
Consider Last Logged In User on Asset as UsedBy Using this option, the last logged in person on the registered asset will be counted as the last user who used it.
Discover Software on Linux Machine Using this option, the system will discover the software properties along with the Linux machine discovery.
Auto Change Asset Status for Agent-less Discovery This will change the asset status automatically, otherwise no status change will be done if not enabled.
Auto Change Asset Status for Agent-based Discovery This will change the asset status automatically, otherwise no status change will be done if not enabled.
Auto Change Asset Type for Agent-less Discovery This will change asset type automatically, otherwise no type will be selected if not enabled.
Auto Change Asset Type for Agent-based Discovery This will change asset type automatically, otherwise no type will be selected if not enabled.
Overwrite display name on change of host name If you enable this flag, as soon as the host name will be edited and changed, it will reflect on the display name as per the changes done. By Default: Disabled.
Fetch Shared Folder Details for Windows Asset You can fetch the details of the shared folder for Windows Asset. If enabled the Shared Folder tab appears in the Hardware tab of the Asset Details page.
Fetch USB Port Details for Windows Asset You can fetch the details of the USB Ports for Windows Assets. If enabled, the USB Hub and USB Controller tabs will be available in the Hardware tab of the Asset Details page.
Hardware Asset Prefix You can set the prefix for hardware assets. The default prefix is AST. For example, for Hardware you can set the prefix as HW.
Software Asset Prefix You can set the prefix for software assets. The default prefix is AST. For example, for software you can set the prefix as SW.
Non IT Asset Prefix You can set the prefix for Non IT assets. The default prefix is AST. For example, for Non IT assets you can set the prefix as NIT.
Barcode Prefix You can set the prefix of the Barcode Number generated. Numerals and more than ‘4’ characters are not allowed.
Auto Barcode Generation Strategy This parameter indicates whether Barcode Prefix overriding is supported or not and if is supported then it is based on Asset Type or based on Location value of asset. The options are:

  • None: This is the default value.
  • Asset Type Wise: Select if you want to generate the barcode based on asset type. If selected, Asset Type option is available while generating the barcode.
  • Location Wise: Select if you want to generate the barcode based on location. If selected, Location option is available while generating the barcode.
Asset Unique Identifier for SSH Select the Identifiers from the dropdown for the SSH protocol.
Asset Unique Identifier for WMI Select the Identifiers from the dropdown for the WMI protocol.
Asset Unique Identifier for SNMP Select the Identifiers from the dropdown for the SNMP protocol.
QR Code Support Enable if you want to support the QR code feature. If enabled, you can select the various details or parameters that can be printed in the QR code.

Once the required parameters are configured, click Update.

Agent Preference

This tab enables you to set the intervals for running the agent discovery cycle as well as upload or download the agent build.

Agent Settings

This provides the options for setting the agent with respect to the Discovery. The settings are according to the minutes/cycle scale. Also, for the Patch download, when you enable the flag the agent can directly download the patch from the Internet instead of the server. Thus, saving the bandwidth.  By default, it is disabled.

Agent Preference > Agent Setting

Agent Build

This enables you to upload as well as download the Agent build file.

Note: This will only be available if the agent is already installed.
Agent Preference > Agent Build

Survey Preference

This tab enables you to set the minimum questions and audience size limit in the survey. For more details on Survey, refer to the link User Survey.

The options are:

  • Minimum Questions in a Survey: You can set the minimum number of questions in a survey. The default value is 5. The maximum questions can be 30.
  • Minimum Audience Size: You can select the minimum size of the audience in a survey. i.e. Number of Requesters to be selected. The size can be from 3 to 100.

Once set, click Update to apply the setting.

Note: A user with Super Admin role and holding Manage User Survey permission can access this module.
Survey Preference
Survey Preference

Project Preference

This tab enables you to set the timing as per the requirement for the complete week and working hours.

Project Preference
Project Preference

Application Settings

This tab enables you to configure the settings applicable for the entire application. The settings are:

  • Base URL: Specify the URL of the installed application page where the GUI needs to be accessed. This field is read-only in the SaaS application.
  • Max Upload Size (MB): Specify the maximum size of the file which a user can upload. File should not exceed 25MB. This field is read-only in the SaaS application.
  • Enable Application Accessibility: Enable to resize the font of the content in the application. You can increase, decrease, and reset the font size. If enabled, the font size icon will appear next to the Create New + button at the top of the screen.
  • Blocked File Extensions: Specify the file extensions which you want to block. To block the file, click the + Add Extensions button, enter the extension, and click the green (right) symbol.

Once configured, click Update and the settings will get applied to the entire application.

Application Settings