How to create your own dashboard?
Go to Main Menu, Select Dashboard ![]() . The default dashboard screen is displayed.
. The default dashboard screen is displayed.
Click on the drop-down that is present at the top-left corner of the screen beside the main menu. Now, select the ![]() button.
button.
A proprietary framework that incorporates AI and ML for IT operations to increase efficiency and reduce operations cost.
Gain the complete data control across multiple sources using AI powered analytics at any scale
Explore MoreAccelerate your service delivery and streamline internal processes to meet the rising expectations of your end-users.
Go to Main Menu, Select Dashboard ![]() . The default dashboard screen is displayed.
. The default dashboard screen is displayed.
Click on the drop-down that is present at the top-left corner of the screen beside the main menu. Now, select the ![]() button.
button.
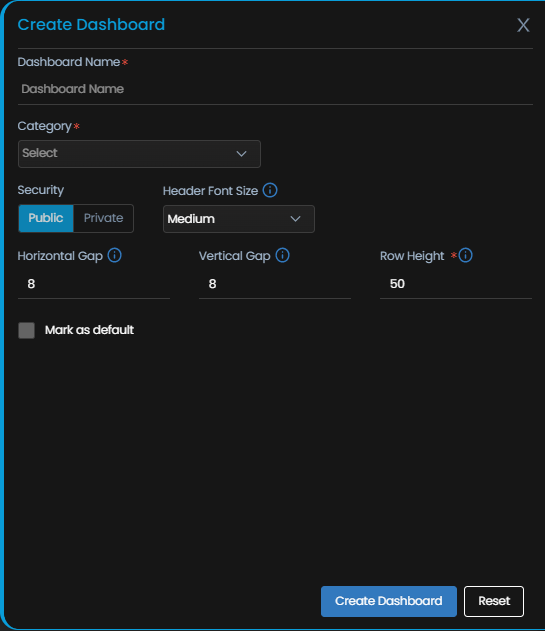
The pop-up to create a dashboard is now displayed.
Please fill up the fields in the pop-up as follows:
| Dashboard Name | Enter a unique name of the dashboard you want to create. |
| Category Name |
|
| Security |
|
| Users | This column appears only if you select Security as Private. Select the users for whom you want to keep this dashboard visible. |
| Header Font Size | Select the font size for the title of each widget. |
| Horizontal Gap | Enter the horizontal distance (in pixels) that you want to set between two widgets. |
| Vertical Gap | Enter the vertical distance (in pixels) that you want to set between two widgets. |
| Row Height | Enter the height (in pixels) of each row in a widget. |
| Mark as default | Select this check-box to mark the dashboard you are creating as the default dashboard which is displayed when you open the Dashboard section from the main menu. |
Select Create Dashboard to create the dashboard as per the parameters you selected.
Select Reset to erase all the current field values, if required.
| Cookie | Duration | Description |
|---|---|---|
| cookielawinfo-checkbox-analytics | 11 months | This cookie is set by GDPR Cookie Consent plugin. The cookie is used to store the user consent for the cookies in the category "Analytics". |
| cookielawinfo-checkbox-functional | 11 months | The cookie is set by GDPR cookie consent to record the user consent for the cookies in the category "Functional". |
| cookielawinfo-checkbox-necessary | 11 months | This cookie is set by GDPR Cookie Consent plugin. The cookies is used to store the user consent for the cookies in the category "Necessary". |
| cookielawinfo-checkbox-others | 11 months | This cookie is set by GDPR Cookie Consent plugin. The cookie is used to store the user consent for the cookies in the category "Other. |
| cookielawinfo-checkbox-performance | 11 months | This cookie is set by GDPR Cookie Consent plugin. The cookie is used to store the user consent for the cookies in the category "Performance". |
| viewed_cookie_policy | 11 months | The cookie is set by the GDPR Cookie Consent plugin and is used to store whether or not user has consented to the use of cookies. It does not store any personal data. |