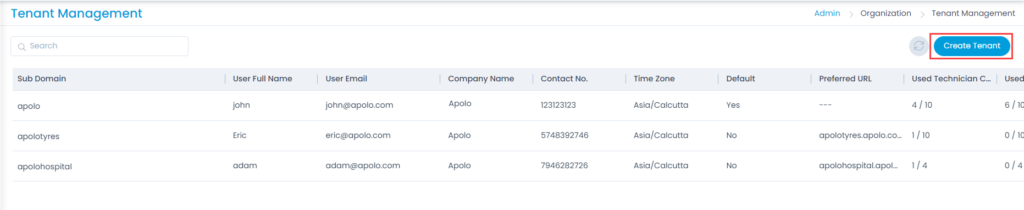
Motadata Docs

Create Tenant

To create a tenant, follow the below steps:

  1. Click Create Tenant button and a popup appears.
Create Tenant button
Create Tenant
Create Tenant
  1. Enter the below details:
    Parameter Description
    User Full Name Enter the full name of the user.
    User Email Enter the email address of the user using which you can login.
    Password Enter the password.
    Company Enter the name of the company.
    Time Zone Select the time zone.
    Contact No. Enter the contact number of the user.
    Sub Domain Enter the sub domain name.

    Note: A Sub Domain should not contain spaces, special characters, and uppercase letters.
    Preferred URL Enter the preferred URL using which you can access the tenant. The URL should be in the below format: {subdomain}.{domain}.com

    For example: If apolo.com is the domain and james is the subdomain, the preferred URL will be james.apolo.com

    Technician Count Enter the number of technicians you want to allow to be added in the tenant out of the total technicians license.
    Hardware Asset Count Enter the number of hardware assets you want to allow to be added in the tenant out of the total hardware assets license.
    Non-IT Asset Count Enter the number of Non-IT assets you want to allow to be added in the tenant out of the total Non-IT assets license.
    End Points Scope Count Enter the number of end points you want to allow to be added in the tenant out of the total End Points Scope license.
  2. Once all the details are filled, click Save, and the tenant will get created. By default, it is enabled. Similarly, you can create multiple tenants. Note, the tenant creation process may take some time as it is getting registered for the first time in ServiceOps.

    Notes:

    • You can create multiple tenants, but at a time only 10 tenants (including the default tenant) can be active.
    • Once a tenant is created, you cannot reuse the name even after deleting it.

Edit Tenant

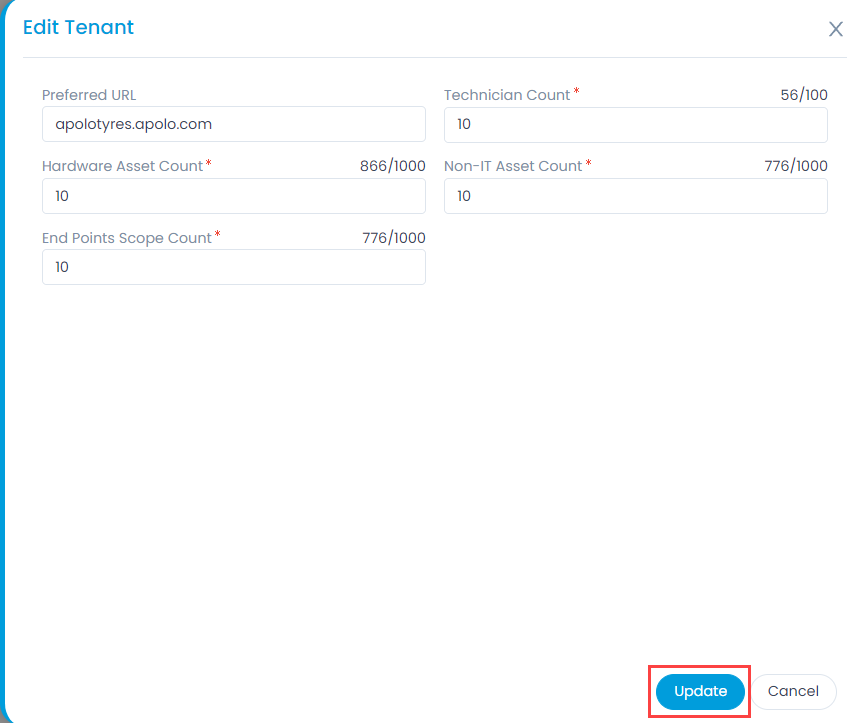
To edit the tenant, click the edit icon next to the desired tenant, and a popup appears as shown below. Change the required details and click Update.

Edit Tenant
Edit Tenant

Access the Tenant

  1. To access the tenant portal, enter the Preferred URL in the address bar of the browser, and the home page appears as shown below.
Accessing the Tenant Portal
  1. Click the Login button and the below page appears.
Login Page
Login Page
  1. Enter the email address and the password set at the time of creation and click Sign In. The Change Password page appears. When logging into the portal for the first time, you are asked to change the password.
Change Password Page
  1. Enter the current password, new password, and confirm password. Once done, click Submit.
  2. Now, sign-in with the new password and the below screen appears.
Tenant Home Page
Tenant Home Page
  1. You can now use this portal as per your requirement.

Notes:

  • The configurations made in the tenant and the default tenant will be independent. The changes  made in one tenant will not be affected in any other tenant.
  • The license used in the tenant (child) is provided from the license that is assigned to the default tenant (parent).
  • If this feature is enabled, the URLs provided in the File Server, Base URL, etc., should be replaced with proper domain names instead of IP Address or localhost.