Motadata Docs

Technicians

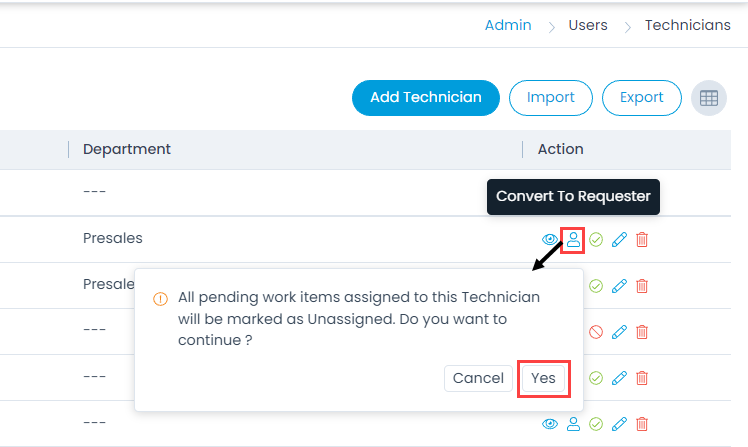
The Technicians are the one responsible for providing solution, handling requests, problems, changes, etc. You can convert a Technician to a requester. By default, all the Technicians are Requesters too.

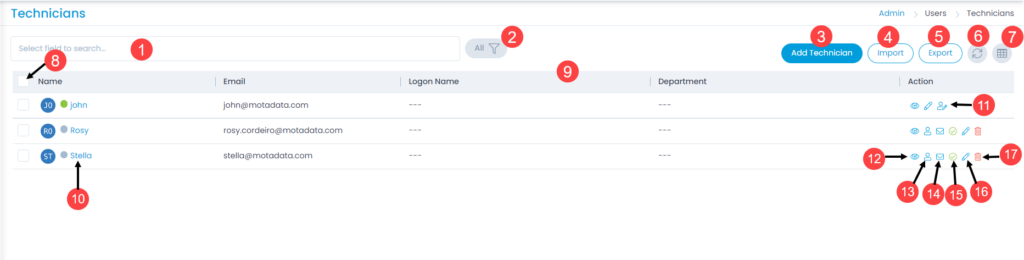
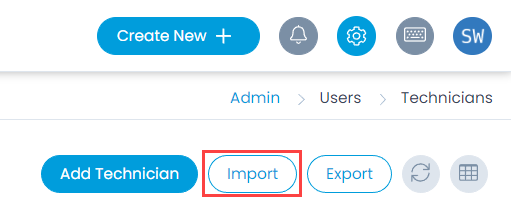
To view the Technicians page, navigate to Admin > Users > Technicians and the list page appears.

List Page

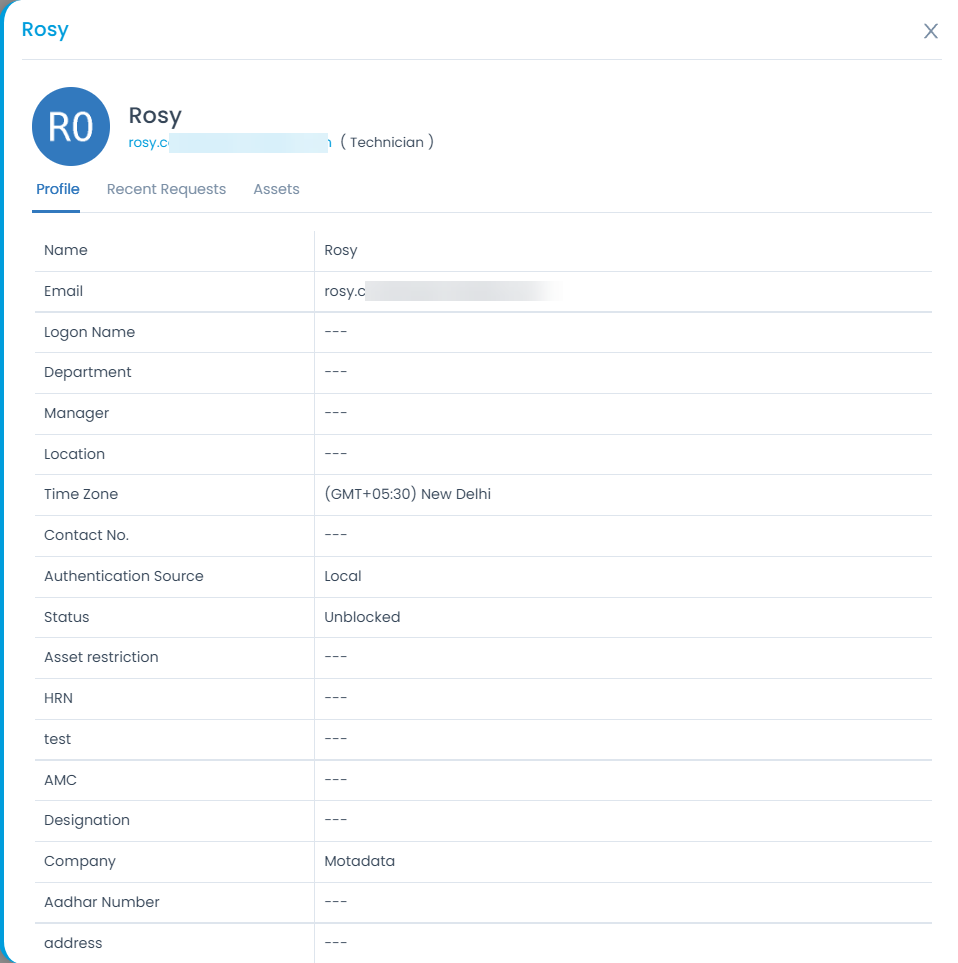
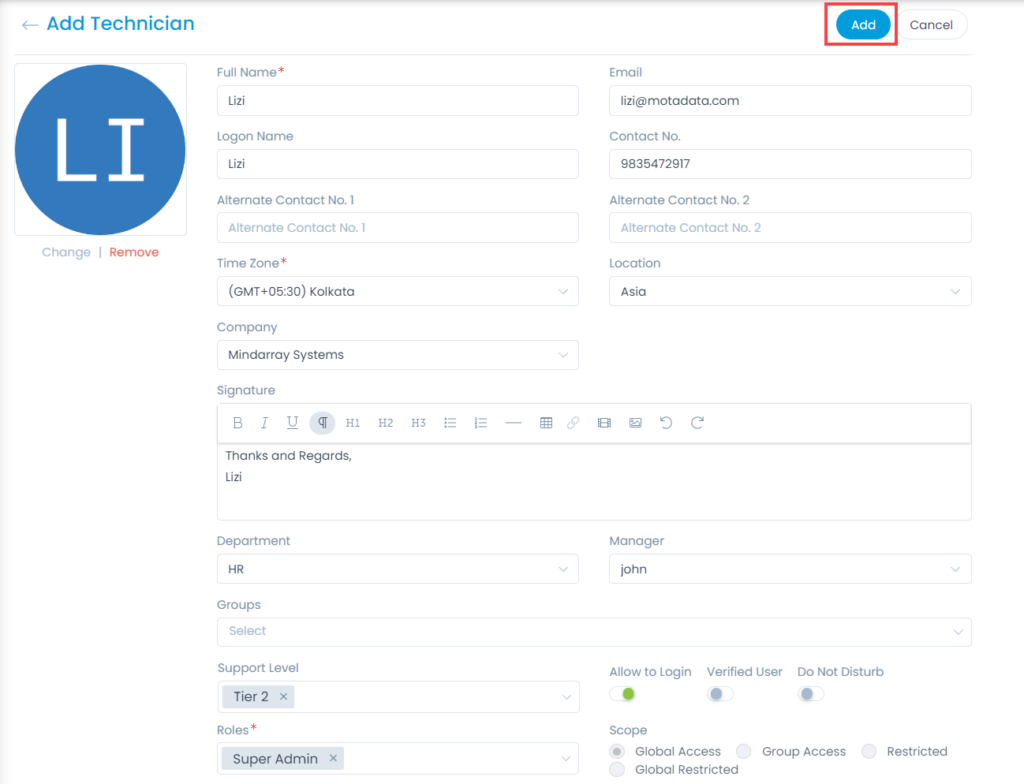
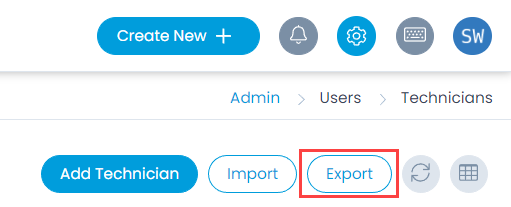
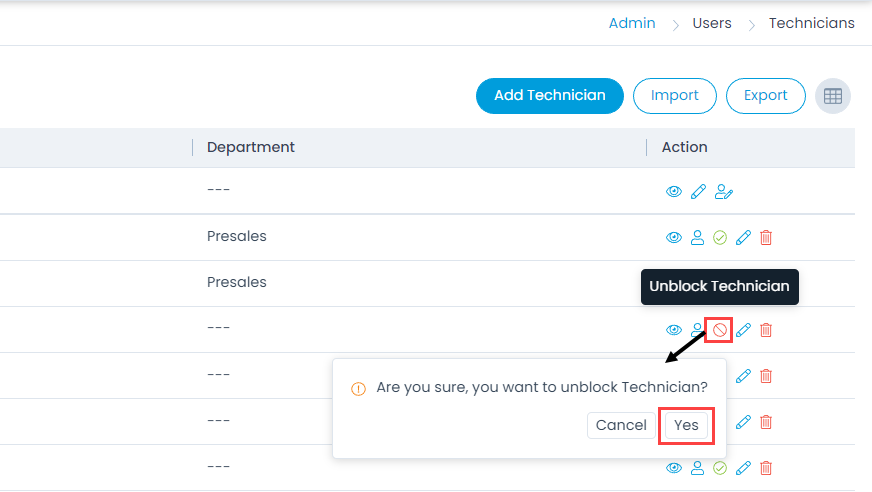
The list page shows the details of the technicians as per the columns selected. You can view, add, edit, and delete the technicians. You can also search, filter, refresh, import, export, select columns to view in the grid, view the status and details of the technician, convert technicians to requesters, send an email to verify the user, and block technician.

Technicians List Page
  1. Search: You can look for a specific technician by searching them. The search is a faceted search and allows you to find with specific criteria. You can find more details in the search section.
  2. Filter: You can filter the technicians list by clicking the desired option. The options are: All, Verified, Unverified, and Archived. If Verified is selected, all the technicians whose email addresses are verified will appear.
  3. Add Technician: You can add a technician.
  4. Import: You can import a list of technicians in one go.
  5. Export: You can export a list of technicians in CSV or Excel format.
  6. Refresh: You can refresh the technician list. This is useful when multiple people are working on the technician page and contents are updated frequently.
  7. Column Selection: You can select the columns that you want to be visible in the grid.
    To select the columns, click the Column Selection icon, select the desired columns, and click Apply. The columns will become visible in the grid.
  8. Bulk Archive: You can archive the selected or all technicians in bulk.
  9. Grid: You can view the details of the technicians as per the columns selected.
  10. User Status: You can view whether the technician is logged in or logged out of the ServiceOps portal.
  11. Change Super Admin: You can change the super admin user.
  12. View: You can view the details of the technician by clicking the eye icon as shown below.
View Technician Details
  1. Convert to Requester: You can convert the required technician to a requester. On doing so, the access permissions will also get changed.
  2. Send an Email to Verify the User: You can send an email to verify the technician user. The email contains the link using which the technician can verify and activate the account.
  3. Block Technician: You can block the desired technician.
  4. Edit: You can edit the details of the required technician.
  5. Delete: You can delete the technician if no longer needed.

Add Technician

To add a technician,
Click the Add Technician button and the page appears.

Adding Technician
Adding Technician

Enter the following details:

Parameter Description
Select Image You can select an image to set the profile picture of the technician. If not set, it automatically takes the first two letters of the name. You can change the image using the Change link below the square box.
Full Name Enter the full name of the technician.
Email Enter the email address of the technician.
Logon Name Enter the logon of the technician. You can use this to login instead of the email address.
Contact No. Enter the contact number of the technician.
Alternate Contact No. 1 Enter the first alternate contact number.
Alternate Contact No. 2 Enter the second alternate contact number.
Time Zone Select the time zone.
Location Select the location. To create custom locations, click here.
Company Select the company to which you want to associate the user. To add companies, click here.

Note: This field is available only if Managed Services Provider feature is enabled.
Signature Enter the signature that you may want to add at the end of every email.
Department Select the department in which the technician belongs. To create custom departments, click here.
Groups Select the groups to which the technician belongs.
Support Level Select the level of the Technician you want to assign. Levels available are Tier 1, Tier 2, Tier 3, and Tier 4. It is not a mandatory field.

Note: Smart Balance will function only if Support Level is assigned to a technician.
Allow To Login Enable if you want to allow the technician to login to the portal.
Verified User Enable if the user is verified.
Do not Disturb Enable if you want the technician to be in DND mode.
Roles Select the roles to assign the responsibilities to the technician. For example, problem specialist is the technician who has to take care of every problem and provide a solution for the same. To create a custom Role, click here. It is a mandatory field.
Scope Select the scope of the access to the technician. The options are:

  • Global Access: Technician can view all the requests.
  • Group Access: Technician can view only those requests that are assigned to their group.
  • Restricted: Technicians can view and perform operations on all the requests that are assigned to them.
  • Global Restricted: Technicians can view all the tickets but perform operation only on those that are assigned to them.

Once done, click Add and the technician gets created.

Note: If more than one technician is viewing the same request simultaneously, the end-user can view the details about all the current technicians who are viewing the request.

Export Technicians

To export the list of technicians,

  1. Click the Export button and a popup appears.
  2. Select the format in which you want to export the list. The options are CSV and Excel.
  3. Select the fields that you want to export.
  4. Click Export and an email is received on the Administrator’s Email-id with the link to download the list in the selected format.
Export Button
Export Button
Export Technicians
Export Technicians

Import Technicians

To import technicians to ServiceOps,

  1. Click the Import button and the Technician Batches page appears.
  2. Click the Import CSV Batch button.
Import Button
Import Button
Import CSV Batch
Import CSV Batch
  1. Select the .csv file if you already have it filled with the respective fields. If not, download the sample file using Click Here, and fill in the details. Once the file is uploaded, click Next.
CSV Details
CSV Details
Select .CSV File
Select .CSV File
  1. Map the fields as per the requirement. By default it is mapped, only in case of removal or change of some parameters mapping is necessary, and click Save Batch.
Map Fields
Map Fields
  1. The Technician Batches page appears. It displays the status of the import along with the details like processing time, total records, success records, failed records, etc. as shown below. Once successful, the imported technicians will appear in the technician list page.
Imported CSV Batches

Block or Unblock Technician

Any Technician can be blocked or unblocked directly from the list page. To block or unblock technician, click the respective icons as shown below. Once a technician is blocked the icon turns to red color.

Block Technician
Block Technician
Unblock Technician
Unblock Technician

Convert Technician to Requester

You can convert a Technician to a Requester. This can be done using User icon from the list page. Once converted, all the pending work items assigned to this technician will be marked as unassigned.

Convert to Requester

Verify Technician via Email

When you create a technician, the system sends an email to verify the email address. The email address contains the link to reset the password. A technician can login to the system only after changing the password. To manually send the email, click on the Email icon.

Verify User
Verify User

Change Super Admin

In case a senior staff or Manager leaves/changes the Organization, there is a need to change the existing current Super Admin and assign other responsible person the rights of Super Admin.

In the list of Technicians, the first name is always of the Super Admin. In line to actions associated is the Change Super Admin feature as shown below:

Change Super Admin
Change Super Admin

To change the Super Admin,

  1. Click the Change Super Admin icon and a popup appears.
  2. Select the technician to whom you want to assign the Super Admin role.
  3. You can also archive the current Super Admin using the checkbox to avoid using it again.
  4. Once done, click Change and the Super Admin user will get changed.
Select the technician

Bulk Archive

This option enables you to archive multiple technicians in one go.
To archive multiple technicians in bulk,

  1. Select the desired technicians.
  2. Click on the Take Action dropdown.
  3. Select the Archive option. A confirmation message appears. Click Yes to continue or No to stop the process. If Yes is clicked, the selected technicians will get moved to the Archive.
Bulk Archive
Bulk Archive