Motadata Docs

Request Form

The layout of the request management has all the fields required to manage the requests of an organization. However, to meet the organization’s needs, you can modify the default template, and add new fields. The fields can later be used in the automation settings also.

To view the Request Form, navigate to Admin > Request Management > Request Form and the below page appears.

Request Form
Request Form

The page displays two types of fields:

  • Default Fields: These are the primary fields that come with the fresh installation. The field names can neither be changed nor deleted.
  • Custom Fields: These are the additional fields added from the pallet. The fields can be renamed and deleted.

Here, you can customize the form using the below options:

  1. Field Pallet: You can drag and drop the fields from the pallet to add into the form.
  2. User Fields Mapping: You can map the user fields with the request fields.
  3. Re-Order: You can drag and drop the fields to change the order of the form. This option is available for both: default and custom fields.
  4. Expand/Collapse: You can expand and collapse the fields to show 1 in a row or 2 in a row. If collapsed, the width of the field will get reduced to half. This option is available for both: default and custom fields.
  5. Duplicate: You can create duplicate fields from the custom fields. This option is available only for custom fields.
  6. Edit: You can edit the fields and make them mandatory, show on requester form, or change their characteristics. For default fields, some of the options are restricted.
  7. Remove: You can delete the custom fields and not the default ones.

Example Scenario: For example, every request in an organization requires a follow-up date. This is the date by which a technician has to close the request. All SLA, KRA, and KPI(s) of technician are computed using this date.

DateTime

To add the Datetime custom field, drag and drop it on the form in the right-hand side, and a popup appears.

Adding Custom Field in the Request Form

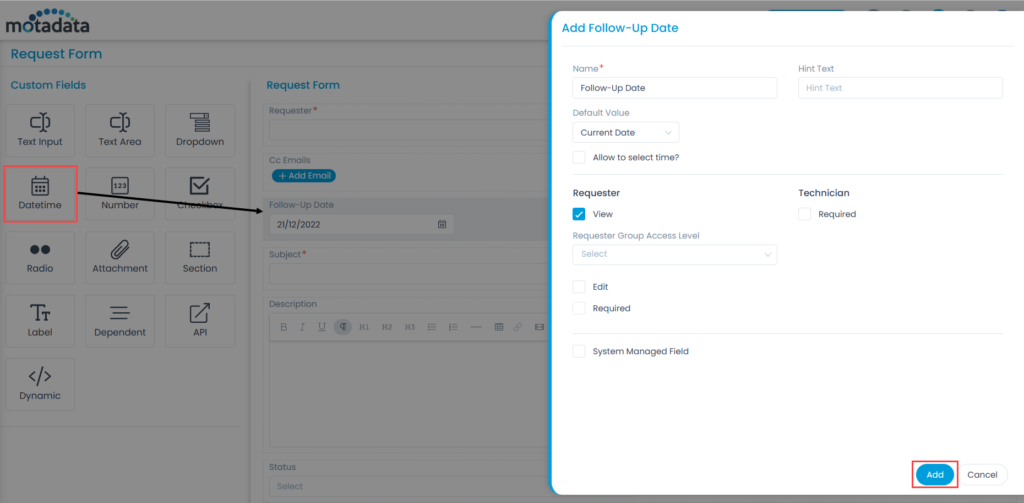
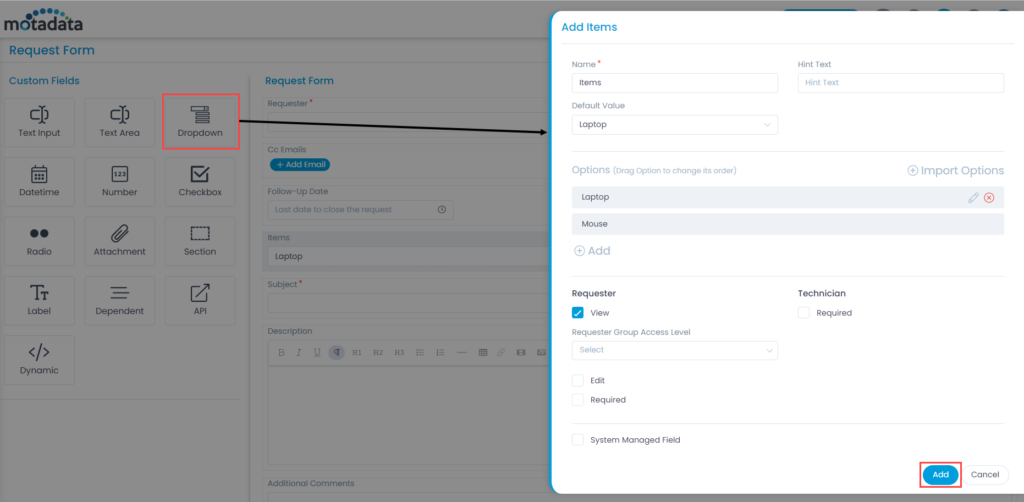
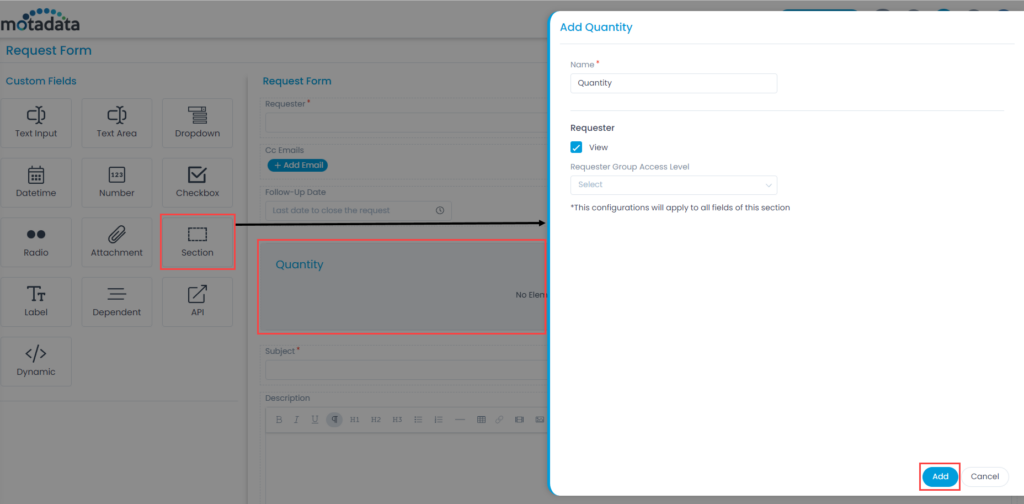
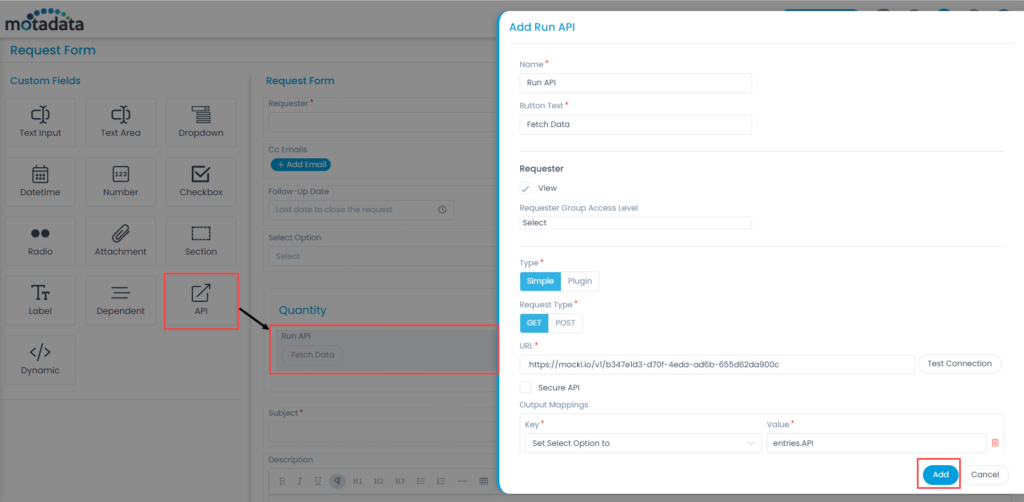
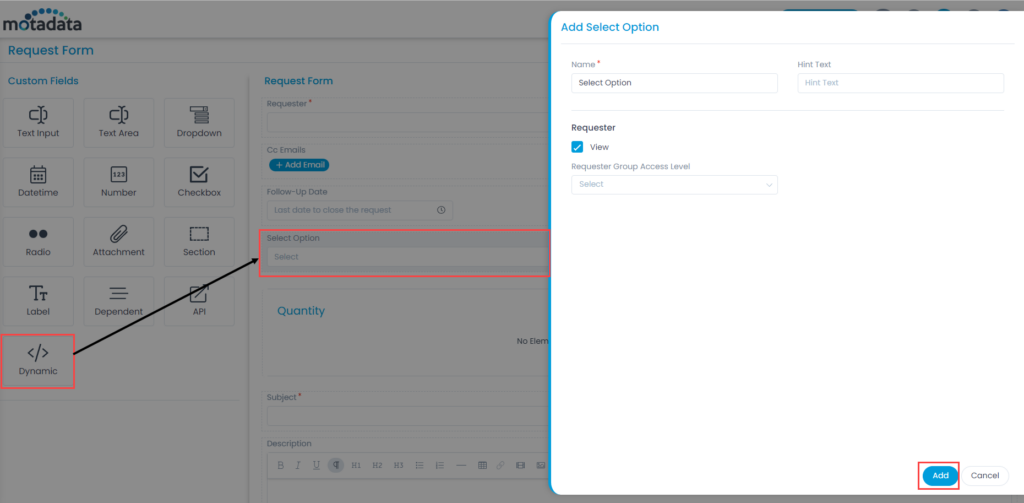
Enter the following details:

  • Name: Enter the name of the field.
  • Hint Text: Enter the text to appear by default. It appears in grey color.
  • Default Value: Select the default value of the field. The options are: Current Date and Custom.
  • Allow to Select Time?: Enable to allow the user to select time along with the date.

Requester: Set the permissions based on which the requester can fill in the details at the time of request creation.

  • View: Enable to display the field on the requester form while creating a request. If enabled, you can only view the field and not edit it. To edit, you need to enable the Edit permission. You can also select the Requester Group Access Level.
  • Requester Group Access Level: Select the requester groups who can access the field.
  • Edit: Enable to allow the requester to provide input in the field.
  • Required: Enable to make the field mandatory.

Technician: Set the permission for the technician which will be applicable at the time of request creation.

  • Required: Enable to make the field mandatory.

System Managed Field: Enable to make the field as non-editable. It will display values from the dependents. You can enable this for Text Input, Text Area, Dropdown, Datetime, Number, and Radio fields.

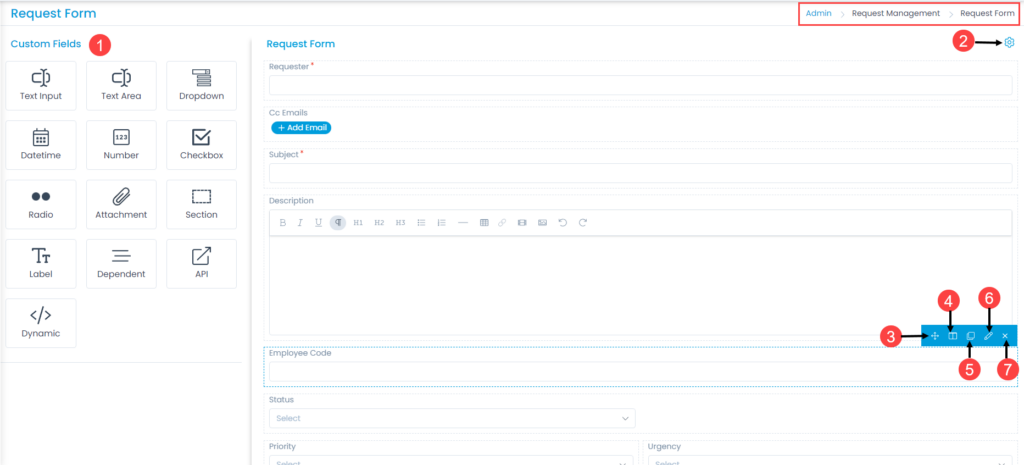
Once done, click Add. You can then re-arrange its location, create a duplicate field, expand/collapse its width, edit, or delete it if required. Similarly, you can add other custom fields.

Text Input and Text Area

Add these fields when a text input (like name) and a brief description (like address and comments) are required from the user.
The details are:

  • Name: Enter the name of the field.
  • Hint Text: Enter the text to appear by default. It appears in grey color.
  • Default Value: Enter the default value of the field.
  • Allow to Select Time?: Enable to allow the user to select time along with the date.

Requester: Set the permissions based on which the requester can fill in the details at the time of request creation.

  • View: Enable to display the field on the requester form while creating a request. If enabled, you can only view the field and not edit it. To edit, you need to enable the Edit permission. You can also select the Requester Group Access Level.
  • Requester Group Access Level: Select the requester groups who can access the field.
  • Edit: Enable to allow the requester to provide input in the field.
  • Required: Enable to make the field mandatory.

Technician: Set the permission for the technician which will be applicable at the time of request creation.

  • Required: Enable to make the field mandatory.

System Managed Field: Enable to make the field as non-editable. It will display values from the dependents. You can enable this for Text Input, Text Area, Dropdown, Datetime, Number, and Radio fields.

Add this field when a list of options are to be displayed on the form. For example, list of software applications.

  • Name: Enter the name of the field.
  • Hint Text: Enter the text to appear by default. It appears in grey color.
  • Default Value: Select the default value of the field from the options added.
  • Options: Click Add to add options in the dropdown list or you can import them using the Import Options link. To add manually, click the Add link, enter the option, and select the green right symbol. If required you can also change the order of the options to be displayed in the form using drag and drop.

Requester: Set the permissions based on which the requester can fill in the details at the time of request creation.

  • View: Enable to display the field on the requester form while creating a request. If enabled, you can only view the field and not edit it. To edit, you need to enable the Edit permission. You can also select the Requester Group Access Level.
  • Requester Group Access Level: Select the requester groups who can access the field.
  • Edit: Enable to allow the requester to provide input in the field.
  • Required: Enable to make the field mandatory.

Technician: Set the permission for the technician which will be applicable at the time of request creation.

  • Required: Enable to make the field mandatory.

System Managed Field: Enable to make the field as non-editable. It will display values from the dependents. You can enable this for Text Input, Text Area, Dropdown, Datetime, Number, and Radio fields.

Adding Dropdown field in the Request Form

Number

Add this field when a number input is required. For example, Employee ID.

  • Name: Enter the name of the field.
  • Hint Text: Enter the text to appear by default. It appears in grey color.
  • Default Value: Enter the default value of the field.
  • Allow Decimal in Number?: Enable to allow the user to enter decimal numbers in the field.

Requester: Set the permissions based on which the requester can fill in the details at the time of request creation.

  • View: Enable to display the field on the requester form while creating a request. If enabled, you can only view the field and not edit it. To edit, you need to enable the Edit permission. You can also select the Requester Group Access Level.
  • Requester Group Access Level: Select the requester groups who can access the field.
  • Edit: Enable to allow the requester to provide input in the field.
  • Required: Enable to make the field mandatory.

Technician: Set the permission for the technician which will be applicable at the time of request creation.

  • Required: Enable to make the field mandatory.

System Managed Field: Enable to make the field as non-editable. It will display values from the dependents. You can enable this for Text Input, Text Area, Dropdown, Datetime, Number, and Radio fields.

Checkbox

Add this field to allow the user to select multiple options in the form. For example, Laptop details.

  • Name: Enter the name of the field.
  • Hint Text: Enter the text to appear by default. It appears in grey color.
  • Default Value: Select the default value of the field from the options added.
  • Options: Click Add to add options in the dropdown list or you can import them using the Import Options link. To add manually, click the Add link, enter the option, and select the green right symbol. If required you can also change the order of the options to be displayed in the form using drag and drop.

Requester: Set the permissions based on which the requester can fill in the details at the time of request creation.

  • View: Enable to display the field on the requester form while creating a request. If enabled, you can only view the field and not edit it. To edit, you need to enable the Edit permission. You can also select the Requester Group Access Level.
  • Requester Group Access Level: Select the requester groups who can access the field.
  • Edit: Enable to allow the requester to provide input in the field.
  • Required: Enable to make the field mandatory.

Technician: Set the permission for the technician which will be applicable at the time of request creation.

  • Required: Enable to make the field mandatory.

System Managed Field: Enable to make the field as non-editable. It will display values from the dependents. You can enable this for Text Input, Text Area, Dropdown, Datetime, Number, and Radio fields.

Radio

Add this field to allow the user to select a single option from a list of options. For example, Yes or No responses.

  • Name: Enter the name of the field.
  • Default Value: Select the default value of the field from the options added.
  • Options: Click Add to add options in the dropdown list or you can import them using the Import Options link. To add manually, click the Add link, enter the option, and select the green right symbol. If required you can also change the order of the options to be displayed in the form using drag and drop.

Requester: Set the permissions based on which the requester can fill in the details at the time of request creation.

  • View: Enable to display the field on the requester form while creating a request. If enabled, you can only view the field and not edit it. To edit, you need to enable the Edit permission. You can also select the Requester Group Access Level.
  • Requester Group Access Level: Select the requester groups who can access the field.
  • Edit: Enable to allow the requester to provide input in the field.
  • Required: Enable to make the field mandatory.

Technician: Set the permission for the technician which will be applicable at the time of request creation.

  • Required: Enable to make the field mandatory.

System Managed Field: Enable to make the field as non-editable. It will display values from the dependents. You can enable this for Text Input, Text Area, Dropdown, Datetime, Number, and Radio fields.

Attachment

Add this field to attach files in the form. For example, evidence image.

  • Name: Enter the name of the field.
  • Button Text: Enter the name of the button.

Requester: Set the permissions based on which the requester can fill in the details at the time of request creation.

  • View: Enable to display the field on the requester form while creating a request. If enabled select the Requester Group Access Level.
  • Requester Group Access Level: Select the requester groups who can access the field.
  • Edit: Enable to allow the user to change the attachment if required.
  • Required: Enable to make the field mandatory.

Technician: Set the permission for the technician which will be applicable at the time of request creation.

  • Required: Enable to make the field mandatory.

Section

Add this field to add a separate section in the form. You can drag and drop the fields like text input etc. on the section.

  • Name: Enter the name of the field.

Requester: Set the permissions based on which the requester can fill in the details at the time of request creation.

  • View: Enable to display the field on the requester form while creating a request. If enabled select the Requester Group Access Level.
  • Requester Group Access Level: Select the requester groups who can access the field.
Adding Section Field in the Request Form

Label

Add this field to add a label.

  • Name: Enter the name of the field.
  • Default Value: Enter the default value of the field.

Requester: Set the permissions based on which the requester can fill in the details at the time of request creation.

  • View: Enable to display the field on the requester form while creating a request. If enabled select the Requester Group Access Level.
  • Requester Group Access Level: Select the requester groups who can access the field.

Dependent

Add this field to display a hierarchy of fields. For example, if Location field is selected, its related countries, states, and districts will be displayed.

  • Name: Enter the name of the field.
  • Hint Text: Enter the text to appear by default. It appears in grey color.
  • Allow user to select leaf node only: Enable to allow the user to select only the last leaf node and not the middle or parent node.
  • Display Entire Hierarchy in Report: Enable to display the entire hierarchy in the report.
  • Options: Click Add to add options in the dropdown list or you can import them using the Import Options link. To add manually, click the Add link, enter the option, and select the green right symbol. If required you can also change the order of the options to be displayed in the form using drag and drop.

Requester: Set the permissions based on which the requester can fill in the details at the time of request creation.

  • View: Enable to display the field on the requester form while creating a request. If enabled, you can only view the field and not edit it. To edit, you need to enable the Edit permission. You can also select the Requester Group Access Level.
  • Requester Group Access Level: Select the requester groups who can access the field.
  • Edit: Enable to allow the requester to provide input in the field.
  • Required: Enable to make the field mandatory.

Technician: Set the permission for the technician which will be applicable at the time of request creation.

  • Required: Enable to make the field mandatory.

API

Add this field to fetch data on the request form using the API. These are available only while creating a request. The data fetched via API can be displayed using the Dynamic field.

  • Name: Enter the name of the field.
  • Button Text: Enter the name of the button. the default value is Fetch Data.

Requester: Set the permissions based on which the requester can fill in the details at the time of request creation.

  • View: Enable to display the field on the requester form while creating a request. If enabled select the Requester Group Access Level.
  • Requester Group Access Level: Select the requester groups who can access the fields.
  • Type: Select the type of API as Simple or Plugin. If plugin is selected, select the required plugin from the dropdown list. These plugins are added from the Integration section. If Simple is selected, enter the below details.
    • Request Type: Select the type as GET or POST.
    • URL: Enter the API URL from where the data is to be fetched.
    • Request JSON: Type the code for request JSON. This is required for POST request type.
    • Secure API: Enable if you want the API to be secured. By default, it is disabled. If enabled, enter the username and password.
    • Output Mappings: Add the Key and Value of the fields that you want to map. You can add more fields using the Add Output Mapping link. Key are the fields added in the form. For Example: You can select a Dynamic field, Select Option as shown below.
Adding API Field in the Request Form

Dynamic

Add this field to get the values using the API field at the time of creating a request. This is a dropdown field whose values are populated by executing the API. Once the request is created the field becomes non-editable. To edit the value, you need to run the API again.

Note: To use the Dynamic field, API field is required.
  • Name: Enter the name of the field.
  • Hint Text: Enter the text to appear by default. It appears in grey color.

Requester: Set the permissions based on which the requester can fill in the details at the time of request creation.

  • View: Enable to display the field on the requester form while creating a request. If enabled select the Requester Group Access Level.
  • Requester Group Access Level: Select the requester groups who can access the fields.
Adding a Dynamic Field to the Request Form
Fetching Values at the time of Creating a Request

User Fields Mapping

This feature allows variable mappings of the User Fields with the Request Fields.

You can click the icon from the top-right corner of the page and a popup appears.

User Fields Mapping
User Fields Mapping

Here, add the fields using the Add Field Mapping link and selecting the fields from both the dropdowns. The request fields dropdown will only show fields which are not mapped.