Motadata Docs

LDAP Configurations

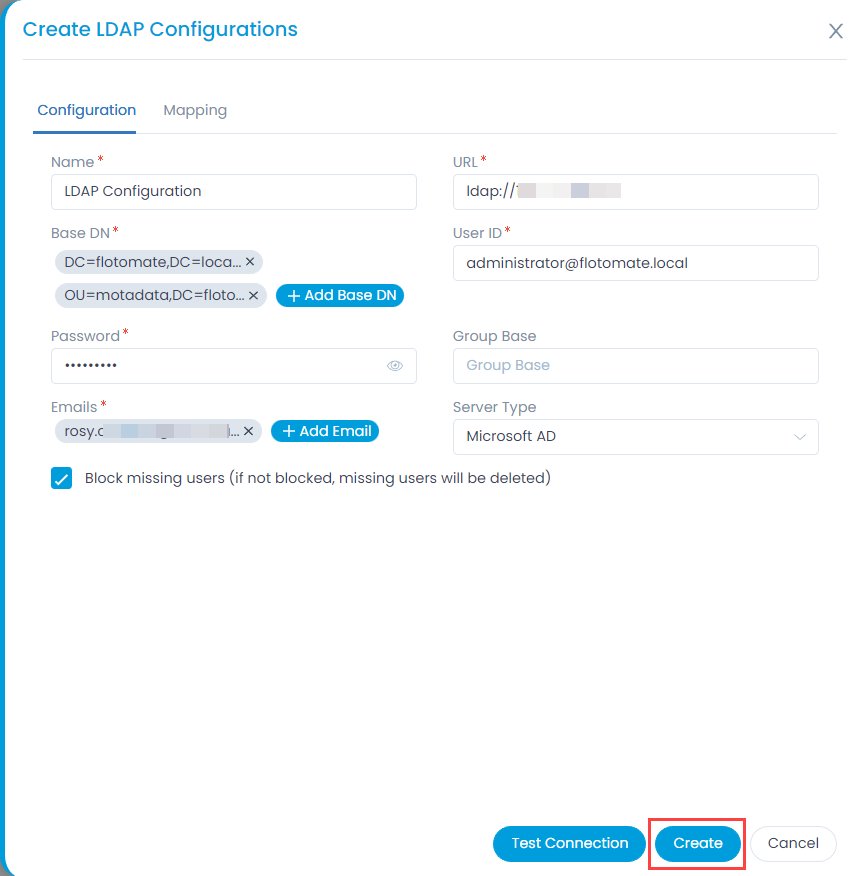
Motadata allows you to upload a list of Requesters through an LDAP request. LDAP is a protocol that the enterprises use to access a distributed directory of their employees. The email clients and other contact search programs mostly use this LDAP.

Motadata establishes a connection with the distributed directory information system using the provided information, and it makes queries using the LDAP protocol. It fetches the employee details from the server into the Motadata ServiceOps.

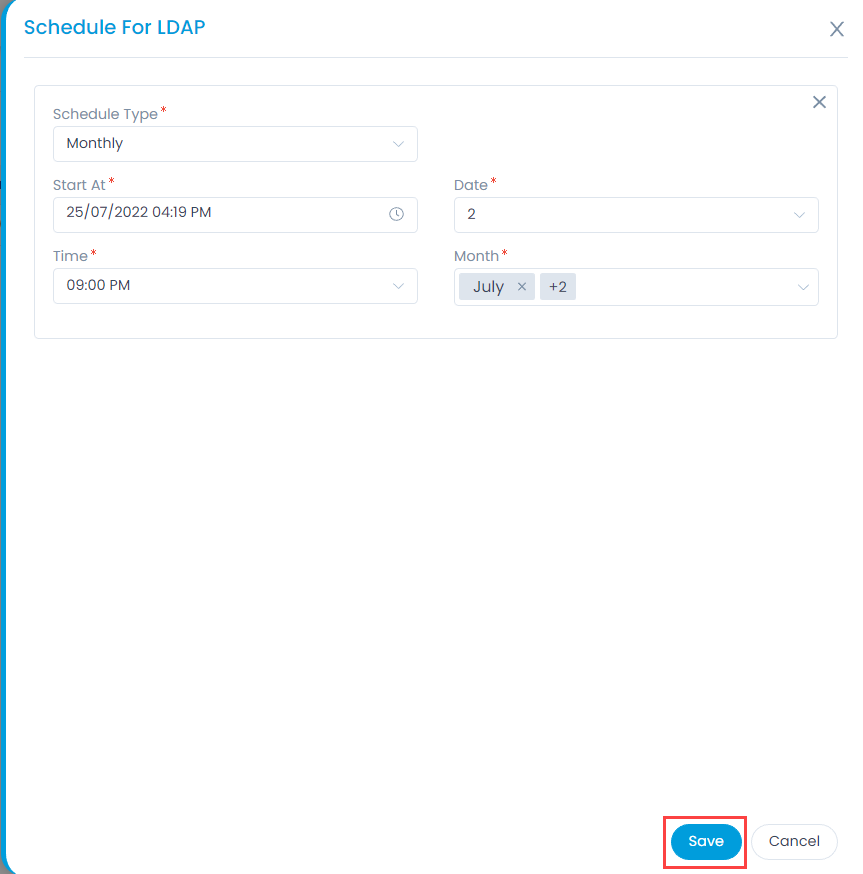
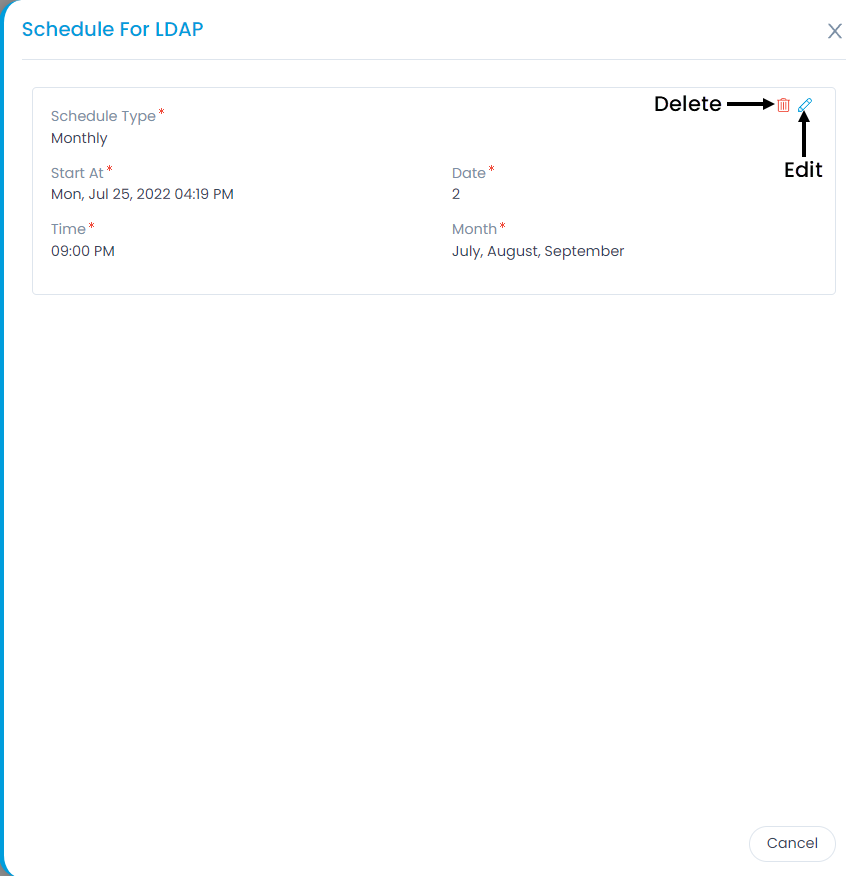
To view the LDAP Configurations page, navigate to the Admin > Users > LDAP Configurations and the page appears.

LDAP Configurations Page

The page provides the following features:

  1. Self Service Settings: You can configure the self service settings.
  2. Create LDAP Configurations: You can create the LDAP configuration.
  3. Grid: Displays the details of the LDAP configurations.
  4. Schedule Enabled: You can enable or disable the schedule.
  5. Show History: You can view the LDAP history.
  6. Import Users: You can import the LDAP users into ServiceOps.
  7. Create Schedule: You can create a schedule based on which the LDAP users will get synchronized.
  8. Edit: You can edit the configurations.
  9. Delete: You can delete the configuration if required.

Create LDAP Configurations

To configure LDAP,

  1. Click the Create LDAP Configurations button and the popup appears.
Create LDAP Configurations
  1. In the Configuration tab, enter the following details:
    Parameter Description
    Name Enter the name of the LDAP configuration.
    URL Enter the URL of the LDAP server which begins with “ldap://” followed by the IP Address and Port Number. For Example: ldap://111.111.0.11:920
    Base DN A DN is a sequence of relative Distinguished Names connected by commas. It is the point from where a server will start looking for users in the Active Directory. You can add multiple Base DNs using +Add Base DN button. For Example: If the server has an origin as Motadata with the server Flotomate, mention the DN as shown in the above figure.
    User ID Enter the user ID of the LDAP user.
    Password Enter the password.
    Group Base Enter the group base using which you can import the users of a particular group.
    Emails Enter the email address of the users to whom you want to send the notifications about the LDAP process completion.
    Server Type Select the server type as Microsoft AD or Open LDAP.
    Block missing users Enable the flag if you want the missing users to be blocked. If disabled, the missing users will be deleted.
  1. In the Mapping tab, map the attributes with the server name. You can map the following details:
    • First Name
    • Last Name
    • Email
    • Contact Number
    • Location
    • Department
    • Logon Name
    • Manager
    Note: All mapping fields should be same as the server, or the connection will not be established.
  2. Once all the details are filled, click Test Connection to verify the connectivity between the LDAP Server and ServiceOps.
  3. Click Create to save the LDAP server. The credentials required for the LDAP configuration are of the LDAP Admin. In case, the credentials are not available then a new user can be created in their Active Directory.

Show History

Click the Show History icon in the Actions column to view the LDAP history and a popup appears. It displays the details like created date, total fetched users, total created users, total failed users, total deleted users, and total updated users. You can also click on the  Total Failed Users link to view the reason of failure for the LDAP users not imported as shown below.

LDAP History
LDAP History
LDAP Failed Users
LDAP Failed Users

Import Users

Click the Import Users icon in the Actions column to import the users from the LDAP server to ServiceOps. Once clicked, the imported users get added as requesters in the ServiceOps as shown below.

User Imported from LDAP Server

Create Schedule

Scheduling allows you to periodically import employee details from the server. This feature helps you to keep the Requesters list up to date.

To create a schedule,

  1. From the list page, click the Create Schedule icon in the Actions column.
  2. In the Schedule for LDAP popup, click Create Schedule.
  3. Select the Schedule Type. The options are:
    • Once: If selected the schedule will run only once as per the start date selected in the Start At field.
    • Daily: If selected the schedule will run daily as per the Start At and Time selected. The Start At field depicts the date and time when the schedule should start.
    • Weekly: If selected the schedule will run weekly as per the Start At, Day, and Time selected. The Start At field depicts the date when the schedule should start. Day depicts the day on which the schedule should run.
    • Monthly: If selected the schedule will run once in a month as per the Start At, Date, Time, and Month(s) selected. The Start At field depicts the date when the schedule should start. Date is the date of the month on which the schedule should run.
  4. Once done, click Save to save the schedule.
Create Schedule
Create Schedule

Once the schedule is created, you can also edit or delete it if required as shown below.

Edit or Delete Schedule