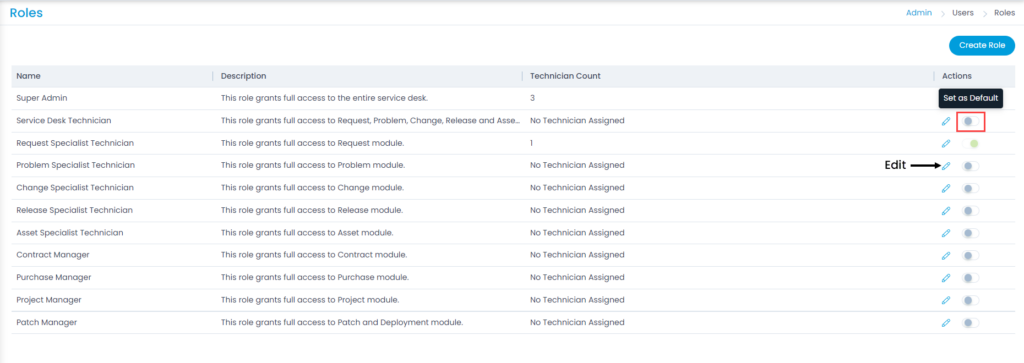
Motadata Docs

Roles

Roles are a set of permissions that help specifying what a technician or requester can view or do within the Support Portal. Based on these roles the user can access or perform the required tasks. You can assign roles based on the certain factors like module, department, user type, etc. A super admin can create multiple roles and assign them to technicians or requests based on the requirement.

This page enables you to view and centrally manage the permissions of all the users without the need of assigning them individually.

To view the Roles page, navigate to Admin > Users > Roles and the page appears.

Roles Page
Roles Page

Here, you can view a list of default and custom roles. Also, you can create custom roles, edit them, and set a particular role as default.

To set a role as default, click the toggle button next to the desired role in the Actions column . Its color will turn green. Now, once the default role is set, whenever a requester is converted to technician, this role will be assigned, else Request Specialist Technician role is assigned.

For example: If the Service Desk Technician role is set as default, when a requester is converted to technician, this role will get assigned automatically. Else, the Request Specialist Technician role will get assigned.

Default Roles

The default roles are:

  • Super Admin
  • Service Desk Technician
  • Request Specialist Technician
  • Problem Specialist Technician
  • Change Specialist Technician
  • Release Specialist Technician
  • Asset Specialist Technician
  • Contract Manager
  • Purchase Manager
  • Project Manager
  • Patch Manager

Create Roles

To create a custom role,

  1. Click the Create Role button and the page appears.
  2. Enter the Name and Description of the role.
  3. In the Permissions tab, select the required permissions for the different modules that you want to assign to this role.
Create Page - Select Permissions
  1. In the Users tab, add the users to whom you want to assign the role.
    To add users, click the Add User link, and a popup appears.
Add User
Add User

Select the required users and click Add. The users get added to the list as shown below.

Users Added
Users Added
  1. Once done, click Create Role, and a confirmation message appears.

Edit Roles

To edit the role, click the Edit icon on the list page, and the below page appears.

Edit Role
Edit Role

Here, you can make the required changes, and click the Update Role button.  For default roles, you cannot edit the permissions, but you can add or remove the users.