Motadata Docs

Asset Actions

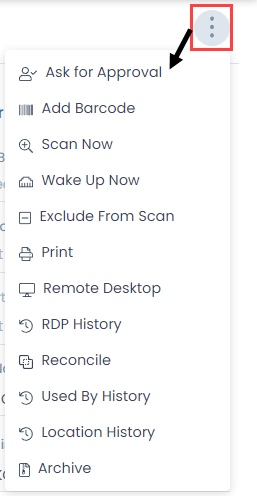
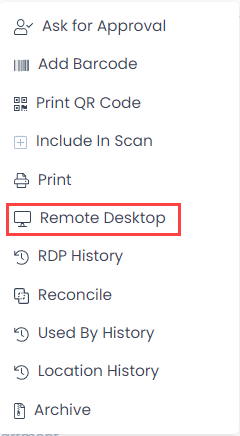
To view the asset actions, on the top-right corner of the page, click the vertical three dots, and a set of actions appear as shown below.

Action Options on Asset Details Page
  • Ask for Approval: This enables to ask for approval from the approvers.
  • Add Barcode: This enables to add a barcode to the asset. For more details, refer Barcodes.
  • Print QR Code: This enables to print the respective asset’s QR Code for scanning. For more details, refer to the QR Code page.
  • Scan Now: This enables to scan the asset by Agent Discovery. Once scanned, it gets logged in the Scan History.
  • Wake Up Now: This enables to manually wake up the remote computer which is in sleep mode. Once clicked, the status of the WOL event gets logged in the WOL History tab as shown below. The status changes from Requested to Initiated, and then to Failed or Success. For more details, refer to the Wake On LAN page.
WOL History
WOL History
  • Exclude from Scan/Include In Scan: This enables to exclude or include the asset in scan. If excluded, a tag Exclude from Scan is added next to the Add Tag. Also, this asset will not be scanned in Agent Discovery.
  • Print: This enables to print the entire details page in the form of a pdf file.
  • Remote Desktop: This enables the technician to remotely connect the computers within or outside the organization LAN.
  • RDP History: This enables to view the RDP history.
  • Reconcile: This enables to merge the duplicate entries of the asset with different names.
  • Used By History: This enables to view the history of users who have used this asset.
  • Location History: This enables to view the location history.
  • Archive: This enables to move assets as storage and use in future. Once the asset is archived, it can be restored or deleted from the list page.

Ask for Approval

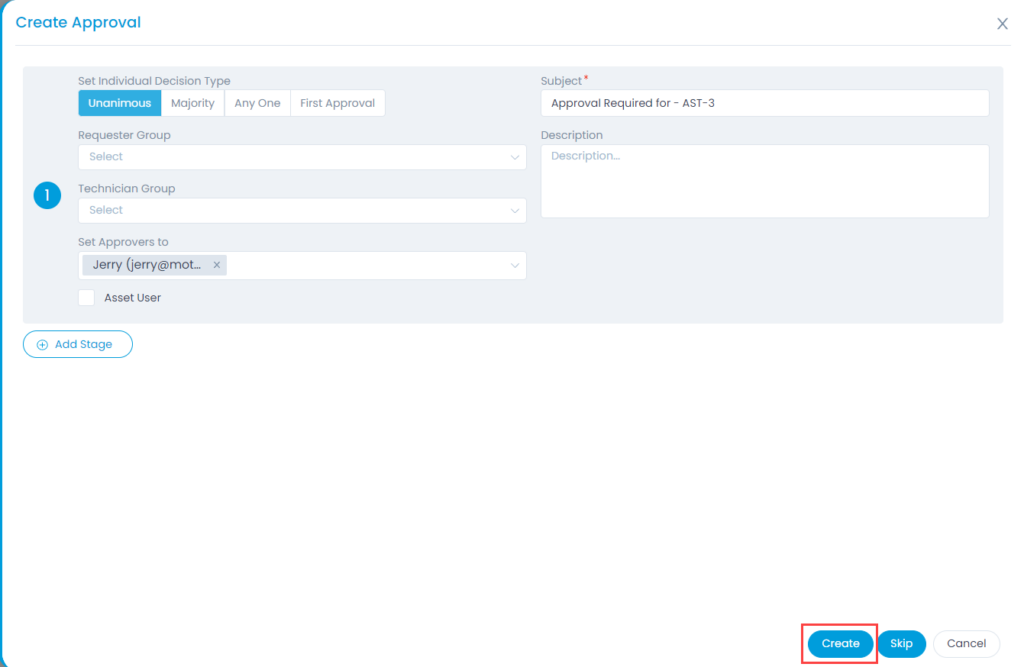
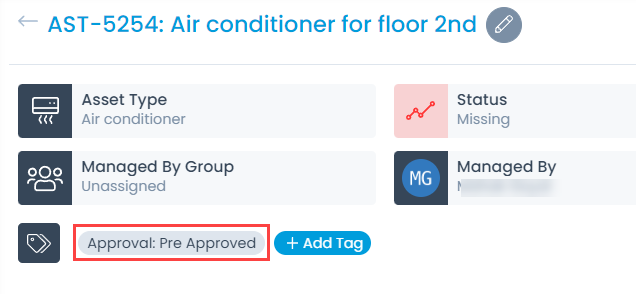
To initiate an approval from the Asset Details page,

  1. Click on the vertical three dots on the top-right corner of the page and select Ask for Approval option. A popup appears as shown below.
Create Approval Form
  1. Provide the following details:
    • Set Individual Decision Type: Select the type of decision.
      • Unanimous: Everybody selected as approver has to approve the request.
      • Majority: Majority of approvers should approve the request.
      • Anyone: Any one approver can approve the request.
      • First Approval: If selected, the first approval received (Approved or Reject) will be considered and the rest will be ignored. For example, If 3 approvers are set and if the first approval received is Approved, then this is considered. The approvals from the rest of the approvers will be Ignored, though rejection is received later from other approvers.
    • Subject: Default subject is ‘Approval Required for – Asset ID’. You can replace it with your own subject.
    • Requester Group: Select the requester group whose members can give the approval.
    • Technician Group: Select the technician group whose members can give the approval.
    • Set Approvers to: Select the approvers if you want specific people to approve.
    • Description: Type the description so approvers can gain sufficient information about the approval required.
    • Asset User: Enable if the approval of the asset user is required.
    • Add Stage: If the approval process is a multi-level process, click on Add Stage to add another approval form. For e.g. When someone needs a new laptop, first the manager should approve. Secondly, IT department should approve, and then the hardware shop should approve as the 3rd level approver.
  2. Once all the details are provided, click Create. The created approval appears in the Approvals tab. If Skip is clicked, the change gets pre-approved and the status is displayed next to the Add Tag option as shown below. The pre-approved changes are not displayed in the Approvals tab.

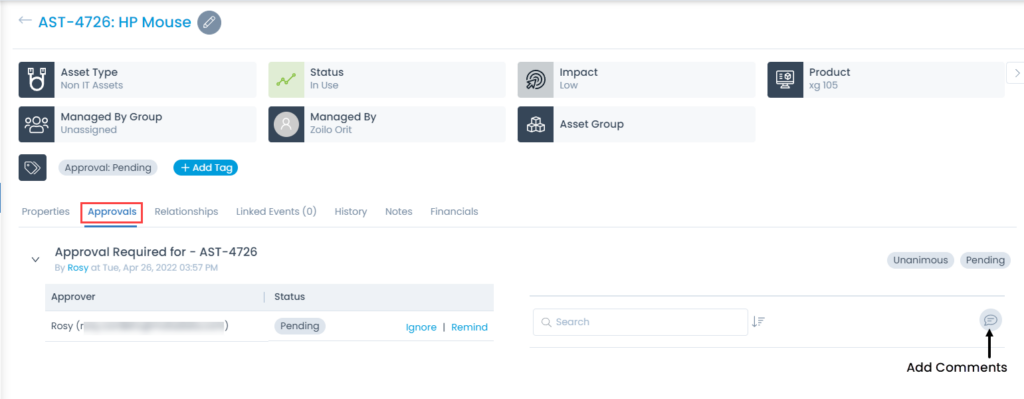
The Approvals tab displays all the approvals done or pending for the asset. From this tab, you can also ignore and remind the approvers for the approvals. As an approver, you can view, approve, and reject the approvals from My Approvals menu.

Pending Approvals

The list of pending approvals for an asset is visible in the Approvals tab. You can ignore the approval if no longer needed, or can remind the approver to take an action on it. Also, you can add comments in this section.

Note: The Approvals tab is visible only when there is a pending approval for the asset.
Pending Approvals
Pending Approvals
Pre-Approved Asset
Pre-Approved Asset

Remote Desktop

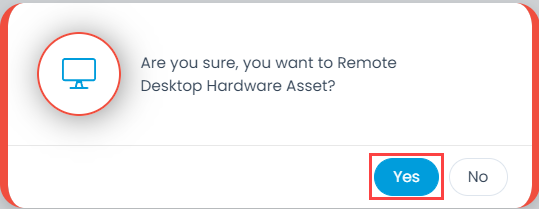
Using the Remote Desktop functionality, a technician can remotely connect the computers within or outside organization LAN.

This functionality can be used to remotely connect Windows and Linux machines after installation of Motadata Remote Desktop Agent application on client computers.

To configure Remote Desktop functionality, refer RDP-Configurations page.

Technician can initiate the remote desktop session on a particular computer from Hardware Asset details page.

To do so,

  1. Click on the Options icon (vertical three dots) and select the Remote Desktop option.
  2. Confirm the Remote Connection initiation.
Remote Desktop option
Confirmation Message
  1. A new tab opens in your browser where the connection is established.
Connection Establishment

Remote Desktop Recordings

This tab enables to view the video recording of the remote desktop session for a particular computer asset.

Note: The Video Recording parameter should be enabled from the Admin > Asset Management > RDP Configurations > RDP Configuration tab.
Remote Desktop Recordings

Download Video Recording File

You can download the particular session Video Recording file from the GUI.

Before downloading, the recording needs to be converted to the downloaded format by clicking on the Covert to M4V button. Once the file is converted, it can be downloaded by clicking on the Download button.

RDP History

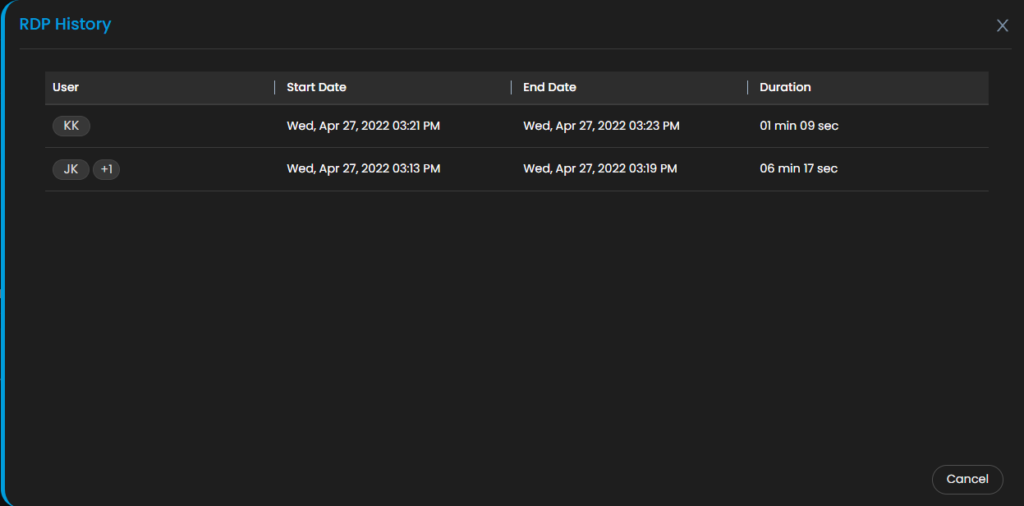
This displays the RDP history of the asset. It displays the details like, user, start date, end date, and duration.

RDP History
RDP History

Reconcile

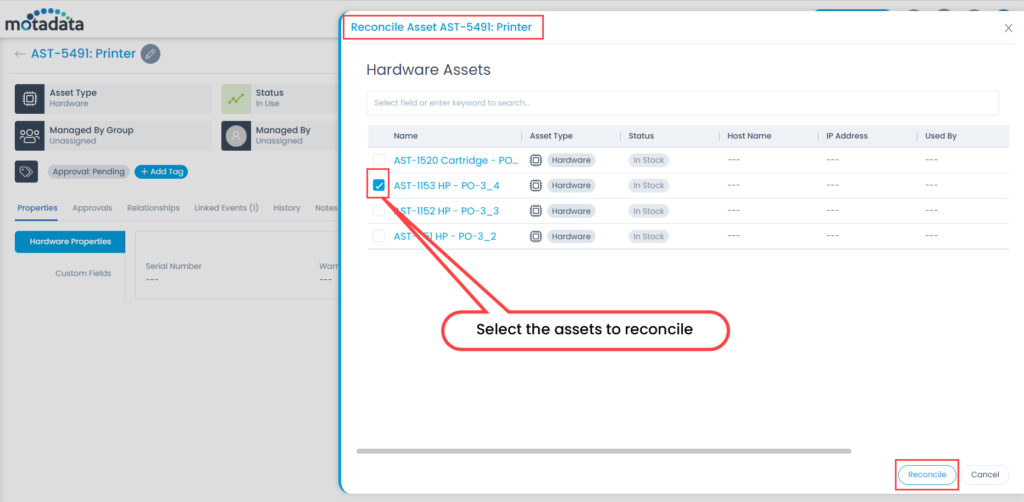
This enables to merge the duplicate entries of the asset. This is required when the assets received through Purchase Order are associated to some groups, and on executing a network scan, these assets get duplicated. Example: HP – PO-3_2 is the asset purchased and is renamed to Printer. On performing asset discovery, both the names will appear. Hence, to avoid this duplication you can reconcile the asset, where HP – PO-3_2 is deleted and Printer is retained.

To reconcile the asset,

  1. In the Asset Details page, click the Options icon (vertical 3 dots), and select the Reconcile option. A popup appears.
  2. Select the assets to be reconciled.
  3. Click the Reconcile button as shown below.
  4. Once reconciled, the selected assets get deleted.
Reconciling the Asset

Used By History

This displays the history of the people who used the asset and for how much duration as shown below.

Used By History
Used By History

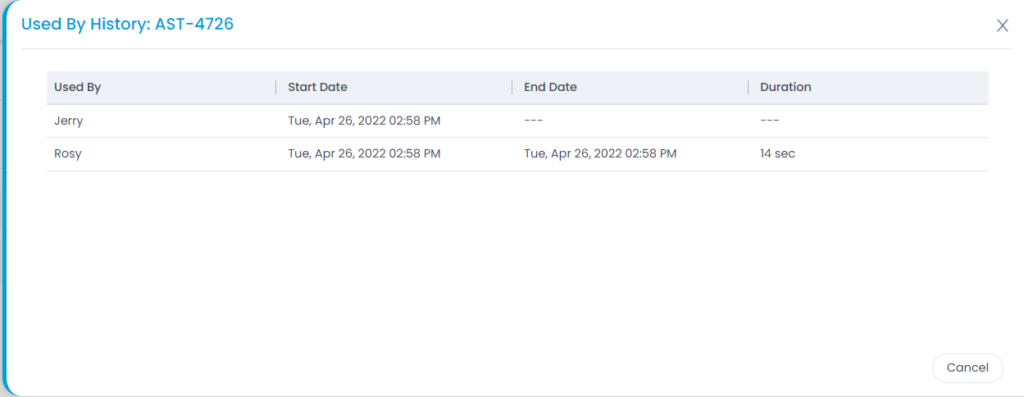
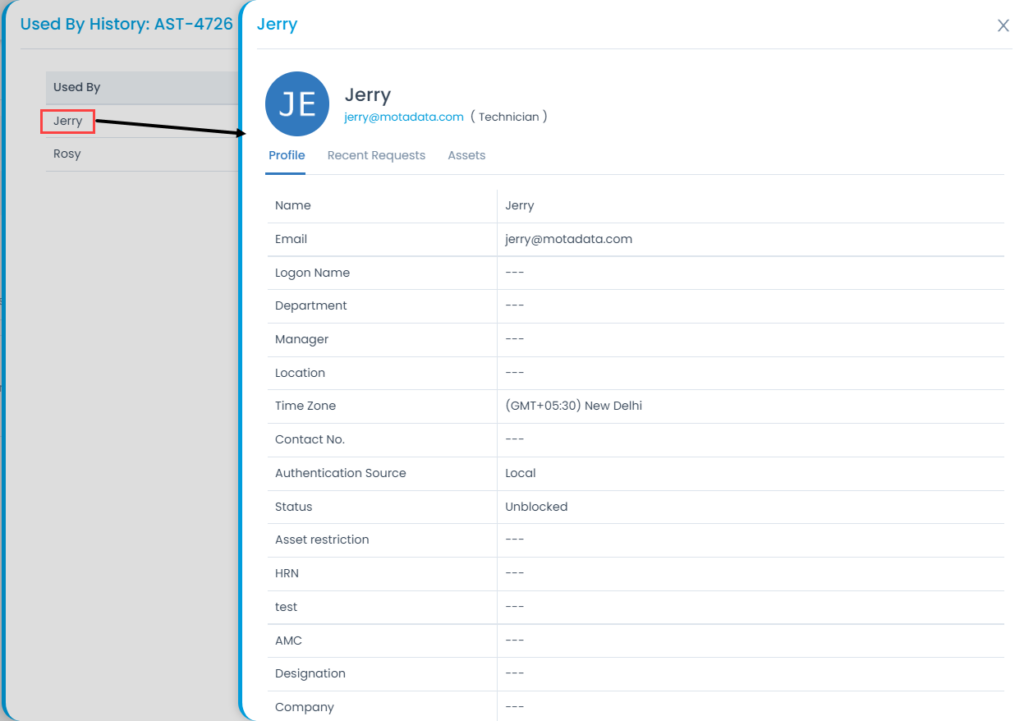
Here, you can also view the details of the user by clicking on the user’s name.

User Details
User Details

Location History

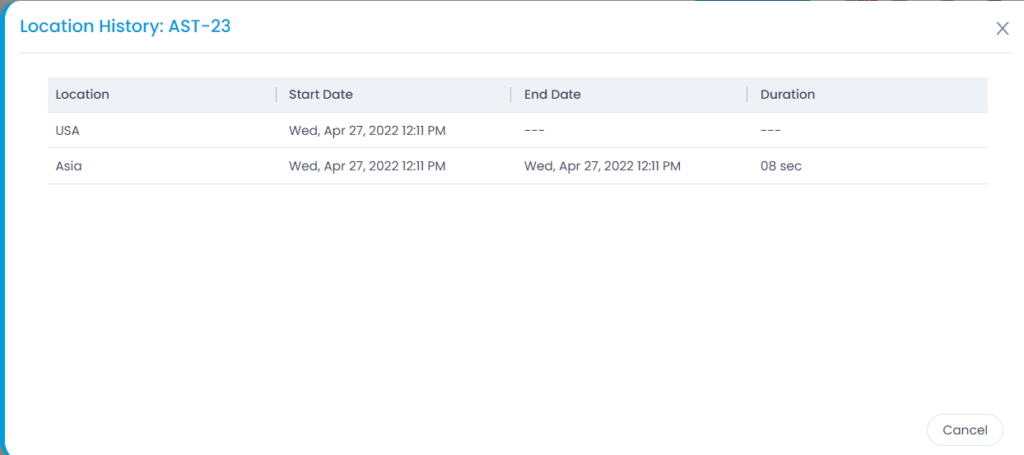
This displays the location history of the asset. It helps to keep a track of the asset location specially when it is sent for repair or for some other purpose.

Location History
Location History

Installation Notification

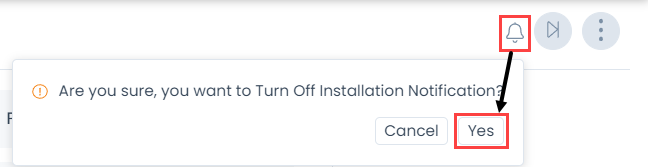
The Grey Bell icon on the Software Asset Details page, allows to enable the notification for the same software installation in any other asset. Admin would receive a notification if any other user is using the same software in his/her asset.
Once clicked, a confirmation message appears. Click Yes to continue or Cancel to discard the action. On clicking Yes, the color of the bell icon changes to Red.

Enabling the Installation Notification
Enabled Installation Notification