Motadata Docs

Create and Manage Incident Requests

From the Home page, you can report the incidents and create requests.

Create New Incident Request

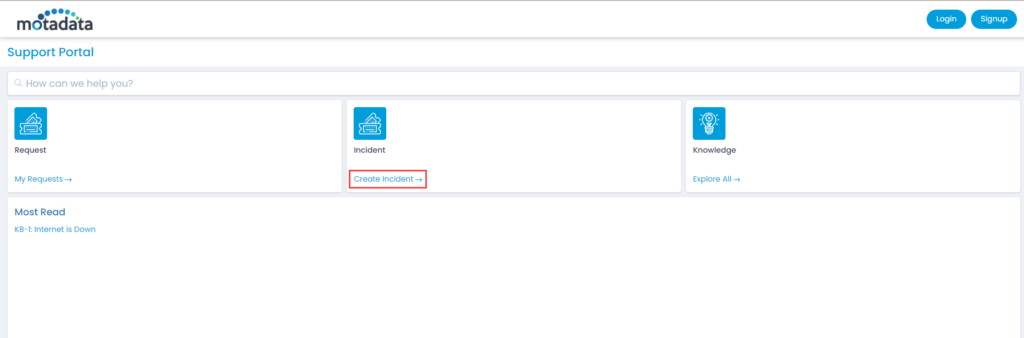
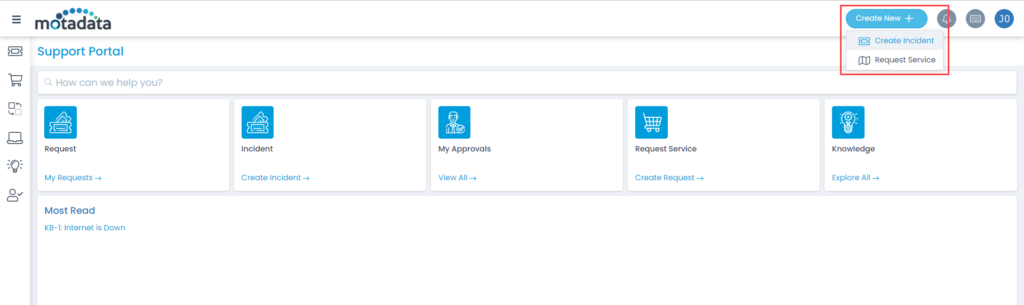
There are two ways to create an Incident Request.

  1. Without Login: Click on the Create Incident link below the Incident tile as shown below.
Create Incident Without Login
  1. After Login: Click on the Create New + button on the top-right side of the header bar and select Create Incident.
Create Incident After Login

The below page appears. Enter the required details:

Create Incident Form
  • Fill From Template: You can find the templates for common requests. Select a template and it will automatically fill the whole request form. You can change them to match your needs. Else, you can choose to create the request manually. Once selected, you can also reset it to default using the Reset to Default link.
  • Requester: Type your email address. You will get notifications about all the events or status updates and notifications on this email. You can also create a request on behalf of another requester.
    Note: If Managed Services Provider feature is enabled, the list will display requesters specific to the company. You will not be allowed to create requests for requesters from a different company.
  • Subject: Type the subject of the request. A subject should be short self-descriptive text to understand the request. Once the subject is entered, based on the keywords and company a list of Suggested Knowledge appears on the right-hand side. This displays a list of articles that may help you in resolving your request before creating.
    Note: If Managed Services Provider feature is enabled, the Suggested Knowledge will appear specific to the company.
  • Description: Type the detailed description about the request. The description should contains sufficient details about the nature of the request and what do you expect from a technician.
  • Attachment: You can attach files as well as link assets.
    • Attach Files: Attach the relevant files that will help technician in resolving the ticket.
    • Link Assets: Link the associated asset if any with the newly created request. When you click the Link Assets button, the list page of assets opens up for the selection of the asset.

Once all the details are filled, click Create to save the request.

Create Service Request

To create a Service Request,

  1. Click the Create New + button, and select the Request Service option.
  2. Select the desired Service Category and the related Service.
Note: Only the logged-in users can create a service request.
Select Category and Service

The below page appears.

Create Service Request
  1. Select the requester.
    Note: If Managed Services Provider feature is enabled, the list will display requesters specific to the company. You cannot create Service Requests for requesters from a different company.
  2. Provide the required details in the Additional Information section. The details will differ from service to service.
  3. Click Submit Request.
Note: The requester can create a service request on behalf of another requester also.

Manage Requests

The Request List page displays all the requests that you created. It includes Incident and Service Requests respectively.

Request List page
Request List page

Here, you have the below options:

  1. Filter: You can filter the requests by clicking the desired option. E.g.: If All Requests is selected, the grid displays all the requests.
  2. Search: You can look for specific requests by searching them using custom criteria as well as form field in the search bar.
  3. Refresh: You can refresh the page to view the latest requests assigned.
  4. Column Selection: You can select and re-order the columns to appear on the list page.
  5. View Details Page: You can click the Subject to view the Request Details page.
  6. View Details Page in a new tab: You can click the arrow icon next to the Subject to view the details page in a new tab.
Request Details Page

You can do the following things:

  • Comment on the requests.
  • Preview the list of Linked Assets.
  • View the Request Information of Service Requests.
  • Close requests.
  • Re-Open requests.
  • Provide a feedback.
  • View the approval status.
Approval Status
Approval Status