Mark Requests as Spam

This option enables you to mark the irrelevant requests as spam requests. Once you mark the request as spam, the system adds a ‘Spam’ tag to the request, and it disappears from the request list.

Irrelevant and unsolicited messages sent are Spam; here the messages are in the form of tickets (Requests). It may happen that some Requests you receive are irrelevant, and you want them to disappear. You can discard a Request as a Spam, and it disappears from the main server.

Mark Spam from List Page

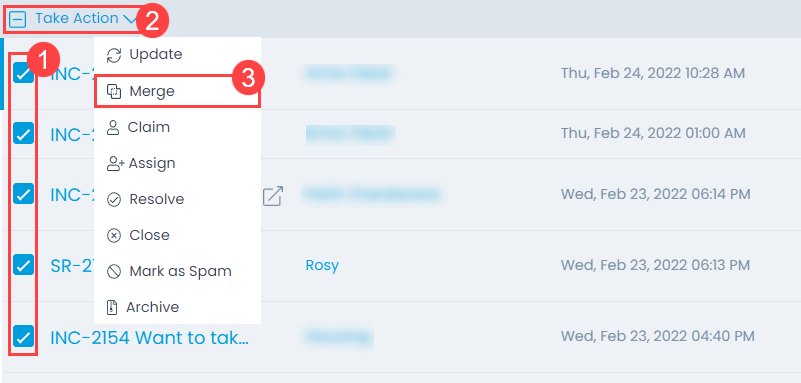
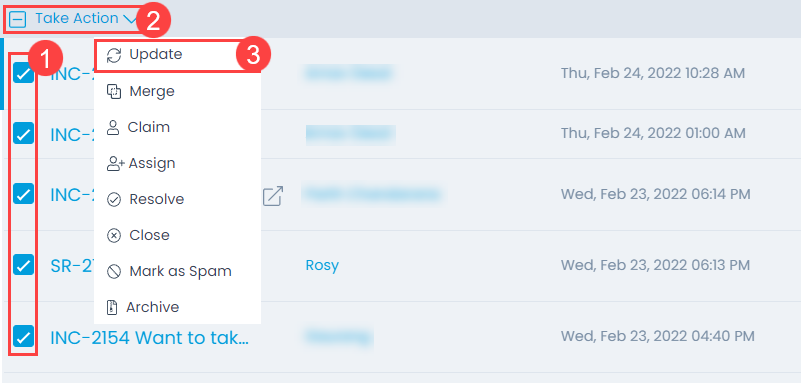
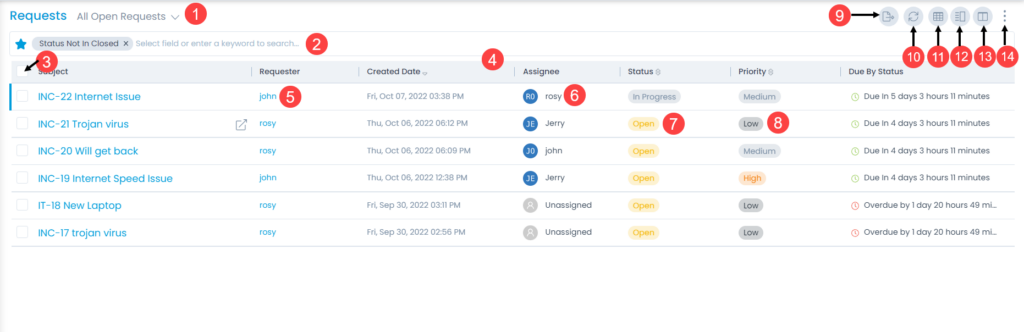
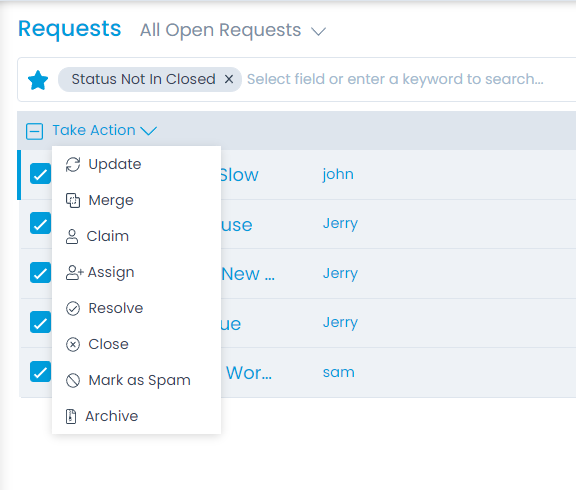
To mark the request as Spam, select the desired tickets, click the Take Action dropdown, and select Mark as Spam option as shown below.

Selecting Requests and Marking as Spam

Once the option is clicked, a confirmation message will appear. Click Yes to confirm the action.

Mark Spam from Details Page

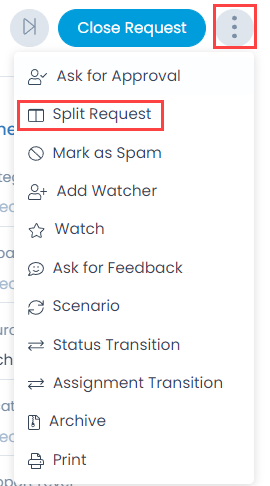
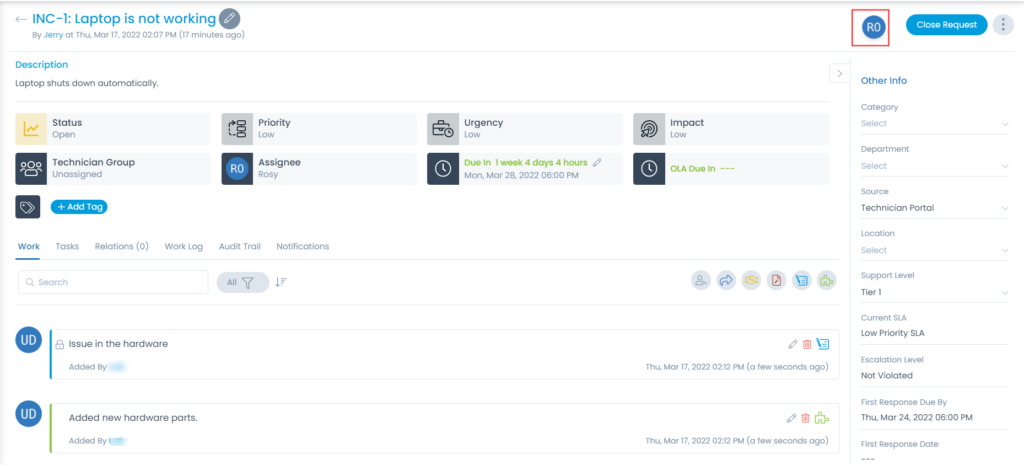
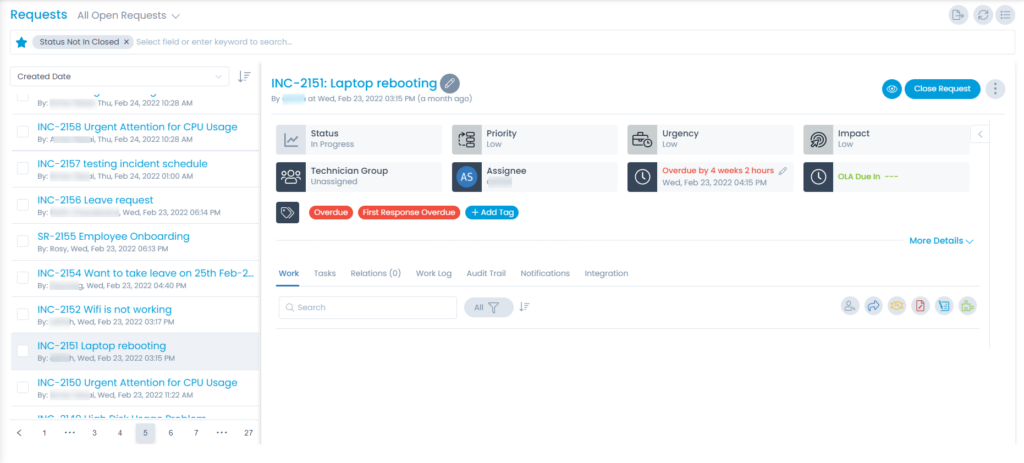
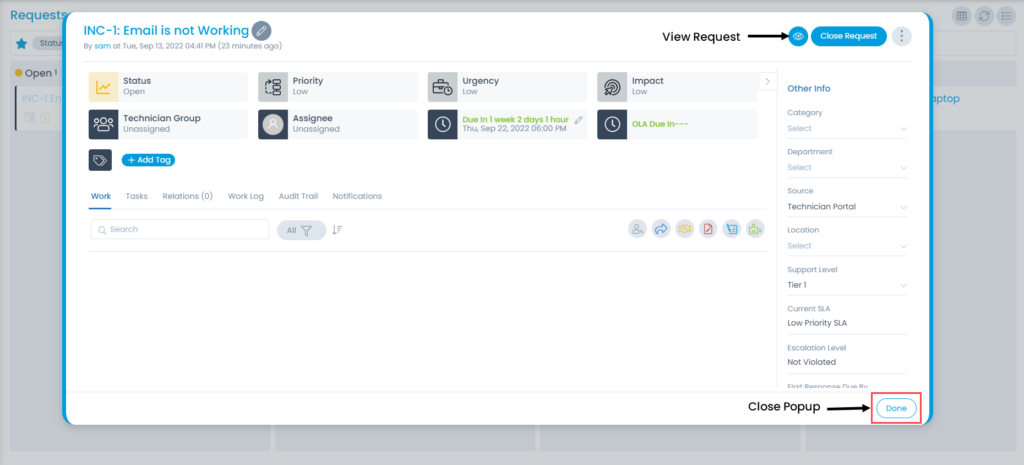
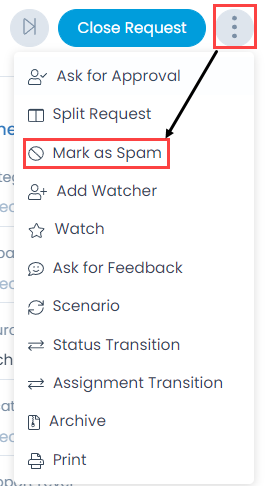
On Request Details page, click on the 3 vertical dots at the top-right corner of the screen, and select Mark as Spam from the dropdown.

Mark request page as spam from details page

Once the option is clicked, a confirmation message will appear. Click Yes to confirm the action.

View Spam Requests

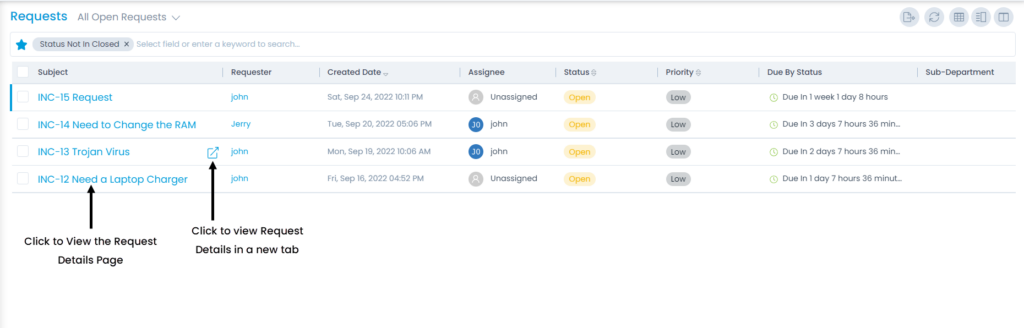
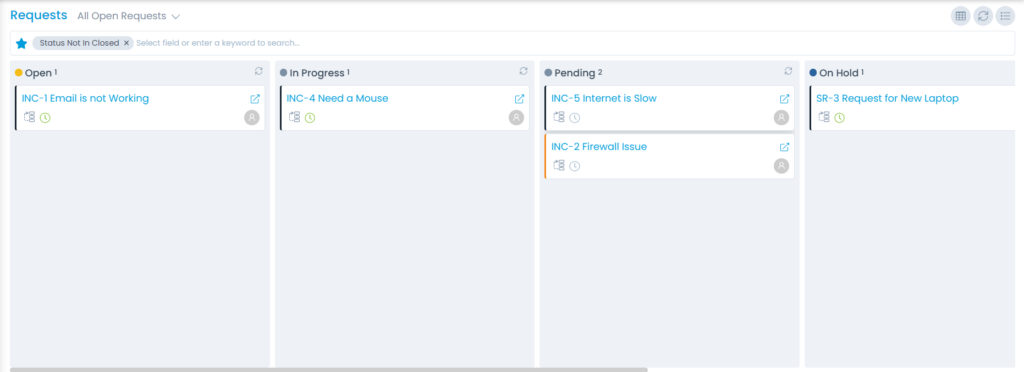
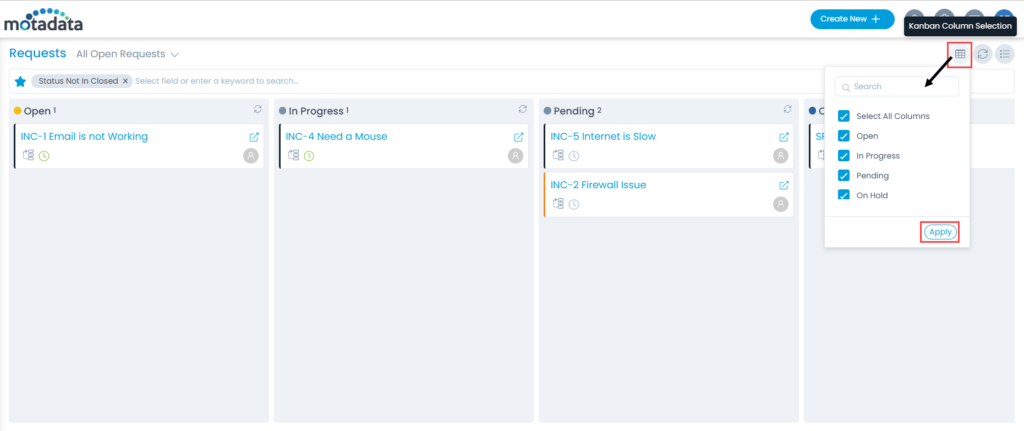
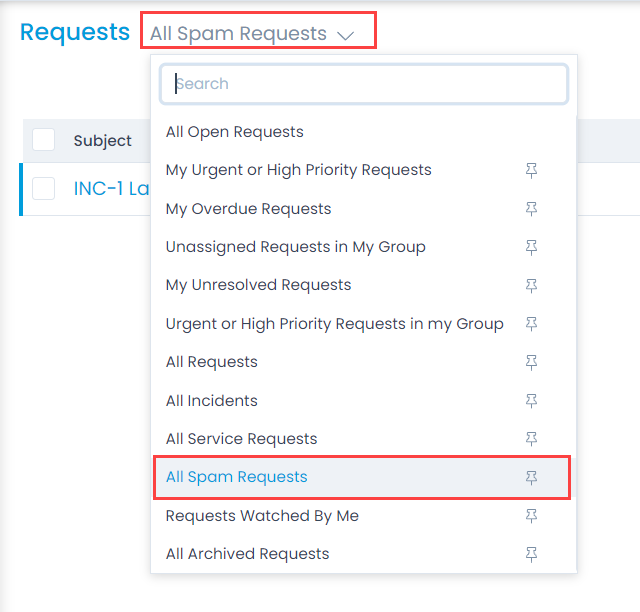
You can view the requests that are marked as spam from pre-defined search criteria. At the top of the list page, select the criteria: All Spam Requests as shown below.

Viewing Spam Requests

Unmark As Spam

This option enabled you to move the requests from Spam to the normal request list. There are two methods to do this:

Option 1: Unmark from List Page:

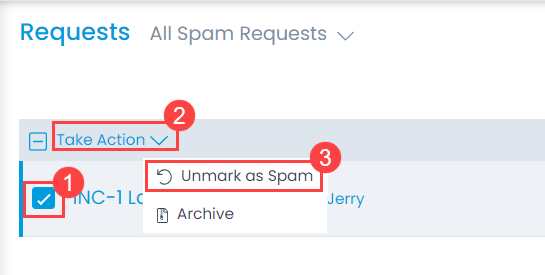
To unmark the request from the spam list, select the records, click the Take Action dropdown, and select the Unmark as Spam option as shown below.

Selecting Requests to unmark as Spam

Once the option is clicked, a confirmation message will appear. Click Yes to confirm the action or No to discard the changes.

Option 2: Unmark from Details Page:

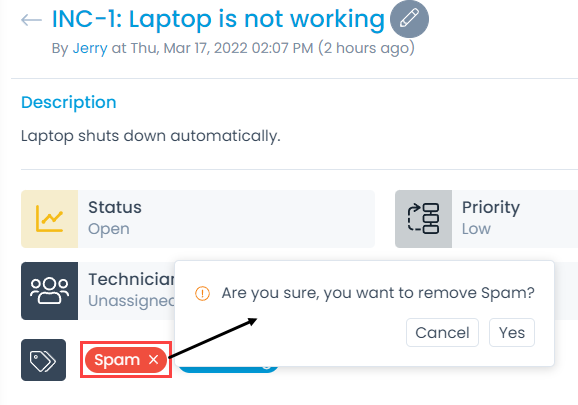
On the Request Details page, you can unmark the spam by deleting the spam tag. System will ask you to confirm deleting the spam tag as shown below.

Delete spam tag to unmark the spam

Archive Spam Request

Archiving the spam request moves the request from spam list to the archive list. To archive the request, refer to the Archive Requests page.

Overview

Poller Service is a piece of software that discovers the assets in the LAN behind the firewall. It is mainly used to discover the assets in On-Premises having multiple sites and SaaS-based platforms.

The poller service is installed in the same subnet as all other assets so it can easily discover the agentless assets. It can discover different types of devices like Windows, Linux, SNMP, and VMware.

Note: Currently the Poller service is supported for Windows machine only.

Architecture:

Poller Service for Cloud Deployment

Poller Service for Cloud Deployment

In the Cloud architecture, the Poller service is installed in the same subnet as all other assets. This enables it to discover the assets easily and send them to the ServiceOps application in the Cloud.

Poller Service for On-Premises Deployment

Poller Service for On-Premises Deployment

The On-Premises architecture is suitable for scenarios where multiple sites are involved. For example: Main Site and Branch Site as shown above. In this, the Poller service is installed in the branch site where it discovers the assets in the local network, and then sends them to the ServiceOps application in the Main site, via Internet.

To install the poller service, follow the steps mentioned on the Installation page.

Merging and Splitting Requests

Merge Requests

This option helps to merge the duplicate and similar requests.

In the Merge process, one request is considered as the Primary Request, and all others as Secondary. As a result, the secondary requests link to the primary request. System decides the ticket actions by evaluating who created the ticket. For example:

  • When the requests are created by the same requestor, then all the secondary requests are closed.
  • When requests are generated from different requestors, then the secondary requests are not closed.

Merge Request Option

To merge requests, select the desired tickets, click the Take Action dropdown, and select the Merge option as shown below.

Selecting and Merging Requests

Merge Action Popup

A popup will open to show the primary and secondary requests. Also, it will show the other requests list. You may add more requests in the merge.

Merge Tickets Popup
Merge Tickets Popup

In the popup, there will always be 1 primary ticket and many secondary tickets.

Primary and Secondary Requests

Make Secondary Request as a Primary Request

You can convert a secondary request to primary request. When you place the cursor on the secondary request, an option appears to make it as the primary request.

Make Secondary Request as the Primary Request

When you convert a secondary request to primary, it will come at the top.

Add More Requests to Merge

On the right side of the page, you can select the requests either to merge or add to the secondary request list.

Add Requests to Merge or Add to Secondary Requests

Here, you have 2 options:

  • Add to Secondary: When you add the requests as the secondary request, they appear on the left hand side.
  • Merge (and close popup): When you click on ‘Merge’, the requests are added as the secondary request and the popup disappears (merge action is complete).

Split Requests

You can create a new request from an existing one using the split feature. The split option copies all the basic details of the request and pre-fills it while creating a new request. Click on the three vertical dots at the top-right corner and click on the ‘Split Request’ option.

Split Request Option

A popup will open up. The popup has all the basic details pre-filled from the existing request.

Split Request
Split Request

Since you are basically creating a request, the fields are all same. Check all the fields and click create. System generates a new request and takes you to the newly created request page.

  • The default subject of request has ‘Split’ word and reference to the old request.
  • The description, labels, work, and audit logs are added to the new request from the existing one.
  • The ‘Audit Trail’ section shows who created the new request and other related details.

Updating a Request

When you are working on a ticket, you can update its basic details, parameters, other info, and various activities/actions associated with it. There are many approaches to update the requests:

  • Inline update from list page
  • Update multiple tickets from list page
  • Update from details page

Inline update from list page

You can update the request from the list page. From here, you can update their: assigned to, status, and priority. Clicking on the field opens a dropdown menu from which you can select a new value.

Inline update requests

Update Multiple Tickets

Bulk update option is useful to add or change something in multiple requests. Instead of editing each request individually, you can select many requests, and update them at the same time.

To do so, select the desired records, click the Take Action dropdown, and select the Update option as shown below.

Bulk Update
Bulk Update

A popup will display where you can update the details.

Select Fields to Update

Bulk update option allows you to edit only those fields that are in common to multiple requests. Above figure shows, you can manage the fields that appear in the dropdown lists. You can add new attachments, and tags with the existing tags (check ‘Append Tags to Existing Tags), or replace manual tags (un-check the option). Replacing manual tags does not replace the system generated tags.

Update a Request from Details Page

You can update the request from the details page. Refer to the Request Details page about what you can do with a request. On this page, updating a request means editing the fields with new values. While working on it means performing actions like replying/forwarding the request, collaborating, adding notes, etc.

Request Details Page

On request details page, you can see the complete details of the request and do the desired activity. This page is accessible from request list page (by clicking on the request subject).

Options to open request details page

A request details page looks like this:

Request Details Page

Subject and Description

You can see the complete subject and the description on the top of the details page. Also, the highlighted box shows the technician name who is also viewing the request simultaneously.

Classifiers of Request

These properties tell you the current statistics of the request and help you classify them under different labels. When someone works on a request, they update the labels accordingly. For e.g. if the ‘status’ is closed, it means you don’t need to do anything on the request.

Properties showing Request Classifiers
Properties Description
Status This label classifies the request based on the status. The value in this label shows the current status of the request. The default options are: Open, In Progress, Pending, Resolved, and Closed.
Priority The label classifies the request based on the priority. The value in this label shows the current priority of the request. The default values are: Low, Medium, High and Urgent.
Urgency The label classifies the request based on the urgency. The value in this label shows the current urgency of the request. The default values are: Low, Medium, High and Urgent.
Impact The label classifies the request based on the impact factor. The value in this label shows the current impact of the request. The default values are: Low, On Users, On Department and On Business.
Technician Group The label helps you sorting the technician when there is a long list. Based on the value selected here, the values of ‘Assignee’ dropdown changes.
Assignee The label classifies the request based on the person to whom this request is assigned. When the value is ‘unassigned’, it means that request is not assigned to anyone. The values of assignee depends on the ‘Technician Group’ value.
Due by Status Shows the time frame by which you should do all the work related to the request.
OLA Due In Shows the time frame by which you should do all the operations related to the request.
Add Tags You can add the custom tags to quickly find the requests based on it. Also, system adds some default tags when based on certain labels and actions.

Associated Actions for Request

You can create or update different actions and activities as a part of communication, collaboration, and resolution in the request.

Additional actions for request

The available types of actions are:

Action Types Description
Work You can gather information through collaboration and communication and use it to resolve a Request.
Tasks You can add and manage different tasks related to the request.
Approvals You can see the approvals given for the request and remind the concerned technician about it.
Relations You can relate the request with other requests, problem, change, knowledge or see the merged requests.
Work Log You can add and manage the work log about the time and actions spent on the request.
Audit Trail You can see the activity in the journal of all the actions related to the request.
Notifications You can send notifications related to the request.

Other Information

The other information shows additional details about the request. You can also change them if required.

Other Information
Other Information
  • Category: Shows the category of the request. Default values are: Software, Hardware, Network, HR or Other. If any sub-category is added in the default values, all the values would appear on selection.
  • Department: Name of the department to which the request belongs.
  • Company: Shows the company to which the request belongs. This field is available only if the Managed Services Provider feature is enabled.
  • Source: Shows the information from where the request originated. Default values are: Email, support portal, technician portal, phone, chat, external and others.
  • Location: Shows the location from where the request is generated.
  • Support Level: Shows the level of support currently assigned to the request. Default values are: Tier 1, Tier 2, Tier 3, and Tier 4.
  • Current SLA: Shows the assigned SLA.
  • Escalation Level: Shows the escalation level of the request.
  • First Response Due By: Shows the date and time till which the first response is due.
  • First Response Date: Shows the date of the first response for the ticket.
  • Cc Emails: Shows the emails of all people who would get notifications about the request.
  • Template: Shows the name of the template used to create the request.
  • Request Type: Shows the type of the request.
  • Last Update Date: Shows the date and timestamp of the last activity on the request.

Request Actions

At the top right corner of the page, you will see a set of actions.

Action options on request details page
  • Previous: Click to go to the previous request.
  • Next: Click to go to the next request.
  • Close: Click on the ‘Close’ button to close the request. Click here to see what happens when you close a request.
  • More Actions: Click on the vertical 3 dots to see other actions available for the request.

Creating a Service Request

A service request in our system is a quick low priority request that doesn’t need much explanation. It can be as simple as: ‘I need a new mouse’. To ease the convenience of the users, service requests are pre-defined. You can easily find a service request by choosing appropriate category.

In the system, both incident and service requests are treated exactly as same. The service request is used when you want to quickly request something without giving much details. Incident request on the other hand is more custom way where you can define your exact request. If a required service request is unavailable, you can always create an incident request for your needs.

Creating a Service Request from the Portal

You can create a new service request directly into the system when you are logged in. When you want to create a service request, system opens a page to select service. The page has many options that helps you in creating a request.

You can access the service request page by clicking the Create New + button and selecting the Request Service option. The Service Catalog page appears.

Create a Service Request option
Select Category and Service

The page displays a list of service categories along with the services.

Service Categories

A category is simply a high level classification of the request services. It helps you to quickly find the required service. The categories displayed here are only the default categories. Actual categories in your portal may vary.

Services

A service is again simply the 2nd level classification of the categories. For example: A Hardware category can have many services like: new laptop, new mouse, Internet not working etc. The list of services depends on the the category you will select. Again, based on the selection, the request will be assigned to the concerned technician.

  • Select the Service Category and then the desired Service. The following page appears.
Submit Service Request
  • In the Additional Information section, select the requester and enter the details. The fields vary based on the service selected.

Notes:

  • A requester can create a service request on behalf of the other requester also.
  • You should select the fields appropriately. If you select the wrong category or service, the assigned technician may not look at it and mark it as a SPAM.
  • Once the details are filled, click Submit Request to submit the request. The Service Request gets created and an email is sent to you acknowledging the Request. By default the Service Request is created with a prefix ‘SR’. For Example: SR-1

Creating a Request

To create a request,

  1. Click the Create New + button and select the Create Incident option. The following page appears.
Create Request option
Create Request Page
Create Request Page
  1. Enter the following details:
Parameter Description
Fill From Template You can find the templates for common requests. Select a template and it will automatically fill the whole request form. You can check if all details are good or you can change them to match your needs. Else, you can choose to create the request manually. Once selected, you can also reset it to default using the Reset to Default link. Also, a list of suggested knowledge appears on the right-hand side. This displays a list of articles that may help you in resolving your request before creating. The articles appear based on the keywords typed in the subject. For more details on template creation, refer to the link Request Templates.
Requester Type the name of the person who is creating the request. By default, system takes your name as the requester. You can also create a request on behalf of another requester. For example: If you are signed-in with name Jerry, you can create a request from another name i.e. Mary. Once a request is created, you can view its creator from the Audit Trail tab of the Request Details page.
Cc Emails Type the email address of other people who should get notifications about the request.
Subject Type the subject of the request. A subject should be short self-descriptive text to understand the request. Once the subject is entered, based on the keywords a list of Suggested Knowledge appears on the right-hand side. This displays a list of articles that may help you in resolving your request before creating.
Description Type the detailed description about the request. The description should contains sufficient details about the nature of the request and what do you expect from a technician.
Status If it is a new request, keep the status as ‘Open’. If the request is a back-date entry, you can choose other values.
Priority Select the priority of the request. You can leave it blank. System will assign the default value: ‘low’.

Note: While creating requests, this parameter is available only if the Priority Matrix is disabled. If enabled, this field will be unavailable, and the value will be set automatically based on the urgency and impact values.
Urgency Select the urgency of the request. You can leave it blank. System will assign the default value: ‘low’.
Impact Select what is the impact of the request. You can leave it blank. System will assign the default value: ‘low’.
Category Select the category of the request. It is optional.
Technician Group Select the technician group for the request.
Assignee Select the assignee if you want to assign the request to a specific person. It is optional.
Department Select the department if you want to assign the request to a specific department. It is optional.
Company Select the company to associate with the request. This field is available only if the Managed Services Provider feature is enabled.
Location Select the location if you can find the location from the dropdown menu. It is optional.
Tags You can add tags if you want. It will help you in identifying the similar requests. It is optional.
Attachment Attach the relevant files that will help technician in resolving the ticket.
Link Assets Link the associated asset if any with the newly created request. When you click the Link Assets button, the list page of assets opens up for the selection of the asset.
  1. Once done, click Create. The request gets created and appears on the Request list page. Also, an email is sent to you acknowledging the request. A request starts with a prefix ‘INC’. For example: INC – 1.

Create Request from Email

System gives the option to set up an email as the Helpdesk email address. Technicians can send an email to create a Request.

You can create a request without logging into the system. When a Technician creates a Request using an email, the email subject becomes the Request Subject, email body becomes the Request Description, and any attachments become the Request attachment.

Additional Reading:

Request List View

The Request List View page displays all the available Requests in the system. It is the central hub for a Technician, where you can find a Request and act upon it.

Request List Page
Request List Page

Here, you can do the following:

  1. Filter: You can filter the requests by clicking the desired option. For example: If All Open Requests is selected, the grid displays all the requests with open status.
  2. Search: You can look for specific requests by searching them. The search is a faceted search and allows you to search with specific criteria. The filter option uses a predefined criteria and segregates the list accordingly. You can find more details in the search section.
  3. Bulk Operations: You can select multiple requests and take the required action.
  4. Grid: Displays all the requests in the grid.
  5. View Requester Details: You can view the details of the requester like profile, recent requests, and assets.
Requester Details
Requester Details
  1. Change Assignee: You can change the assignee from the Assignee column by clicking on the assignee’s name and selecting the desired technician.
  2. Change Status: You can change the status of the request by clicking on it and selecting the required option. The options are: Open, In Progress, Pending, Resolved, and Closed. The default value is Open.
  3. Change Priority: You can change the priority of the request by clicking on it and selecting the required option. The options are: Low, Medium, High, and Urgent. The default value is Low.
  4. Export: You can export the requests list in CSV and Excel format.
  5. Refresh: You can refresh the request list. This is useful when multiple people are working on the request and contents are updated frequently.
  6. Column Selection: You can select the columns to be displayed in the grid table.
  7. Split View: You can see the requests in split format.
  8. Kanban View: You can view the request list in Kanban view.
  9. More Options: You can click and select the Import Request option to import a list of Requests in bulk.

Column Selection

The column selection icon allows you to personalize the columns of the list page. When you change the columns of the list page, the changes does not affect other people.

Column Selection
Column Selection

Bulk Operations

With bulk operations, you can manage multiple Requests together. The option is visible when you select a Request. An option ‘Take Action’ displays with a list of options supported for bulk operations.

Bulk operations in Request

Split/List View

Default view is the list view. You can also click on Split View/List View icon to change the view. The split view displays the list of requests on the left side and the details of the selected request on the right side. To know about the details page options, click here.

Split View of Requests

Kanban View

Default view is the list view. You can click on the Kanban View option to change the view. The Kanban view displays a list of requests based on their status as shown below.

Kanban View
Kanban View
  • You can also view the details of a particular request by clicking on it and a popup appears. Here, you can make the required changes. For more details, you can refer to the Request Details Page. To close the popup, click Done at the bottom-right corner.
Request Details Popup
  • In this view, you can select the statuses to be available on the screen using the Kanban Column Selection icon as shown below.
Kanban Column Selection

Import and Export Request

To import multiple requests in bulk, follow the below steps:

  1. Click the More Options icon (three dots) on the top-right corner of the page and select the Import Request option. The Request Batches page appears.
  2. Click the Import CSV Batch button.
  3. Select the .csv file if you already have it filled with the respective fields. If not, select the new .csv file using Click Here and fill the respective details. Once the file is uploaded, click Next.
Select .CSV File
Select .CSV File
  1. Map the fields as per the requirement. By default it is mapped, only in case of removal/change of some parameters mapping is necessary, and click Save Batch.
Map Fields
Map Fields
  1. The Request Batches page appears. It displays the status of the import along with the details like processing time, total records, success records, failed records, etc. as shown below. Once successful, the imported requests will appear in the request list page.
Import CSV Batches
Import CSV Batches

To export the request list locally in the form of CSV or Excel,

  1. Click on the Export icon and a popup appears.
  2. Select the Format as CSV or Excel.
  3. Select the desired fields to be exported.
  4. Click Export and an email is sent to the Administrator’s email address with the link to download the list in the selected format.

Request Management

Know how Request Management helps in tracking and managing the various requests.

What is Request Management?

Request Management is a module using which you can log, analyze, and resolve the requests. Its main aim is to fulfill the requests of the requesters in minimum time and maintain the quality.

What is a Request?

Request is a service requirement or an unexpected disturbance that the users raise. It initiates a service action that is agreed as a standard process of service delivery. There are two types of requests:

  • Incident Requests: These requests are raised when there is a failure or degradation of a service. For example: The Email Server is not Working.
  • Service Requests: These requests are raised for normal requirements like things and services. For example: Request to reset password or Request for a new Mouse.

Request Management in ServiceOps

Whenever a user creates a request in the Support Portal (requesters) or Technician Portal (Technicians) a ticket gets created. Request is also known as a Ticket. The request is a means by which you can communicate with the requesters.

The ServiceOps Request Management involves the following activities:

Request Management Lifecycle
  • Creating Requests in the Portal or by sending an email.
  • Classifying the requests based on impact and urgency to prioritize work.
  • Creating tasks and assigning requests to appropriate technicians or groups for speedy resolution.
  • Escalating if necessary for further investigation.
  • Resolving the request and notifying to the user who created it.
  • If required re-opening the request for further analysis.
  • Using reports to track and analyze the improvements.

In this section you can do the following:

  • Create New requests: You can create requests in the following ways:
  • View requests: View all the requests of your organization based on the assigned role and rights. For example: If you are an HR, you will see the requests created for HR department.
  • Update requests: Modify the basic details of the request.
  • Manage requests: Based on the role you can: Merge, mark as spam, claim requests, assign requests to others, archive requests, approve/reject requests, create and manage tasks, add relations, etc.
  • Control Settings as an Admin: You can control the behavior of how the requests are managed and who can do what.

Managing Widgets

A Dashboard is like an empty canvas, and widgets are data blocks showing specific data. Multiple widgets together give contextual meaning to a Dashboard. There are n number of permutations that can be achieved using different kinds of widgets all showing different data.

We currently have three kinds of widgets:

  • KPI: The abbreviation stands for Key Performance Indicator which is a counter of occurrences satisfying a preset condition. For example, there could be a KPI that shows the number of Request tickets having reopen count greater than 0.
KPI
KPI
  • Widget: A widget shows data points graphically across X and Y coordinates or as proportions. For example, count of Problem tickets can be shown across priorities using a Bar Chart.
Widget
Widget
  • Shortcut: It is a predefined box that shows specific system data. For example, there is a Shortcut box called My Open Request that shows recent open Requests assigned to you.
Shortcuts
Shortcuts

A user can perform the following operations with widgets:

  • View widgets, along with their parameters.
  • Create custom widgets (not possible with Shortcuts).
  • Edit existing widgets (not possible with Shortcuts).
  • Create duplicate of a widget (not possible with Shortcuts).
  • Delete a custom widget (not possible with Shortcuts and predefined widgets).

Creating a Custom widget

Here, you can create n number of custom widgets (only KPIs and Widgets) apart from the predefined ones.

Accessing the widgets panel

  • Go to the Dashboard page.
  • Click on the Customize button and the Edit Helpdesk Dashboard page appears.
  • Click the  Add widgets button on the top-right corner of the page. Add Widgets popup appears.
Customize Button
Customize Button
Add Widgets
Add Widgets

Creating a KPI

  • In the Add Widgets popup, select the KPIs tab, and click on Create KPI.
Create KPI
Create KPI
  • A dialog box opens. Enter the following details:
KPI Parameters
KPI Parameters
Parameter Description
Name Name of the KPI.
Module Name of the module of which the KPI belongs (either Request, Service Catalog, Problem, Change, Release, Asset (Hardware, Software, and Non IT), Patch, Software License, and Project).
Technician Access Level Select the Technicians to whom you want give access to the KPI.
Technician Group Access Level Select the technician group to whom you want to give access to the KPI.
Date Filter Select the date filter based on which the data should be displayed. It allows you to filter data using time. The options are:

  • Created Date: This option is valid for all modules. A Dashboard has a time filter using which the KPI displays only those data points whose create date falls within the selected time period. For example: If the time period is selected as Last 7 days, the KPI will display only those assets whose create date falls within the selected time period.
  • Resolved Date: This option is valid for all modules. Instead of the Create date, the system uses the resolved date for filtering the data.
  • Closed Date: The closed date of a ticket or item is considered to check whether it falls within a specified period.
  • Last Updated Date: The Last updated date of a ticket or item is considered to check whether it falls within a specified period.
Description Description of the KPI.
Conditions A KPI is a counter that shows the number of times a condition(s) is satisfied. A condition is created using parameters. For example: Priority Equals to Low for a Request module will show the count of Requests with Priority Low for a specific time period.

Once done, click on Create to add the KPI under the KPI tab.

Creating a Widget

  • In the Add Widgets popup, select the Widgets tab.
Create Widget
Create Widget
  • Click on Create Widget on the top-right corner.
  • A dialog box opens. Enter the following details:
Widget Parameters
Widget Parameters
Parameter Description
Name Enter name of the widget.
Module Select the module based on which the data should be displayed.
Technician Access Level Select the technician name to whom you want to give the access of the widget.
Technician Group Access Level Select the technician group to whom you want to give the access of the widget.
Date Filter Select the date filter based on which the data should be displayed. It allows you to filter data using time. The options are:

  • Created Date: This option is valid for all modules. A Dashboard has a time filter using which the widget displays only those data points whose create date falls within the selected time period. For example, a Widget that shows the number of Assets added in a time period will consider the create date of each Asset.
  • Resolved Date: This option is valid for all modules. Instead of Create date, the system uses the resolved date for filtering the data.
  • Closed Date: The closed date of a ticket or item is considered to check whether it falls within a specified period.
  • Last Updated Date: The Last updated date of a ticket or item is considered to check whether it falls within a specified period.
Description Enter the details of the widget.
Conditions A widget graphically shows the count or average of data points categorically as a chart. Here, you can decide what data to use, using a condition(s) (filters). A condition is created using parameters. For example; SLA Violation Equals to True for Request module will show tickets that have violated the SLA resolution time for a specific time period. Filters can be made using multiple conditions all connected by logical operators: AND and OR. Conditions can be grouped together as well.
Charting Options Here, you can decide how to represent the filtered data.

  • The filter data will have parameters. You can choose any one to show on the X-axis. In the above diagram, the Priority parameter is selected to be represented on the X-axis.
  • The Y- axis holds functions. Here, the Count function to count Request tickets across priorities is used. The value Low for the parameter Priority is disabled.
  • Select the Visualization (Chart type). The options are: Bar Chart, Line Chart, and Column Chart.
  • Select the Sort Order from:
    Ascending: X-axis will be sorted (based on count) in ascending order.
    Descending: X-axis will be sorted (based on count) in descending order.

When done, click on Create to add the Widget.

Filtering Widget

Filters: The Time Filter is available for all Widgets. These include: Today, Last 7 Days, Last 15 Days, Last 30 Days, This Week, This Month, or also Custom.

Filter using Time Filter

Auto Refresh Interval

Auto Refresh: You can auto refresh the complete Dashboard at specific intervals. It includes the time frames from 5 minutes to 30 minutes. On selecting the desired time interval, the dashboard would get refreshed automatically by default.

Auto Refresh Filter
Auto Refresh Filter

Viewing Widget

Note: Only the Super Admin user can edit the predefined widgets (barring Shortcuts).

The user can view the definition of a KPI and Widget. But only an owner of a widget (KPI or Widget) can edit its definition.

  • Open a Dashboard.
  • You can view the definition of a KPI and Widget using the View Icon (eye).
View Widget
View Widget

Deleting Widget

Note: The predefined widgets cannot be deleted.

Owner of a custom widget (KPI or Widget) can delete it using the Delete Icon.

Delete Widget
Delete Widget

Other Options for Widget

You can view the particular widget in Full Screen as well as download the Widget in .png and .jpeg format. If you wish to view it in the form of a document you can export the widget to PDF, CSV, and XLS format as shown below:

Other Options for Widget