Adding Relations

Sometimes a request is very complex and you intend to divide it into simpler requests, problems, change, release, asset, knowledge, merged request, purchase, and project categories. Also, you may find other similar requests and it’s a good idea to associate all these.

In Relations tab, you can build a contextual information by linking various items. This tab gives you an option to create relationships between a Request and other Requests, Problems, Changes, Releases, Assets, purchases, projects, Knowledge Articles/FAQs, and see merged requests.

Relations tab in Request Details page

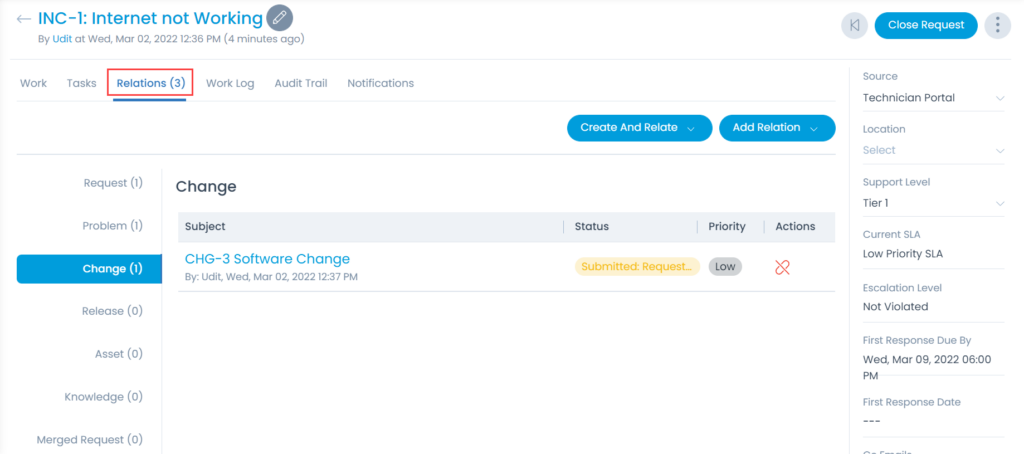
On this page you get the following features:

  • View all the items related with the request.
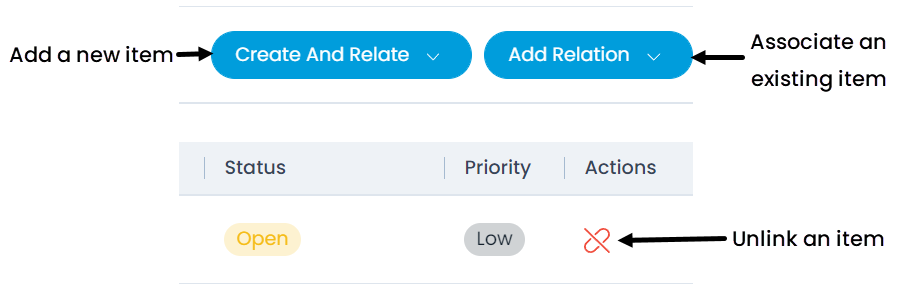
  • Create a new item and associate with the request.
  • Add an existing item to the request.
  • Unlink the items related with the request.
  • Here, the count of the linked entities will also be shown besides the Relations label.
Features in Relations Tab

Tasks

The tasks are the activities required to resolve the request. Creating tasks is not mandatory but a convenient feature to effectively work on a request. You can add tasks, assign technicians, and set due date for them.

Tasks in the request

The Tasks tab displays all the tasks done for a request. Here, you can perform the following activities:

  1. Search: The search works on the content of the tab. It matches your query with all the content (that technicians have entered) to find the results. This search is case sensitive.
  2. Sort: You can sort all the items in ascending or descending order.
  3. Add Tasks: You can add new tasks.
  4. Task List: You can view a list of tasks.

Adding a Task

When you add a new task from the Request Details page, the task automatically gets associated with this request. To add a task:

  1. Click on the Add Task button. A popup appears.
  2. Fill all the details of the task as shown below.
Task Details
Task Details
Parameters Description
Subject Enter the subject of the task.
Assigned to Select the technician to whom the task is to be assigned.
Task Type Select the task type.
Technician Group Select the technician group to whom the task is to be assigned.
Start Date Select the date when the task should start.
End Date Select the date till which the task should end.
Status Select the status of the task.
Priority Select the priority of the task.
Notify Before Set the hours or minutes before which the technician should be notified about the task.
Description Enter the description of the task.
  1. Once done, click Add.

Managing the Task

You can manage request related tasks from the task list. It is very similar to managing the request.

Managing the Task
Managing the Task

Here, you can do the following:

  1. Set the status.
  2. Set the priority.
  3. Set the task type.
  4. Set the assignee.
  5. Set the technician group.
  6. Set the start and end date of the task.
  7. Edit or Delete the task.
  8. Done or Reopen the task using the Done button.
  9. View the task details using View Details button.

Work Conversations

In the Work tab, you can collaborate and communicate to resolve the request. The Work tab is at the bottom of the details view of a request. Ideally, here you can add comments, notes, diagnosis, solutions, and tag other technicians.

Work tab in Details view

The Work tab shows all the work and communication done for a request. Here, you can perform the following activities:

Features in Work Tab
Parameters Description
Search The search works on the content of the notes and comments in the tab. It matches your query with all the content (that technicians have entered) to find the results. This search is case sensitive.
Filter You can search for the notes and comments based on their type. The available types are: All, Requester Communication, Collaborations, Notes, and Feedback.
Sort You can sort all the items from latest-to-oldest and oldest-to-latest.
Reply You can communicate with other technicians and the Requester. The Requester gets an email notification on every message you post and vice-versa (Requester and assigned Technician are the default recipients for email notification). The Requester can reply to the emails and the replies are added to the comment thread.
Forward You can forward the request to some other user. You can also use the shortcut key f to forward requests.
Collaborate You can collaborate with other technicians. You can start a message thread which is visible to other concerned people. You cannot change or delete a collaboration message.
Note You can add additional information about the Request so that others can view the same. You cannot change or delete a collaboration message.
Diagnosis You can add an inspection of the related problem. The diagnosis statement sits on top of the pane with a different color scheme. You can add only one diagnosis statement per Request. You can modify the diagnosis statement after adding one.
Solution You can add a solution to the request and also convert it to knowledge. The solution is just below the diagnosis with a different color scheme. You can add only one solution statement per request. When you add a solution, the system asks you if you want to resolve the request. You can also modify the solution statement after adding one.

To convert the solution content into knowledge (KB article), you can click the Solution icon, type the content in the text box, and click the Save and Add to Knowledge button, as shown below.

Save and Add to Knowledge

Once clicked, you are redirected to the Create Knowledge page as shown below. Here, the article takes the name of the ticket subject by default. However, you can change it if required.
Once done, click Save as Draft, and then later Publish it to make it live.

Save and Add to Knowledge

Adding a New Work

  1. Select the type of work: Reply, Forward, Collaborate, Note, Diagnosis, or Solution. Some work will be visible to the requester while some will be visible only to the technicians.
  2. Enter the body of the message. To mention someone, press ‘@’. You will see a list of available names. Choose the person whom you want to tag.
  3. You can also attach files, insert from template, and insert knowledge.
Adding a work in request
  1. If the work is a standard communication, you can enter the body content using the response templates. These templates automate the task of typing the same response every time. Refer to the Admin settings for creating response templates.
Inserting Content from Template
  1. You can also insert the Knowledge content or link to provide some standard information in the form of a Knowledgebase as shown below. To insert the content, use the Insert Knowledge button. To insert the link, use the Insert Link button.
Insert Knowledgebase Content or Link
Inserted Knowledge and Link

You can insert knowledge at the time of reply, forward, and collaborate requests. Also, you can do so while adding notes, diagnosis, and solution to the requests.

Resolving and Closing a Request

Resolving a Request

If similar requests are received for a single department, their status can be changed to Resolved all together in one go.

For Example, if in an Organization the new joiners require a mousepad or laptop bags and they all create a request for the same concern. A bulk action Resolve can save time rather than closing the tickets individually.

To resolve multiple requests in one go:

  1. Select the desired requests
  2. Click Take Action.
  3. Select the Resolve option from the dropdown.
  4. A confirmation message appears. Click Yes to continue or click No to discard the action.
Bulk Action Resolve
Bulk Action Resolve

A bulk action- Resolve will be performed and selected requests’ status will be changed to Resolved.

Status Change
Status Change

Closing a Request

There are a multiple ways to close a request.

  • Closing a single request from the list page: Click on the status of the desired request and select Closed as shown below.
Closing a request from the List page
  • Closing multiple requests from list page: Select the desired requests, click Take Action, and Close them at once.
Selecting and Closing Multiple Requests
  • Closing request from details page: On the details page, you have two options to close the request: By changing the status or by clicking the Close Request button.
Closing Request by Changing Status
Close Request button

On clicking close, a confirmation message appears. Click Yes to continue or No to discard the action.

Status and Assignment Transition

You can view a pictorial updation of the stages in the Status and Assignment Transition.

Status Transition

For each requests, the progress is recorded pictorially and displayed. For example, When a request is raised, the status of the Request is OPEN. But as soon as the technician starts working on it, gradually the status changes to In progress or Pending.

Here, the below image shows the Transition, which took place from status OPEN to In progress. Also, the time taken for prior as well as the current status is also displayed.

Status Transition
Status Transition

Assignment Transition

Once the request is opened and assigned to a Technician or Technician Group, this flow starts. The Assignment Transition shows the process of assigning the request from one Technician or Technician Group to other. Additionally, the information such as duration of work on the particular request is also displayed to know the exact utilized time.

Assignment Transition

Use Case

Stark Industries uses multiple software for their day-to-day business requirements. These Software need to be upgraded as and when the new releases arrive. To do so, the ServiceOps Release Management helps in managing, planning, scheduling, and deploying the software by going through the various phases of the release management lifecycle. It involves the below steps:

  1. First create the Software Upgrade Release in the ServiceOps as shown below. For more details, refer to Release Creation.
Create Release
Create Release
  1. Once created, accept the release and start its execution.
  2. In the planning stage, define the plan and schedule for the release. You can also add tasks and associate request, problem, change, asset, and knowledge related to the release.
Planning Stage
Planning Stage
  1. Next, carry out the release tasks associated with each phase. For example, in the approval stage, gain the approval from the approvers and move ahead.
  2. The release phases will get completed as and when the tasks associated with each phase gets fulfilled.
Release Phases
Release Phases
  1. Once the review of the “Software Upgrade” release is completed, it gets closed automatically, and the release process ends.
  2. Similarly, you can track and maintain other releases as well.

Print a Request

To print a request,

  1. Open the Request Details page of the desired request.
  2. Click the vertical 3 dots on the top-right corner and select the Print option.

A PDF will be downloaded automatically with the subject line as shown below.

Print Request
Print Request

Archiving a Request

Here, you can archive the unwanted and old requests.

Archiving Request from List Page

To archive requests in bulk,

  1. Select the desired requests.
  2. Click the Take Action dropdown. A list of actions appears.
  3. Select the Archive option.

Once the option is selected a confirmation message appears. Click Yes to continue or No to discard the action as shown below.

Selecting and Archiving Requests
Confirmation Message

Archiving Request from Details Page

To archive a request from the Details page, click the vertical three dots on the top-right corner of the page, and select the Archive option. A confirmation message appears. Click Yes to continue or No to discard the action.

Archive Option
Archive Option

Assigning and Claiming a Request

When a request is created, the default status is Unassigned. The requests need to be assigned to an agent before one starts working on it. You can assign a request using two approaches:

  • Assign requests to other people.
  • Claim requests (assign to yourself).

Assign Requests to Other Technicians

Assigning a Request to a Technician makes that person responsible for the request. The assigned technician then becomes the point of contact for all matters related to the Request. An assigned Technician has the privilege to initiate an approval process when required.

Option 1: Assign Requests from List Page

Assigning a Single Request: You can assign one request using the inline edit. In the Assigned to column, click on the technician’s name, and choose a new technician from the dropdown.

Assign a request to technician

Assigning Multiple Requests: To assign multiple requests,

  1. Select the desired requests.
  2. Click the Take Action dropdown. A list of actions appears.
  3. Select the Assign option. A list of technicians appear.
  4. Select the technician to whom the request is to be assigned.

Once the technician is selected a confirmation message appears. Click Yes to continue or No to discard the action as shown below.

Selecting and Assigning Requests
Confirmation Message

Option 2: Assign Requests from Details Page

On the Request Details page, click on the assignee’s name to assign a request.

Assigning request to technician on details page

Claim Requests

You can assign requests to yourself and take its ownership. You become the point of contact and can initiate an approval process. Steps to claim a request is same as assigning the request to other technicians.

Option 1: Claiming from List Page:

  • To claim a single request, you can use inline edit, and assign request to yourself.
Select your name in technician dropdown
  • To claim multiple requests, select the requests, click Take Action dropdown, and select the Claim option as shown below.
Select the Requests to Claim

Option 2: Claiming Requests from Details Page:

On the details page, click on the Assigned to dropdown, and select your name to assign a request as shown in the option 2 of Assign Request section.

Installation

System Requirements

  • Windows 8 and above versions (Windows 10 recommended).
  • Windows OS (64 bit)
  • RAM 4 GB
  • Processor 1 GHz
  • Minimum Disk Space 6 GB

Notes:

  • If Windows OS is 7 or 8, install Microsoft Visual C++ Redistributable 2015 package and hotfix based on the machine configuration.
  • Currently the Poller service is supported for Windows machine only.

Windows OS (64bit): Click Here

Procedure

Step 1: Download the latest poller service setup file (.msi) using the above link.

Step 2: Once downloaded, run the file, and the following “Motadata ServiceOps Poller Setup” wizard appears.

Motadata ServiceOps Poller Setup Wizard

Click Next.

Step 3: In Select Installation Folder, browse, and select the folder in which the poller service should be installed, and click Next.

Select Installation Folder

Step 4: In Configuration, enter the server URL and activation code details.

  • Protocol: Select the protocol as HTTP or HTTPS.
  • URL: Enter the URL of your ServiceOps Portal.
  • Port: Enter the port number. It is optional.
  • Activation Code: Enter the agent activation code. You can take this code from the License Details tab of the ServiceOps Portal.

Once done, click Next.

Configuration
Configuration

Step 5: In Ready to Install, click Install and the installation process begins.

Ready to Install
Ready to Install

Step 6: Click Finish.

Finish
Finish

Once the installation is completed your assets will get discovered in ServiceOps in the next scan cycle. The discovered asset will appear in the Hardware Assets List page.