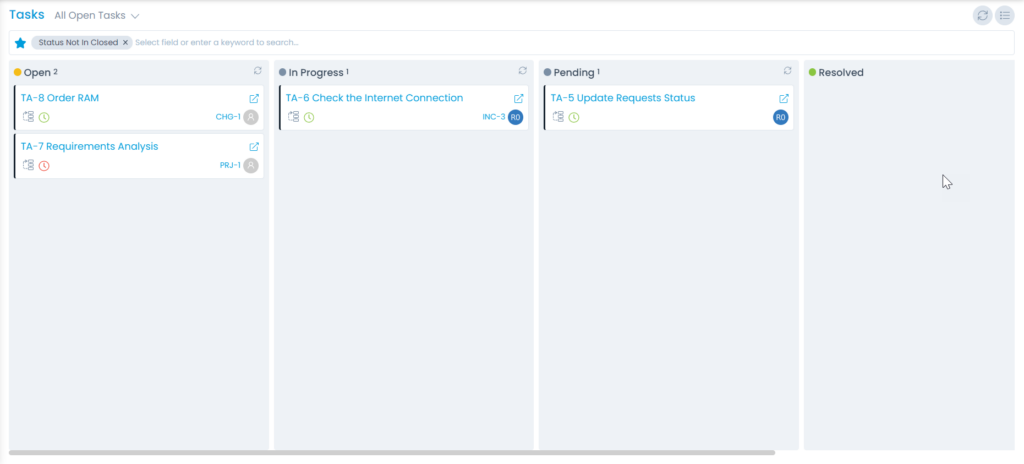
Task Details

To view the task details, either click on the subject or the view icon from the Task List page. It displays all the details along with the tickets that are related to it.

Details Tab
Details Tab

Here, you can do the following tasks:

  • Update the Status, Priority, Task Type, Assigned To, and Technician Group fields.
  • View the due date and time by hovering over the green clock icon at the right-hand side corner.
  • View the Reference tickets.

Adding Check List

In the Check List tab, you can manage the checklists for tasks.

To add a checklist,

  1. Click the Add Check List link.
  2. Specify the name.
  3. Click Save and the checklist appears in the list. Here, you can edit and delete the required checklists using their respective icons. Also, you can select, and update it to the tasks.
Adding Checklist
Adding Checklist
List of Checklists
List of Checklists

Creating a Task

You can create tasks manually as well as automatically using a Task Schedule.

To create tasks manually, you can create in two ways:

  1. From the Details page of Request, Problem, Change, Release, and Project modules respectively. Here, creating a task from the Request module is shown.
Adding Tasks from the Details page
  1. From the My Tasks menu as shown below.
Creating Task from My Task menu

Both the options open up a popup, where you need to fill in the details.

Creating or Adding a Task
  • Subject: Enter the subject of the task.
  • Assigned to: Select the technician to whom you want to assign the task.
  • Task Type: Select the task type.
  • Technician Group: Select the technician group to whom you want to assign the task.
  • Start Date: Select the date when the task should start.
  • End Date: Select the date till which the task should end.
  • Status: Select the status of the task.
  • Priority: Select the priority of the task.
  • Notify Before: Set the hours, days, or minutes before which the technician should be notified about the task.
  1. Hours: Select the number of hours before which the system should send an email reminder to the assigned technician.
  2. Minutes: Select the number of minutes before which the system should send an email reminder to the assigned technician.
  3. Days: Select the number of days before which the system should send an email reminder to the assigned technician.
  • Description: Enter the description of the task.
  • Attach Files: Attach the relevant files if required.

Once done, click Add and the task appears in the list. Similarly, you can create a task from other modules.

Task List View

The Tasks list view allows Technicians to track and manage all the tasks at one place.

In the task list view, you get to see all the requests associated with you in the system. It is a central hub for a Technician, where you can find a Task and act upon it.

Task List View
Task List View

The page provides the following features:

  1. Filter: You can filter the tasks list by clicking the desired option. E.g.: If ‘All Open Tasks’ is selected, the grid displays all the tasks with open status.
  2. Search: You can look for a specific task by searching them. The search is a faceted search and allows you to find with specific criteria. You can find more details in the search section.
  3. Create Task: You can create a task.
  4. Refresh: You can refresh the task list. This is useful when multiple people are working on the task and contents are updated frequently.
  5. Kanban View/List View: You can toggle between the kanban view and list view.
  6. Grid: You can view the details of the tasks. Also, you can change certain details from here.
  7. View Details Page: You can click the Subject to view the Task Details page.
  8. View Details Page in a new Tab: You can click the arrow icon next to the Subject to view the details page in a new tab.
  9. View the Reference details: You can click the ID of the reference which is associated to the task to view its details. Example: If any problem or request is associated with the task, its ID will be displayed here. Clicking on the reference ID will display its details.
Click the Reference ID to view its Details
Reference Details
Reference Details
  1. Edit: You can edit the details of the task.
  2. View Task: You can view as well as update the details of the task by clicking on the eye icon.
  3. Delete: You can delete the required task if not needed anymore.

Kanban View/List View

You can view the task details either in Kanban or List view. The default view is List View.
To view in Kanban mode, click the Kanban View icon on the top-right corner, and the list appears as shown below. The task list appears based on their status.

Kanban View Option
Kanban View Option
Kanban View
Kanban View
  • You can also view the details of a particular task by clicking on it and a popup appears. Here, you can make the required changes. For more details, you can refer to the Task Details Page. To close the popup, click Done at the bottom-right corner.
Task Details Popup
Task Details Popup
  • In this view, you can select the statuses to be available on the screen using the Kanban Column Selection icon as shown below.
Kanban Column Selection

View Tasks

To view the task details either click on the subject or on the eye icon in the Actions column. The Task details popup appears. Here, you can view as well as update the task details.

View icon
View icon
View Task Details Popup

The popup displays the following five tabs:

  • Details: You can view the details of the task along with the associated references.
  • Comments: You can add comments to the task.
  • Work Log: You can add work log to the task.
  • Check List: You can add the required check lists to the task.
  • Audit Trail: You can view the trail of the activities related to the task.

Task Management

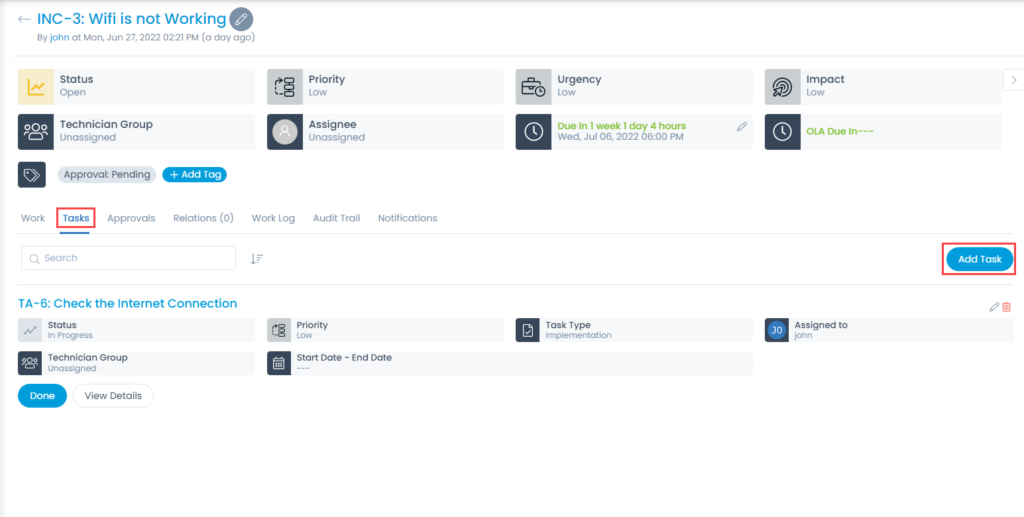
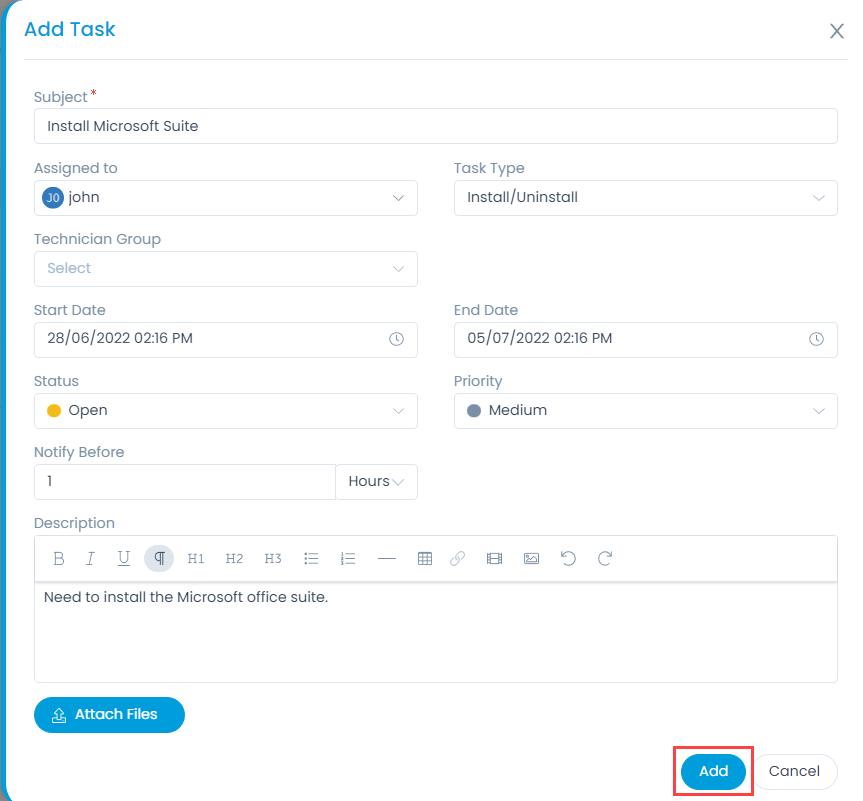
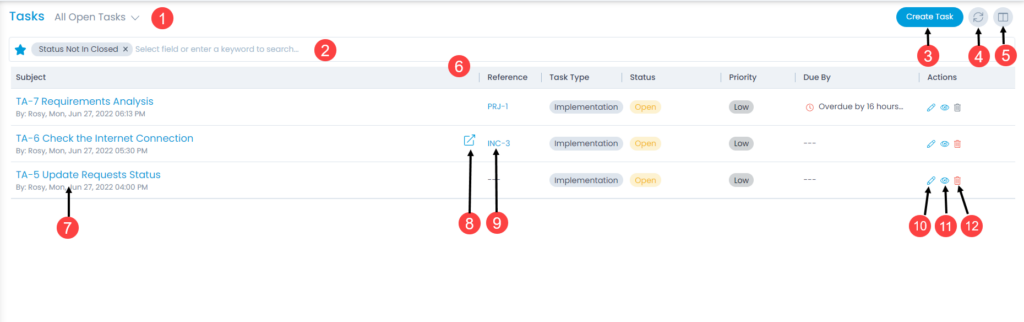
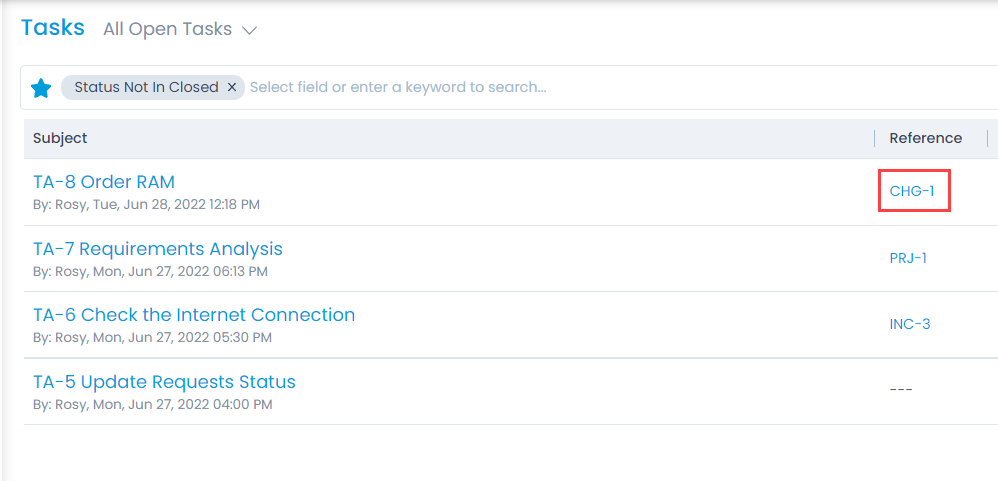
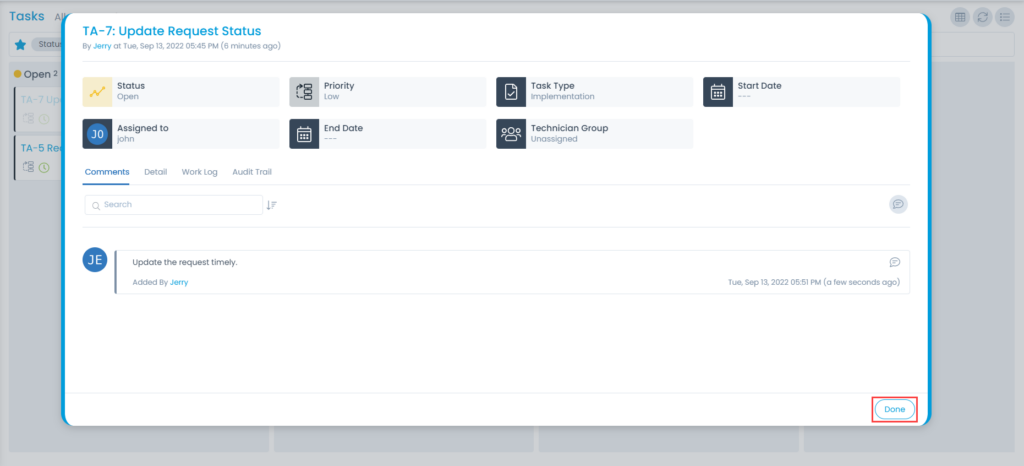
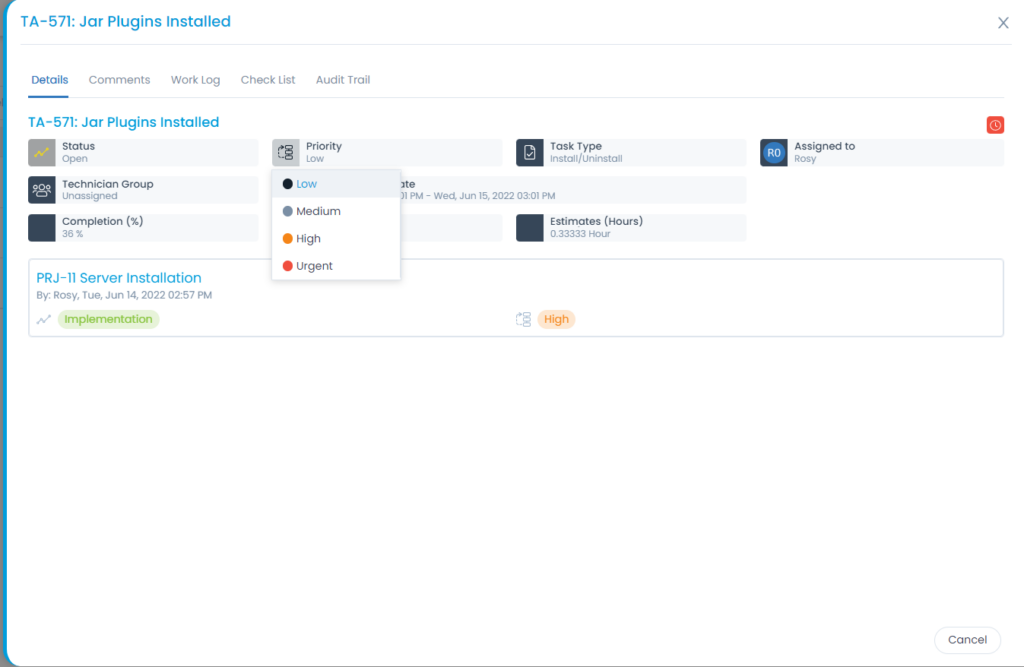
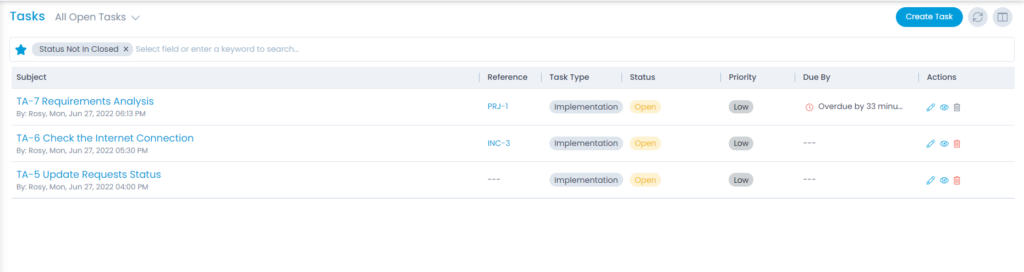
Tasks are the activities that are done to fulfill different types of requests. Also, the tasks can be independent activities that are not related to any module. The task management section keeps a track of all the tasks for an organization and displays the dependency of it on other areas. Here, technicians can create, manage, and track the tasks. Also, they can view the tasks assigned to them or assign a task to peer technicians.

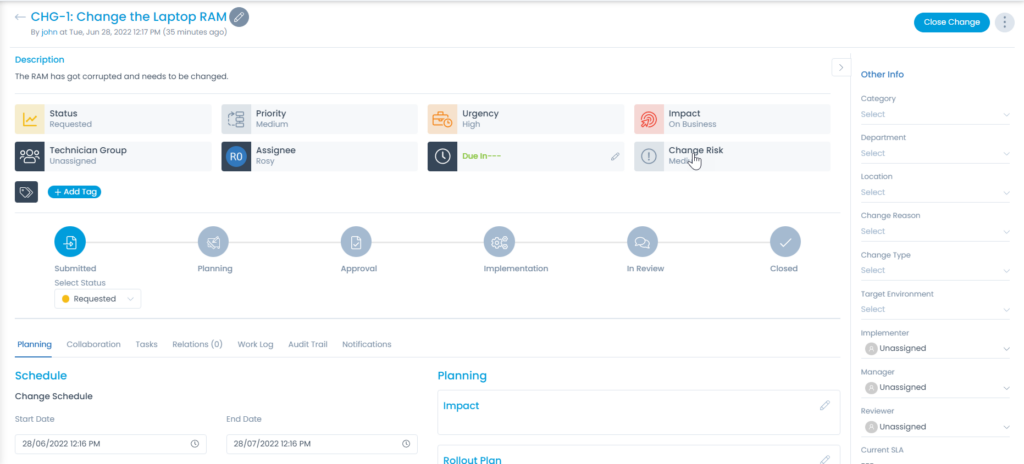
Tasks in the system can be independent or associated with modules like request, problem, change, release, and project. Some of the features of task management in the system are:

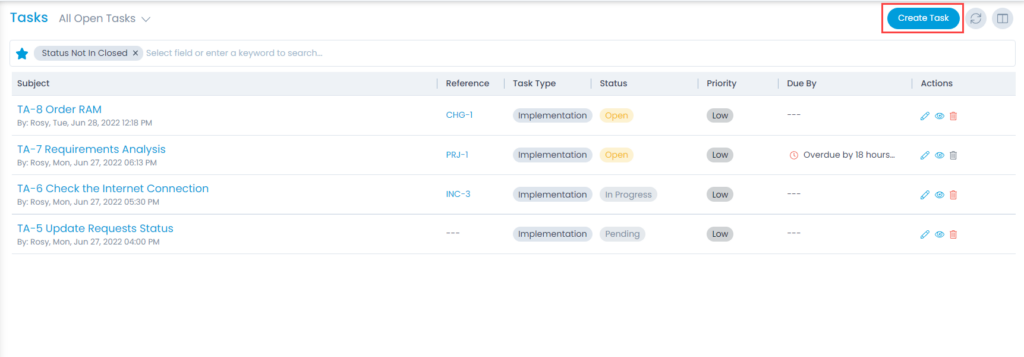
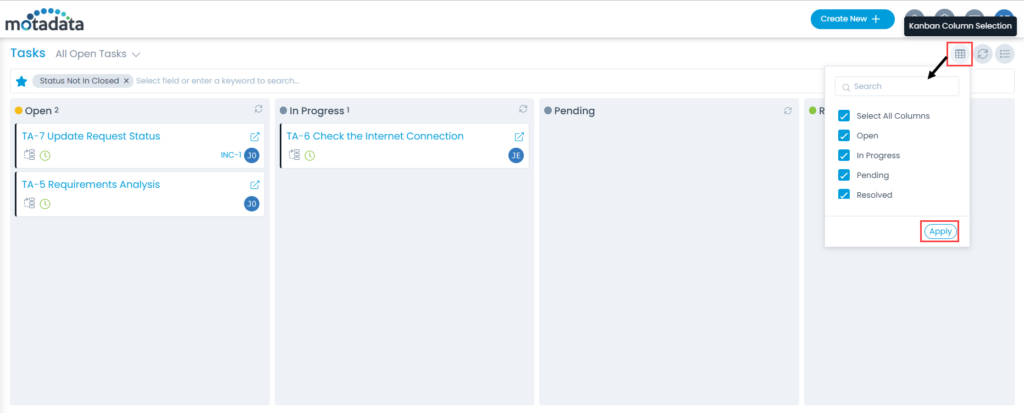
  • View all the tasks at one place.
  • Create, edit, and delete the tasks.
  • Create Tasks manually as well as automatically via Task Schedule.
  • Understand the dependency of the task on request, problem, change, release, or project.
  • Create custom view to identify the tasks of high priority.
  • Plan the execution of the tasks using their due dates.
  • Simple search and faceted search in task management.
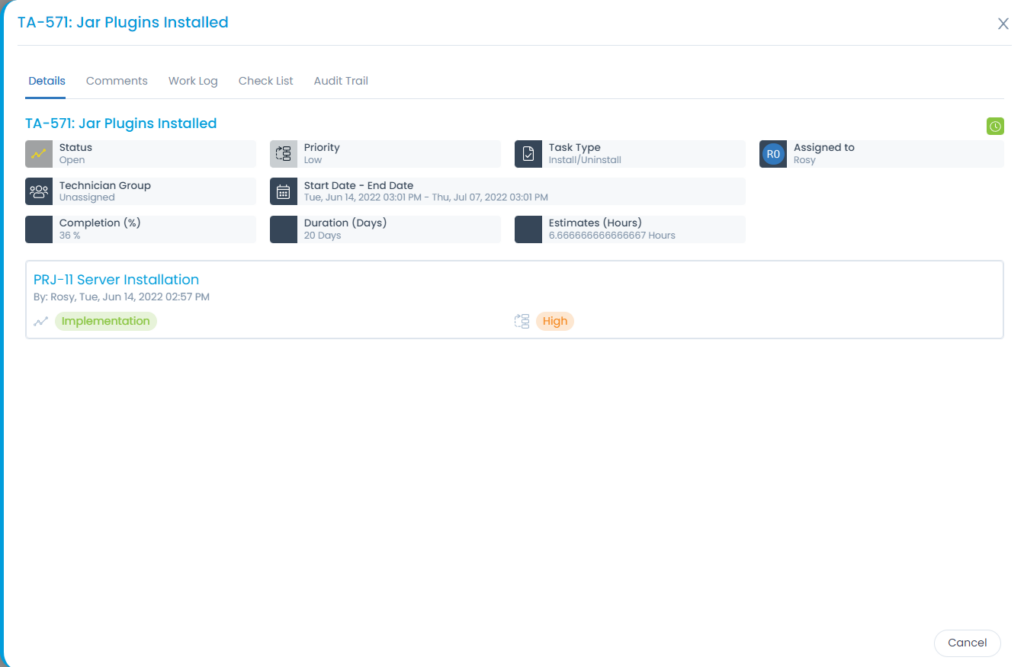
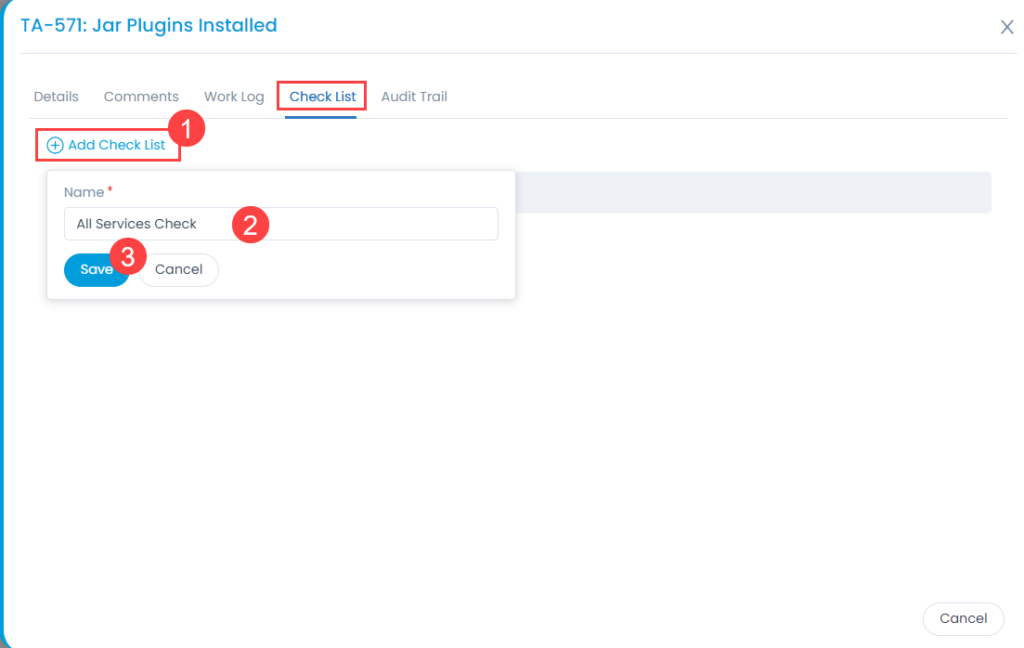
  • Add comments, work logs, and view the audit trail of activities.
Note: The system displays only those tasks that you have created or are assigned to you. You will not see any task that does not have your involvement.
Tasks Management Page

Barcodes

For the uniqueness and ease of business, the organization can store and track information about their physical assets, from individual items to large stocks. You can assign a barcode to every Asset in the CMDB.

Barcodes
Barcodes

You can configure the format of the barcode using the option Configure Barcode Format on the top-right corner of the page.

Configure the Barcode Format

Here, you can select the exact size of the Barcode with its Height, Width, no. of rows and gap measurement. Also, you can select the fields that you want to display on the Barcode.

Searching Approval Requests

The search function in approval requests is a simple search. You can type the words or characters in the search box. The system will compare the words with the approval request’s ‘Subject’ field. When the keywords match as it is in either of the 4 tabs, system shows the matched output. You have to click on each tab to see the output under that heading.

Search in Approval Request

Create a New Approval Request

The approvals have to be linked to the different requests. Hence, you can create a new approval request only from the concerned sections.

  • Click here to see how to create an approval in request management.
  • Click here to see how to create an approval in problem management.
  • Click here to see how to create an approval in change management.
  • Click here to see how to create an approval in release management.
  • Click here to see how to create an approval in asset management.
  • Click here to see how to create an approval in purchase management.
  • Click here to see how to create an approval in knowledge management.

Approval List Page

The Approval List page enables you to search and view the required approvals. To view the page,
Click the My Approvals menu and the following tabs appear.

  • Pending: Displays a list of pending approvals that needs your attention. Here, you can view, approve, or reject the approval.
  • Approved: Displays a list of approvals approved in the past. You can also view them individually by clicking on the eye icon.
  • Rejected: Displays a list of approvals rejected in the past. You can also view them individually by clicking on the eye icon.
  • Ignored: Displays a list of approvals ignored in the past. You can also view them individually by clicking on the eye icon.
Approvals Tab
Approvals Tab
Parameter Description
Requester Name The name of the person who generated the approval request.
Subject The subject of the approval.
Type The module name associated with the request.
Status The current status of the approval.
Created Date The date when the approval request was raised or generated.
Actions The list of available actions for the approval request. The options are:

  • View: View the tickets associated with an approval.
  • Approve: Button to approve the approval request.
  • Reject: Button to reject the approval request.

Here, you can do the following activities:

  • Search approval requests.
  • View the details page of the concerned tickets associated with an approval. You can also approve or reject the ticket from the details page as shown below.
Approving or Rejecting Request from the Details Page
  • Approve or reject the approval requests.
  • View the history of approval requests.
  • View the Relations with whom the request is related. This tab is available for Request, Problem, Change, Release, Purchase, and Asset (Linked Events) modules respectively.

Approval Management

The Approval Management section lists all the approvals that are assigned to you or you have acted on it in the past. It displays a list of all the approvals that are either in the pending, approved, rejected, or ignored state.
The approval requests are generated from the sections like requests, problems, changes, releases, assets, and knowledge.

Note: The section displays only those approvals that are assigned to you.