Export Report

This option enables to export the report in the desired format. You can export the report in PDF, Excel, CSV, and Word format.

To export the report,

  1. Click on the desired report.
  2. On the Preview page, click the Export button.
  3. Add the Email Address of the recipients to whom you want to the send the report.
  4. Select the Format of the report.
  5. Select the export option as Attachment or Attachment Link.
  6. Once done, click Export.
Export Report
Export Report

View History

The View History option displays the history of reports that are downloaded and exported along with their format. You can view the history of all the reports from the list page as well as of individual reports from the preview page.

Viewing History of All the Reports

  1. On the Reports list page, click the View History button.
  2. The Reports History page appears.
View History of All the Reports
Report History
Report History

Viewing History of Individual Report

  1. Click on the desired report.
  2. On the Preview page, click on the View History button.
  3. The Report History page appears.
View History of Individual Report
Report History
Report History

Download Report

This option enables you to download the report in PDF, Excel, CSV, and Word formats.
To download the report,

  1. Click the desired report from the list page.
  2. On the preview page, click the Download button.
  3. Select the required format. The options are: PDF, Excel, CSV, and Word. The default format is PDF.
  4. Click Download and the report gets downloaded in the PDF format.
Downloading Report
Downloading Report
Sample report in PDF Format

Search and Filter Report

The Search and filter options on the report list page helps you to find the required reports from the long list of reports.

Search Reports

Searching the report has the following features:

  • Search uses keywords from the name of the reports.
  • You can only search the name of the report.
  • The search is case insensitive.
Search Reports
Search Reports

Filter Reports

You can filter the reports in either of the three criteria:

  • All Reports (Default filter)
  • Predefined Reports: The default reports.
  • Custom Reports: The reports generated by you or your fellow technicians.
Viewing Reports using Custom Reports Filter

Delete Report

You can delete the old and irrelevant reports from the system. This helps you to focus only on the required report. Once deleted, you cannot retrieve back the deleted report.
You can delete the report from the list page and the preview page as shown below. You can delete only custom reports (and not the default report).

Delete Report from the Preview Page
Delete Report from the List Page

Once the delete icon is clicked, a confirmation message appears. Click Yes to continue deletion or No to stop the process.

Confirmation Message

Schedule Report

The Schedulers in the reports are tasks that do specific operations periodically. For reporting, the schedulers are used to generate and send the report to different people.

To create a schedule,

  1. Click the calendar icon available on the reports list page as shown in the below-left figure. The Schedule Report popup appears.
Scheduler Icon
Scheduler Icon
Schedule Report Popup
    The page displays the schedulers configured only for that particular report. In the popup you can perform the following tasks:

    • View the schedules
    • Create schedule
    • Edit schedule
    • Delete schedule
    • Search schedule
    • Enable or disable the schedule
  1. Click the Create Schedule button and the page appears.
Create Schedule button
Create Schedule Popup
  1. Enter the following details:
    Parameter Description
    Name Enter the name of the schedule.
    Emails Enter the email address of the people to whom you want to send the report.
    Format Select the format of the report. The options are: PDF, Excel, CSV, and Word.
    Run Report for Last Days Select the number of days for which you want to generate the report data.
    Technician Select the technicians to whom you want to send the report.
    Technician Group Select the Technician Groups to whom you want to send the report.
    Export Option Select whether you want to export the report as an attachment or attachment link.
    Schedule Type

    Select the type of schedule. The options are:

    • Once: The schedule will run only once on the selected start date.
    • Daily: The schedule will run daily starting from the selected start date and time.
    • Weekly: The schedule will run once a week as per the selected day and time.
    • Monthly: The schedule will run once a month as per the selected date, time, and month.
    Start At Select the date from which the schedule should start running.
    Time Select the time at which the schedule should run.
    Day (Available for Weekly schedule) Select the day on which the schedule should run.
    Date Select the date based on which the schedule should run.
    Month (Available for Monthly schedule) Select the month till which the schedule should run.
  2. Once done, click Create and the schedule gets created.

Edit Report

To edit the reports, click the Edit icon (pencil) either from the list page or from the preview page. You can edit the custom and default reports. In the default reports you can edit the description field only.

To edit from the list page,

  1. Click the Edit icon and the page appears as shown below.
  2. Make the required changes and click Update.
Edit from List Page
Edit from List Page
Edit Report
Edit Report

To edit from the Preview Page,

  1. Click on the desired report. The preview page appears.
  2. Click the Edit icon on the top-right corner of the page. The edit page appears.
  3. Make the required changes and click Update.
Edit from the Preview page

Email Notification

The Email Notification tab enables you to view and edit the default email templates as per the requirement. These are used to send automatic responses to the recipients when an event is triggered. You can also activate or deactivate them if not required.

Email Templates for Automatic Response

Here, you can do the following tasks:

  • Enable/Disable Email Template
  • Edit Email Template
  • Insert Placeholders in the subject and body to display specific text instead of the generic text.

Enable/Disable

To enable or disable the email template,
If disabled, click the grey icon in the Enabled column. It turns green and the email template gets enabled.

If enabled, click again the green icon, and the template gets disabled. Its color will turn to grey as shown below. Here, email templates are used from the Request module.

Similarly, you can enable or disable the email templates for all the modules displayed in the tab.

Enable/Disable Email Templates

Editing the Email Template

To edit the content of the email template, click the Edit icon, and the page appears. For example: Click on the Edit icon next to the “Notify Requester when new Request is Created” email template and the page opens as shown below.

Edit Email Template
Edit Email Template

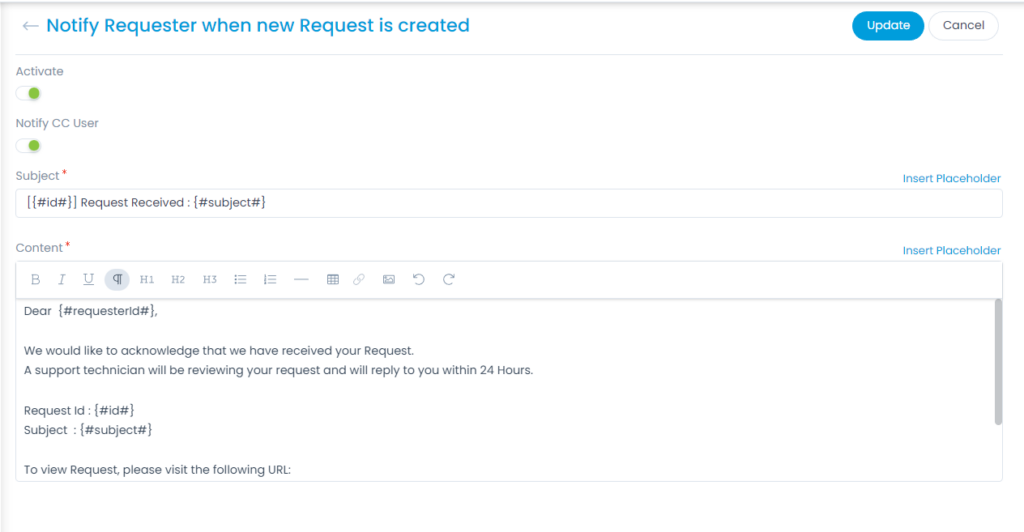
Here, you can do the following:

  • Activate: You can activate or deactivate the email template.
  • Edit Subject: You can edit the subject and insert placeholders.
  • Edit Content: You can edit the email body and add placeholders as per the requirement.
Note: The fields in the page may vary as per the module and template selected.

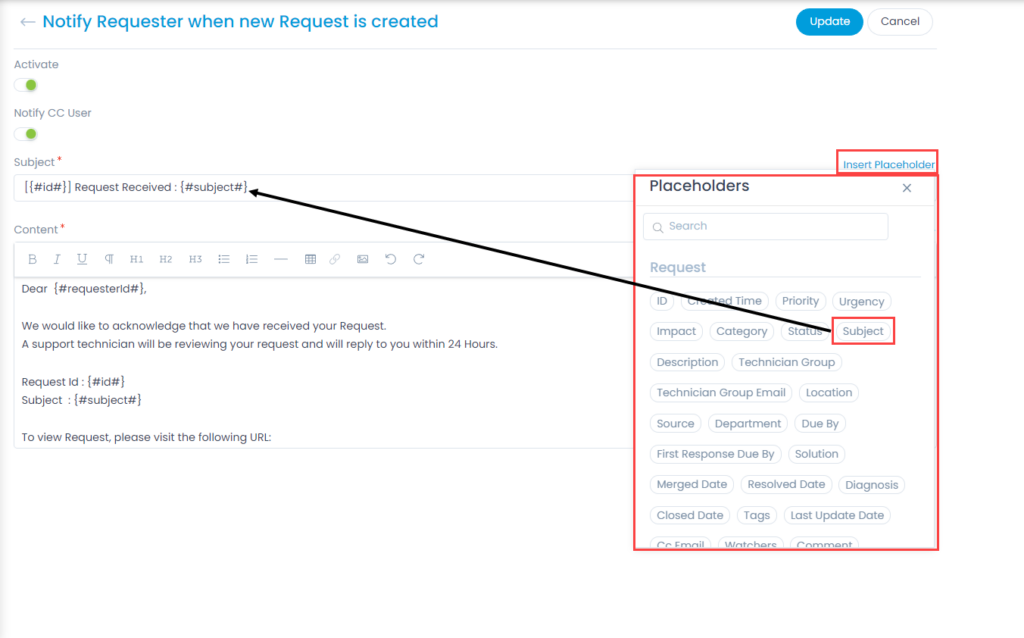
Inserting Placeholders

To insert the placeholders,
Click the blue link on the right-corner, and select the required field. Once clicked, the placeholder gets added in the subject as shown below.

By default, all the templates have necessary placeholders available to provide request specific information. You can add more based on the recommendations from the technicians.

To add or remove a tag, edit the desired template, and use the Insert Placeholder link.

Note: You can only use the placeholders available in the list and cannot create new ones.
Adding Placeholders
Adding Placeholders

Create Report

The page enables you to create a custom report for all the modules. You can create tabular, matrix, summary, plugin, and query reports.  Based on the module and report type selected, the filters, charts, and column values will appear for configuration.

Tabular Report

The tabular report displays the actual data of the column fields.
To create a tabular report,
Click Create on the top-right corner of the page and the Create Report page appears as shown below.

Create Report button
Create Report Page
Create Report Page

Enter the following details:
Basic Details

  • Name: Enter the name of the report.
  • Module: Select the desired module for which you want to generate the report. Based on the module selected, the report identifies the relevant filters, and columns of the report. For example, if you select the Request module, all the filters, and columns related to the request will be displayed. Also, in case of the Release report, all the filters, and columns related to the Release module will be available.
  • Type: Select the type of report as Tabular.
  • Technician Access Level: Select the technicians whom you want to allow to access the report.
  • Group Access Level: Select the group of the technicians whom you want to allow to access the report you are creating.
  • Description: Enter the description of the report.

Filters
Select the filters that display only relevant data without any clutters.

  • Date Filter: Select the date from which the data is to be extracted. The options are: Created Date, Resolved Date, Closed Date, and Last Updated Date.
  • Group By: Select the fields based on which you want to group the data.
  • Conditions: Add conditions if you require more precise output. A report can have single filter condition for simple report or a combination of conditions for precise analysis of some records.

Chart
Enable the flag Include Chart if you wish to include the chart in the report. If enabled, enter the following details:

  • X-Axis: Select the field you want to display on the X-axis.
  • Y-Axis Function: Select the function you want to display on the Y-axis. The functions are: Count of and Average Of.
  • Y-Axis Column: Select the column you want to display on the Y-axis. Once selected, you can also select values related to the column as shown below.
Select Values
Select Values
Select Column Values
  • Visualization: Select the type of chart you want to display in the report. The options are Line chart, Bar chart, Column chart, and Pie chart.
  • Sort Order: Select the order in which the details should be displayed. You can sort in ascending or descending order.

Columns
Select the columns you want to view in the report output. The column fields are available based on the selected module. If required, you can also use the Remove All Columns button to delete all the columns.

Select Columns
Select Columns

Once done, click Create and the report gets created. Now, select the date range, and click Preview to view the details in a tabular format as shown below. Later, you can also download or export the report if required.

Tabular Report
Tabular Report

Matrix Report

The matrix report displays the aggregated count of the column values.

To create a matrix report,
Click Create on the top-right corner of the page and the Create Report page appears as shown below.

Creating Matrix Report

Enter the following details:
For Basic Details, Filters, Chart, and Columns refer to the Tabular Report section.
Sorting

  • Sort Order: You can sort the report in ascending or descending order.
  • Sort By: Select the column based on which the report data should be sorted.
  • Column Value: Select the value as per the column selected for sorting.
  • Top Value: Enter the top value.

Once done, click Create and the report gets created. Now, select the date range, and click Preview to view the details as shown below.

Matrix Report
Matrix Report

Summary Report

The summary report displays the summarized data of the column fields.

To create a summary report,
Click Create on the top-right corner of the page and the Create Report page appears as shown below.

Creating Summary Report

Enter the following details:
For Basic Details, Filters, and Columns refer to the Tabular Report section.

Once done, click Create and the report gets created. Now, select the date range, and click Preview to view the summary of the report.

Summary Report
Summary Report

Plugin Report

The plugin report displays the details as per the customer’s requirements.

To create a plugin report,
Click Create on the top-right corner of the page and the Create Report page appears as shown below.

Creating Plugin Report

Enter the following details:
Basic Details

  • Name: Enter the name of the report.
  • Module: Select the desired module for which the report is to be generated.
  • Type: Select the report type as Plugin.
  • Technician Access Level: Select the technicians whom you want to allow to access the report.
  • Group Access Level: Select the group of technicians whom you want to allow to access the report.
  • Plugin Identifier: Select the plugin which is to be used for generating the report.
  • Description: Enter the description for the report.

Filters
For Filters refer to the Tabular Report section.

Once done, click Create and the report gets created. Now, select the date range, and click Preview to view the details.

Plugin Report
Plugin Report

Query Report

The report displays the details based on the queries. This supports PostgreSQL select queries and are helpful to retrieve data from more than one database tables.

To create a query report,
Click Create on the top-right corner of the page and the Create Report page appears as shown below.

Creating Query Report

Enter the following details:
The Basic Details are same as in the Tabular section except for the Query field.
In the Query field enter the required PostgreSQL select query.

Once done, click Create and the report gets created. Now, click Preview to view the details.

Query Report
Query Report

Reports List Page

The Reports List page displays all the default reports based on the selected module from the left panel. It also enables you to search, filter, create new custom reports, view history, and configure settings.

Reports List Page
Reports List Page

The page provides the following features:

  1. Search: Search for the required report.
  2. Filter: Filter the reports. The options are: All Reports, Pre Defined Reports, and Custom Reports.
  3. View History: Displays the history of report whenever it is exported or downloaded.
  4. Create: Create a custom report.
  5. Report Settings: Enable the flag for adding the serial number column to the Tabular Reports and click Update to apply the changes as shown in the above figure.
  6. Reports Panel: Displays a list of categories of the reports.
  7. Reports List: Displays a list of reports based on the selected category. Also, you can schedule and edit the report from the Actions column.