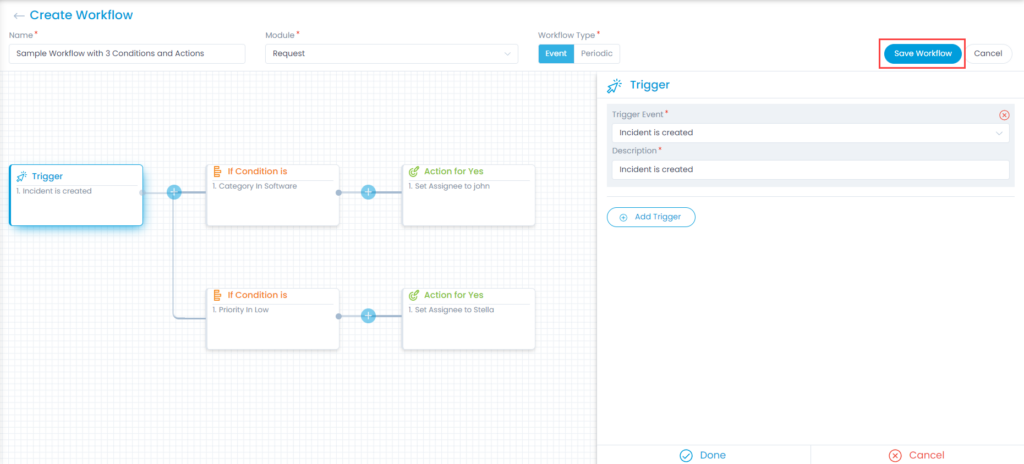
Example Scenario 1

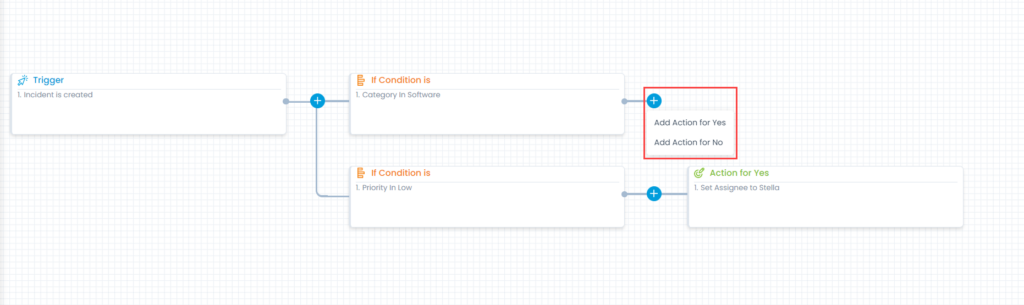
To understand the workflow, a small case scenario is considered. Here, you will see:

  • Triggering of workflow condition
  • Execution of workflow action

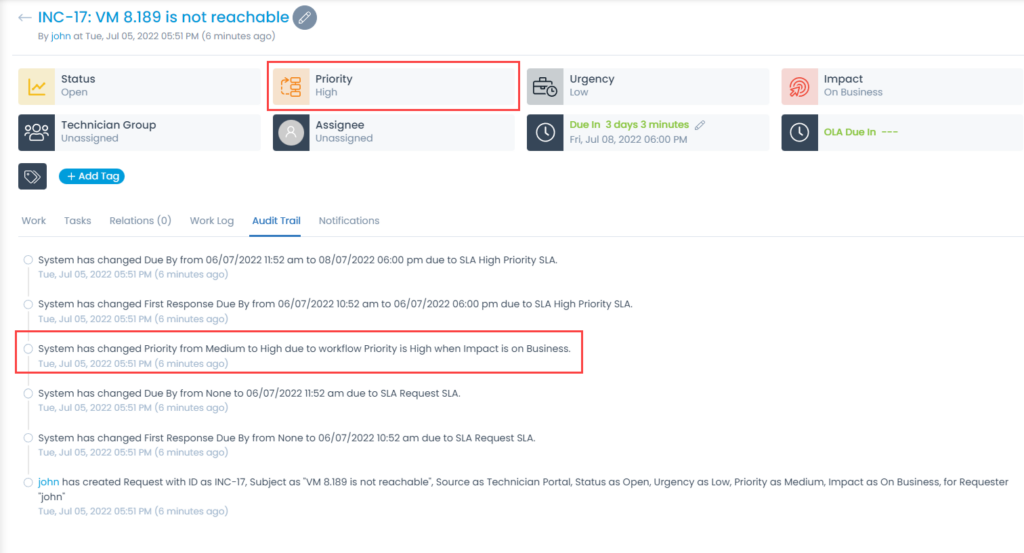
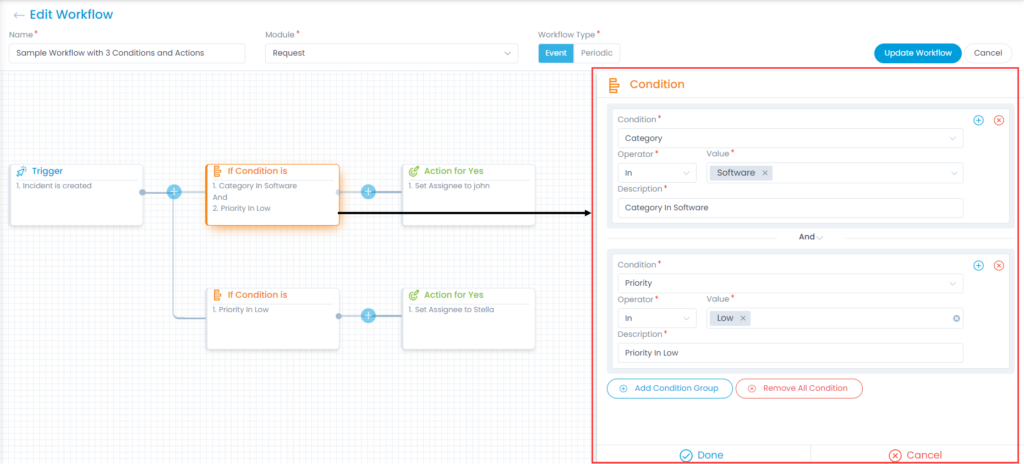
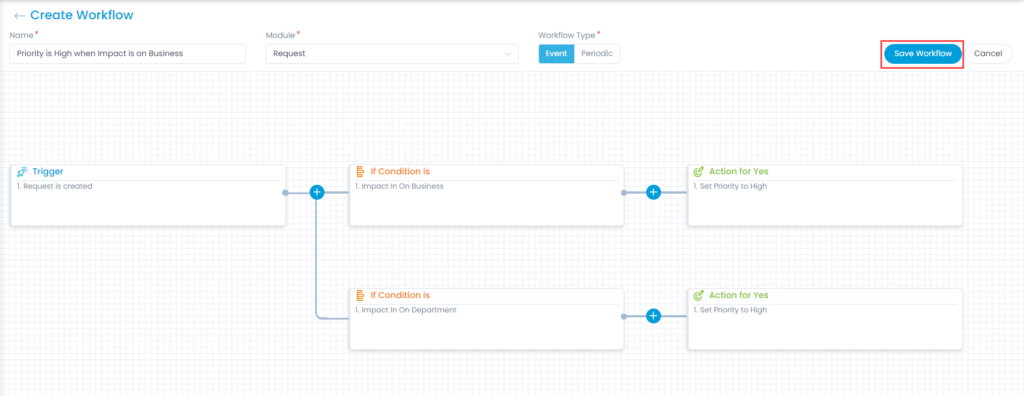
A workflow with the following statements is created:

  • Name: Priority is high when the impact is on business.
  • Trigger Statement: When a new request is created.
  • Condition Statement 1: When the impact = business.
  • Action for condition statement 1: Set priority = high.
  • Condition Statement 2: When the impact = department.
  • Action for condition statement 2: Set priority = medium.
Workflow for Example Scenario

Now, create a request with impact = department. The priority of the request should automatically take the value – ‘medium’.

Workflow when Impact is on Department

When the Impact value is changed to ‘Business’, the Priority of the request changes to – ‘High’.

Workflow when Impact is on Business

Create Workflow

The create page helps you to create a workflow with custom conditions and rules.

To create the workflow, click the Create Workflow button on the top-right corner of the page.

Create Workflow button
Create Workflow Page

If considered for Release Management, the Workflow will affect on a certainly greater basis compared to any other modules. Below is the example of Release Workflow:

Release Workflow Example

You will find the following things on the page:

Basic Settings

  • Name: Enter the name of the workflow.
  • Module: Select the module on which the workflow should work. If you want similar action in multiple modules, you will need to create different workflows for each module.
  • Workflow Type: Select the type of workflow. It defines when a workflow is triggered i.e. either on an event or on periodic intervals.

Design Grid

In the design grid, you can define the triggers, conditions, and actions. To join all the things, you will see the ‘joiners’ and ‘operators’.

Design Grid
Design Grid
  • Trigger: Trigger is the set of the command that initiates a workflow. It can be a condition or an event. For example: An event could be: ‘when an incident is created’. A condition for trigger can happen when one thing changes to other. For example: when status is changed from ‘Any’ to ‘Closed’.
  • Joiners: Joiners are the logical operators that join triggers, conditions, and actions. Joiner is a theoretical term for the blue round plus icon. When you click the icon, it gives you the options.
    • In the first level joiner, you can define a new condition or an action.
First level joiner can have a Condition or an Action
    • In the second level joiner, you can define only actions. The action would execute if the condition set is true or false.
Second level joiner can have Actions when Conditions are True or False
  • Editor: In the editor you can define the trigger, conditions, and the action statements. A statement can have multiple values i.e. multiple conditions to trigger workflow, multiple actions, conditions etc. While creating the condition statement, a logical operator AND/OR acts as a connector in between 2 condition statements.
Editor on Create Workflow screen

The fields in the editor depends on what statement you are trying to make. For example: In the above figure, parameters with fixed values are used. Hence, the system shows you an operator and a dropdown to select the value. Similarly, if you want to send an email notification, the system will show the email template.

Note: It is recommended to not to create complex condition statements unless you know the expected output. Multiple use of ‘AND’ or ‘OR’ in a single set of condition statements can make the workflow unpredictable.

List Page

The list page displays all the workflows available in the system.
To view the list page, navigate to Admin > Automation > Workflow.

Workflow Option in Admin Settings
Workflow List Page
Workflow List Page

From this page, you can do the following tasks:

  1. Search Workflow: Search the workflows using keywords. This is a simple search that matches the keywords as it is.
  2. Create Workflow: Create a new workflow using triggers, conditions, and actions. The newly created workflow appears on the top.
  3. Grid: Displays the details of the workflows.
  4. Enable/Disable Workflow: Enable or disable the workflows that you want to use or do not want to use. By default, a new workflow is always in enabled state.
  5. Change Priority: Change the priority of the workflow. They will execute as per the order.
  6. Duplicate: Use the existing workflow to create a new one. It helps in modifying the existing workflow without breaking it.
  7. Edit Workflow: Edit the existing workflow to make changes in it. The page is exactly similar to the create page.
  8. Delete Workflow: Delete the workflow if not required.

Grid

The grid displays the following details:

Field Description
Name Displays name of the workflow. You can also click on it to view the edit page and make changes if required.
Type Displays the type of the workflow. It is either event or periodic.
Trigger Displays the statement that triggers the workflow.
Created Date Displays the date and time when the workflow was created.
Enabled Displays whether the workflow is enabled or disabled.
Actions Displays the list of available actions for the workflow. The options are:

  • Change Priority: Click and hold the snow-flakes icon to drag and change the priority of the workflow.
  • Duplicate: Click on the icon to duplicate the workflow. You will be redirected to create workflow page and conditions or actions will be pre-filled.
  • Edit: Click the icon to view and modify the workflow details.
  • Delete: Click on the icon to delete the workflow. The system will ask for a confirmation. Click Yes to continue or No to stop the process.

Workflow

Workflows are a set of rules that comply with processes of an organization. A rule on granular level is made up of conditions and actions. The system monitors the ticket activities and evaluates them against the list of workflows. When a ticket matches with the conditions of any workflow, the system applies the actions defined for it.

Workflow Characteristics

The characteristics of the workflow are:

  • Different set of workflows for Request, Problem, Change, Release, Asset, User, Task, and Admin modules.
  • Interactive graphical representation of workflow for clear understanding of AND and OR operators.
  • Virtually unlimited set of if-else/and-or conditions in a workflow.
  • Positive and negative evaluation of conditions i.e. applying different actions when the set of conditions are True or false.
  • Enable or Disable the workflow in real-time.
  • Periodic workflows that run at specific intervals of time.
  • Workflow ordering to manage its priority in case of conflicts.

Types of Workflow

There are two type of Workflows: Event and Periodic.

  • The event workflows are triggered on events like: something changes or users perform some action.
  • Periodic workflow does not require a trigger and are automatically executed at given intervals.

Levels of Workflow

The workflow can be defined in different levels based on their type.

  • In the Event type, the workflow can be both 2 levels and three levels.
    • A 2 level workflow uses only conditions and actions. Here, the triggers work as conditions.
    • A 3 level workflow uses a trigger, a set of conditions, and a set of actions. Here, you can define when to execute the action i.e. when conditions are true or when they are false.
A 2 level workflow has Conditions and Actions
A 3 level workflow has Trigger, Conditions, and Actions
  • In the Periodic type, the workflow can be a 3 level workflow.
    • The 3 level workflow uses the time period as the trigger, conditions, and actions. Defining conditions are mandatory here before defining the action.
A 3 level periodic workflow has Trigger, Conditions, and Actions

The Working of Workflow

The workflow is an independent module but evaluates the values in the ticket (that are defined in other modules). For example: A workflow may have a condition for ‘assignee’. For such a workflow, ‘Technicians’ should be present in the system.

When someone does any activity on a ticket, the system compares the values of the ticket with the conditions in the workflow. If the condition matches, the system reads the action, and applies on the ticket.

The system uses a reverse chronological order while comparing with the workflows with the ticket. You can understand this using the following example:

  • Workflow 1 has the following definition: If status = ‘Open’; set assignee to ‘Jerry’.
  • Workflow 2 has the following definition: If status = ‘Open’ && impact = ‘Low’; set assignee to ‘John’.
  • The order of workflow 1 is higher than workflow 2.
  • When you create a request with the following values: status = Open; impact = Low, and leave the assignee as blank.
  • The system will compare the ticket with the workflows one by one i.e. first workflow 1 will be compared and then workflow 2 will be compared.
  • Since the conditions of workflow 1 matches (status = open), the system will execute the action, and set assignee to ‘Jerry’.
  • The system will again compare the ticket with the remaining workflows. Now, workflow 2 will be compared.
  • Since the conditions of workflow 2 matches (status = open and impact = low), the system will execute the action, and set the assignee to ‘John’.
Note: Suppose you create a set of conditions that qualifies in both SLA and workflow. The system will give priority to the SLA and workflow action may not be applied in that case.

Admin Section

The Admin section is the control center of the application’s settings. As an admin, you can set up the system to meet your organization’s settings and compliance. It is the central hub for managing the entire product. It gives you the options to set up the product and make it a part of an organization.

Admin is responsible for the configuration of the product. Using this section, an administrator seeks to ensure the performance, resources, and security of the product while meeting the needs of the users.

Accessing the Admin section requires Admin rights. For easier access, the admin settings are grouped into various high-level headings:

Admin Section
Admin Section
  • Automation: This section enables you to automate the certain actions of the technicians. You can configure the conditional values and actions against them. When the conditions match in a module, the system triggers the action.
  • Users: This section manages all the users and their roles in the system.
  • Organization: This section contains settings that are applicable across the system and are not module-specific.
  • Support Channels: This section manages all the communication of the system.
  • Request Management: This section manages the features and configurations related to the request module.
  • Service Catalog: This section manages the standard services so that the users can access them quickly.
  • Problem Management: This section manages the features and configurations related to the problem module.
  • Change Management: This section manages the features and configurations related to the change module.
  • Release Management: This section manages the features and configurations related to the release module.
  • Asset Management: This section manages the features and configurations related to the asset module.
  • Contract Management: This section manages the features and configurations related to the contract module.
  • Purchase Management: This section manages the features and configurations related to the purchase module.
  • Patch Management: This section manages the features and configurations related to the patch module.
  • Project Management: This section manages the features and configurations related to the project module.
  • Knowledge Management: This section manages the features and configurations related to the knowledge module.
  • User Survey: This section manages the collection of data of all the surveys.

Here, you can also search for the required tabs and the sub-tabs of the individual sections. For Example: If the sms keyword is searched on the Admin page, the sections containing the word sms in the sub-tabs will be highlighted as shown below.

Searching Sub-Tabs
Searching Sub-Tabs

Audit Trail

The Audit Trail tab displays the activity logs related to the task.

Audit Trail Tab
Audit Trail Tab

Adding Work Log

The Work Log tab allows the analysts to record the activities they performed (along with the time frame).

Work Log Tab
Work Log Tab

Here, you can view, add, edit, and delete the Work Log. You can also view the estimated time, total Work Log time, and the remaining time.

To add a Work Log,

  1. Click the Add Work Log button and a popup appears.
  2. Enter the following details:
    Parameter Description
    Technician Enter the Technician’s name.
    Start Date Select the start date and time when the work started.
    End Date Select the end date and time of the work when it got completed.
    Time Taken The system automatically calculates the time taken for the work based on the selected start and end date time.
    Description Type the details of the work.
  3. Once done, click Add, and the work log gets added.
Adding a Work Log
Adding a Work Log

Adding Comments

Comments section is available on the details popup in the second tab. Comments helps you to communicate with the audience. By commenting, you can highlight issues or ask questions. You can comment on any task whether it is Open, Closed, In progress or Resolved state.

Comments Tab
Comments Tab

Here, you can do the following:

  • Search Comments: Search the comments using the keywords. It is a simple search that matches your query with the comment body.
  • Sort Comments: Sort the comments from oldest to newest or vice versa. By default, the comments are arranged in the reverse chronological order.
  • Create Comments: Click on the comment icon to create a new comment as shown below. All the concerned persons (you and to whom the task is assigned) will get an email notification. You can also attach the files with the comment.
Adding a Comment
Adding a Comment
Note: Once a comment is added, it cannot be deleted.

Deleting a Task

Deleting is simply an activity of removing any task. A task can be deleted in two ways:

  • From Task List View: A particular task can be directly deleted using the Delete icon.
Delete from List Page
  • From View Task Details: On the details page, click on the Delete button.
Note: The delete button is available for tasks related to requests, problems, changes, and releases.
Delete from the Details Page

Updating a Task

When you are working on a ticket, you can update its basic details, parameters, other info, and various activities/actions associated with it. There are many approaches to update the tasks:

  • Update from the List Page
  • Update from the Details Page

Updating Tasks from the List Page

You can update the Task Type, Status, and Priority of the task from here.
To update the details:

  1. On the list page, click on the field, and a dropdown appears.
  2. Select the desired value and the status gets updated accordingly. Here, Task Type is updated.
Update from List Page

Update from Details Page

To update the task,
Click the edit icon and the page containing the pre-filled details appear.

Make the desired changes and click Update.

Edit Task
Edit Task