How to Configure a Switch Step by Step for a Secure, Stable Network
Why do switches that pass every bench test start dropping phones or failing audits weeks after go-live? Usually the hardware is fine. Someone missed a setting, left a port open or never saved a change.
Build order matters too. Access gets locked down first, and VLANs come before the ports that use them. Then treat the first build as day one, because every later change can pull a switch off its standard.
This guide walks through how to configure a network switch from the first console login to a hardened, verified and backed-up baseline. In this blog, you will see the decisions to make before typing a command, ten configuration steps (with the commands for each) and the checks that confirm the work. We also cover the mistakes behind most switch outages, and how to keep dozens of switches consistent once they're in production.
What is Switch Configuration?
Switch configuration (network switch configuration, in most vendor docs) is the full set of commands on a managed switch. Logins live there, and so do VLAN membership, uplinks and loop protection. If someone asks "why is port 12 on the guest VLAN?", the configuration has the answer.
Unmanaged switches skip all of it and forward traffic as shipped. Managed ones need configuring before they are useful on a business network, and they store that network configuration in two places:
Running configuration: Active settings in RAM; each command applies instantly and is gone after a reload or power cut
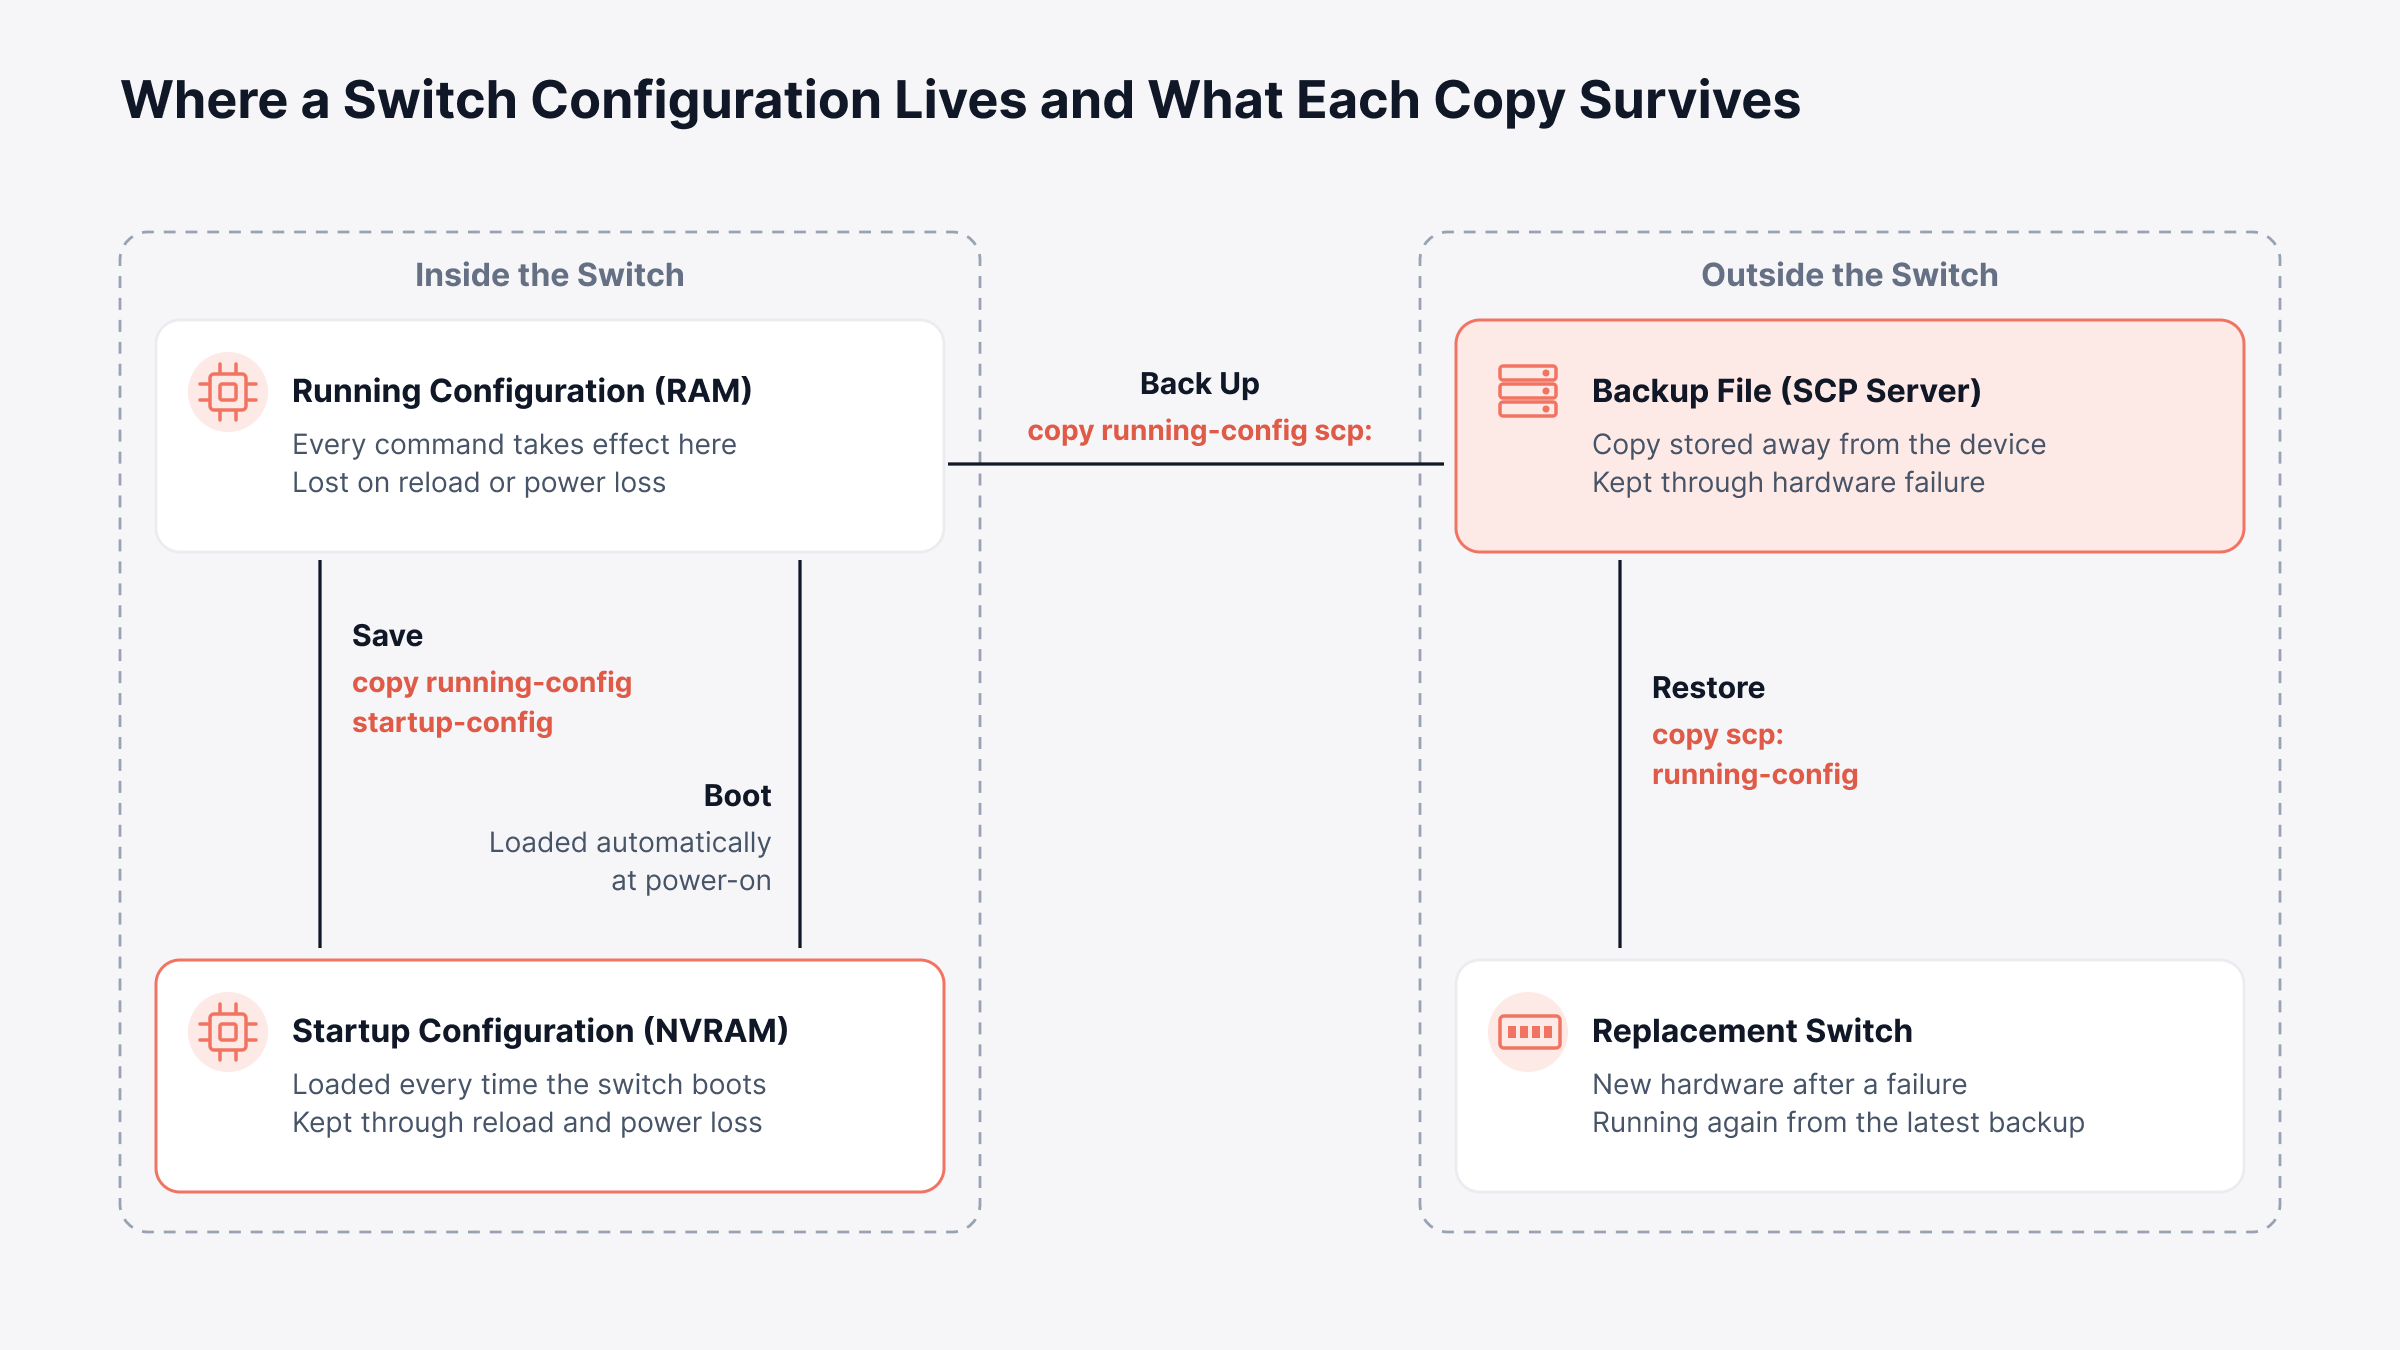
Startup configuration: The copy in NVRAM (non-volatile memory) that loads at boot. Changes only when you save
That split causes a familiar outage. Months go by without a save. Then a power cut forces a reboot, and the switch returns to an older configuration that nobody can account for.
Why Does Switch Configuration Matter to the Business?
Switch configuration matters to the business because the switch is the first hop for every laptop, phone and payment terminal. Get a setting wrong and the damage spreads downstream:
Service uptime: A floor, branch or store offline from one loop or unsaved change, with the cost of downtime hitting sales and support
Security exposure: Open ports, default passwords and Telnet still enabled
Audit readiness: Auditors want proof of secure settings and of who approved each change
Rollout speed and cost: One documented build, reused at every new site
A regional retailer opening 15 stores in a quarter shows the risk. Built from memory, store 4 goes live without its payment VLAN and store 9 has a guest port in the staff VLAN. Give every store the same planned and verified build, and the network becomes a predictable line item in each opening plan.
What are L1, L2 and L3 Switches?
L1, L2 and L3 switches take their names from the OSI model layer they work at. Layer 1 devices only repeat signals. Layer 2 switches forward frames by MAC address, and Layer 3 switches route between VLANs too.
Configuration effort grows with each layer:
Type | Works At | What It Does | Configuration You Do |
L1 (hubs, repeaters, media converters) | Physical layer | Repeats electrical or optical signals to every port | Little or none |
L2 switch | Data link layer | Forwards frames using MAC address tables | Set up management access, VLANs, trunks, spanning tree and port security |
L3 switch | Network layer | Routes IP packets between VLANs, on top of L2 forwarding | Add routing and VLAN gateway interfaces to the L2 work |
Layer 3 switches can act as the default gateway for every VLAN in a building. Inter-VLAN traffic then never has to travel up to a separate router.
How is a Managed Switch Configured Differently From an Unmanaged One?
A managed switch is configured through a management interface. Access, addressing, VLANs and security are all set there. An unmanaged switch has no settings at all and works the moment it gets power. Managed switches offer three ways in:
Command line interface: Console cable or SSH session; full control, and the method this guide uses
Web interface: A browser menu, common on small business models, with fewer options exposed
Cloud dashboard: Settings pushed from a vendor portal on cloud-managed switch lines
This guide covers how to configure a managed switch through the CLI, using Cisco IOS syntax (the most widely documented, and the style most Cisco switch configuration guides follow). Juniper, Aruba and other vendors use different keywords for the same jobs.
Any managed switch, set up any of these ways, can also report health and events to a central network management system. Step 9 sets that up.
What Should You Plan Before Configuring a Switch?
Planning before you configure a switch means deciding names, addresses, VLANs and security settings before anyone types a command. We recommend a one-page build sheet per site. It keeps VLAN numbers identical on every switch in the closet.
Agree on these before anyone opens a console:
Naming convention: Site, role, number (BR1-ACC-SW01 is access switch 1 at branch 1)
VLAN plan: Staff, phones, printers and guests, each with a VLAN number, a name and a port range
Management network: Its own VLAN and subnet. VLAN 1 stays unused
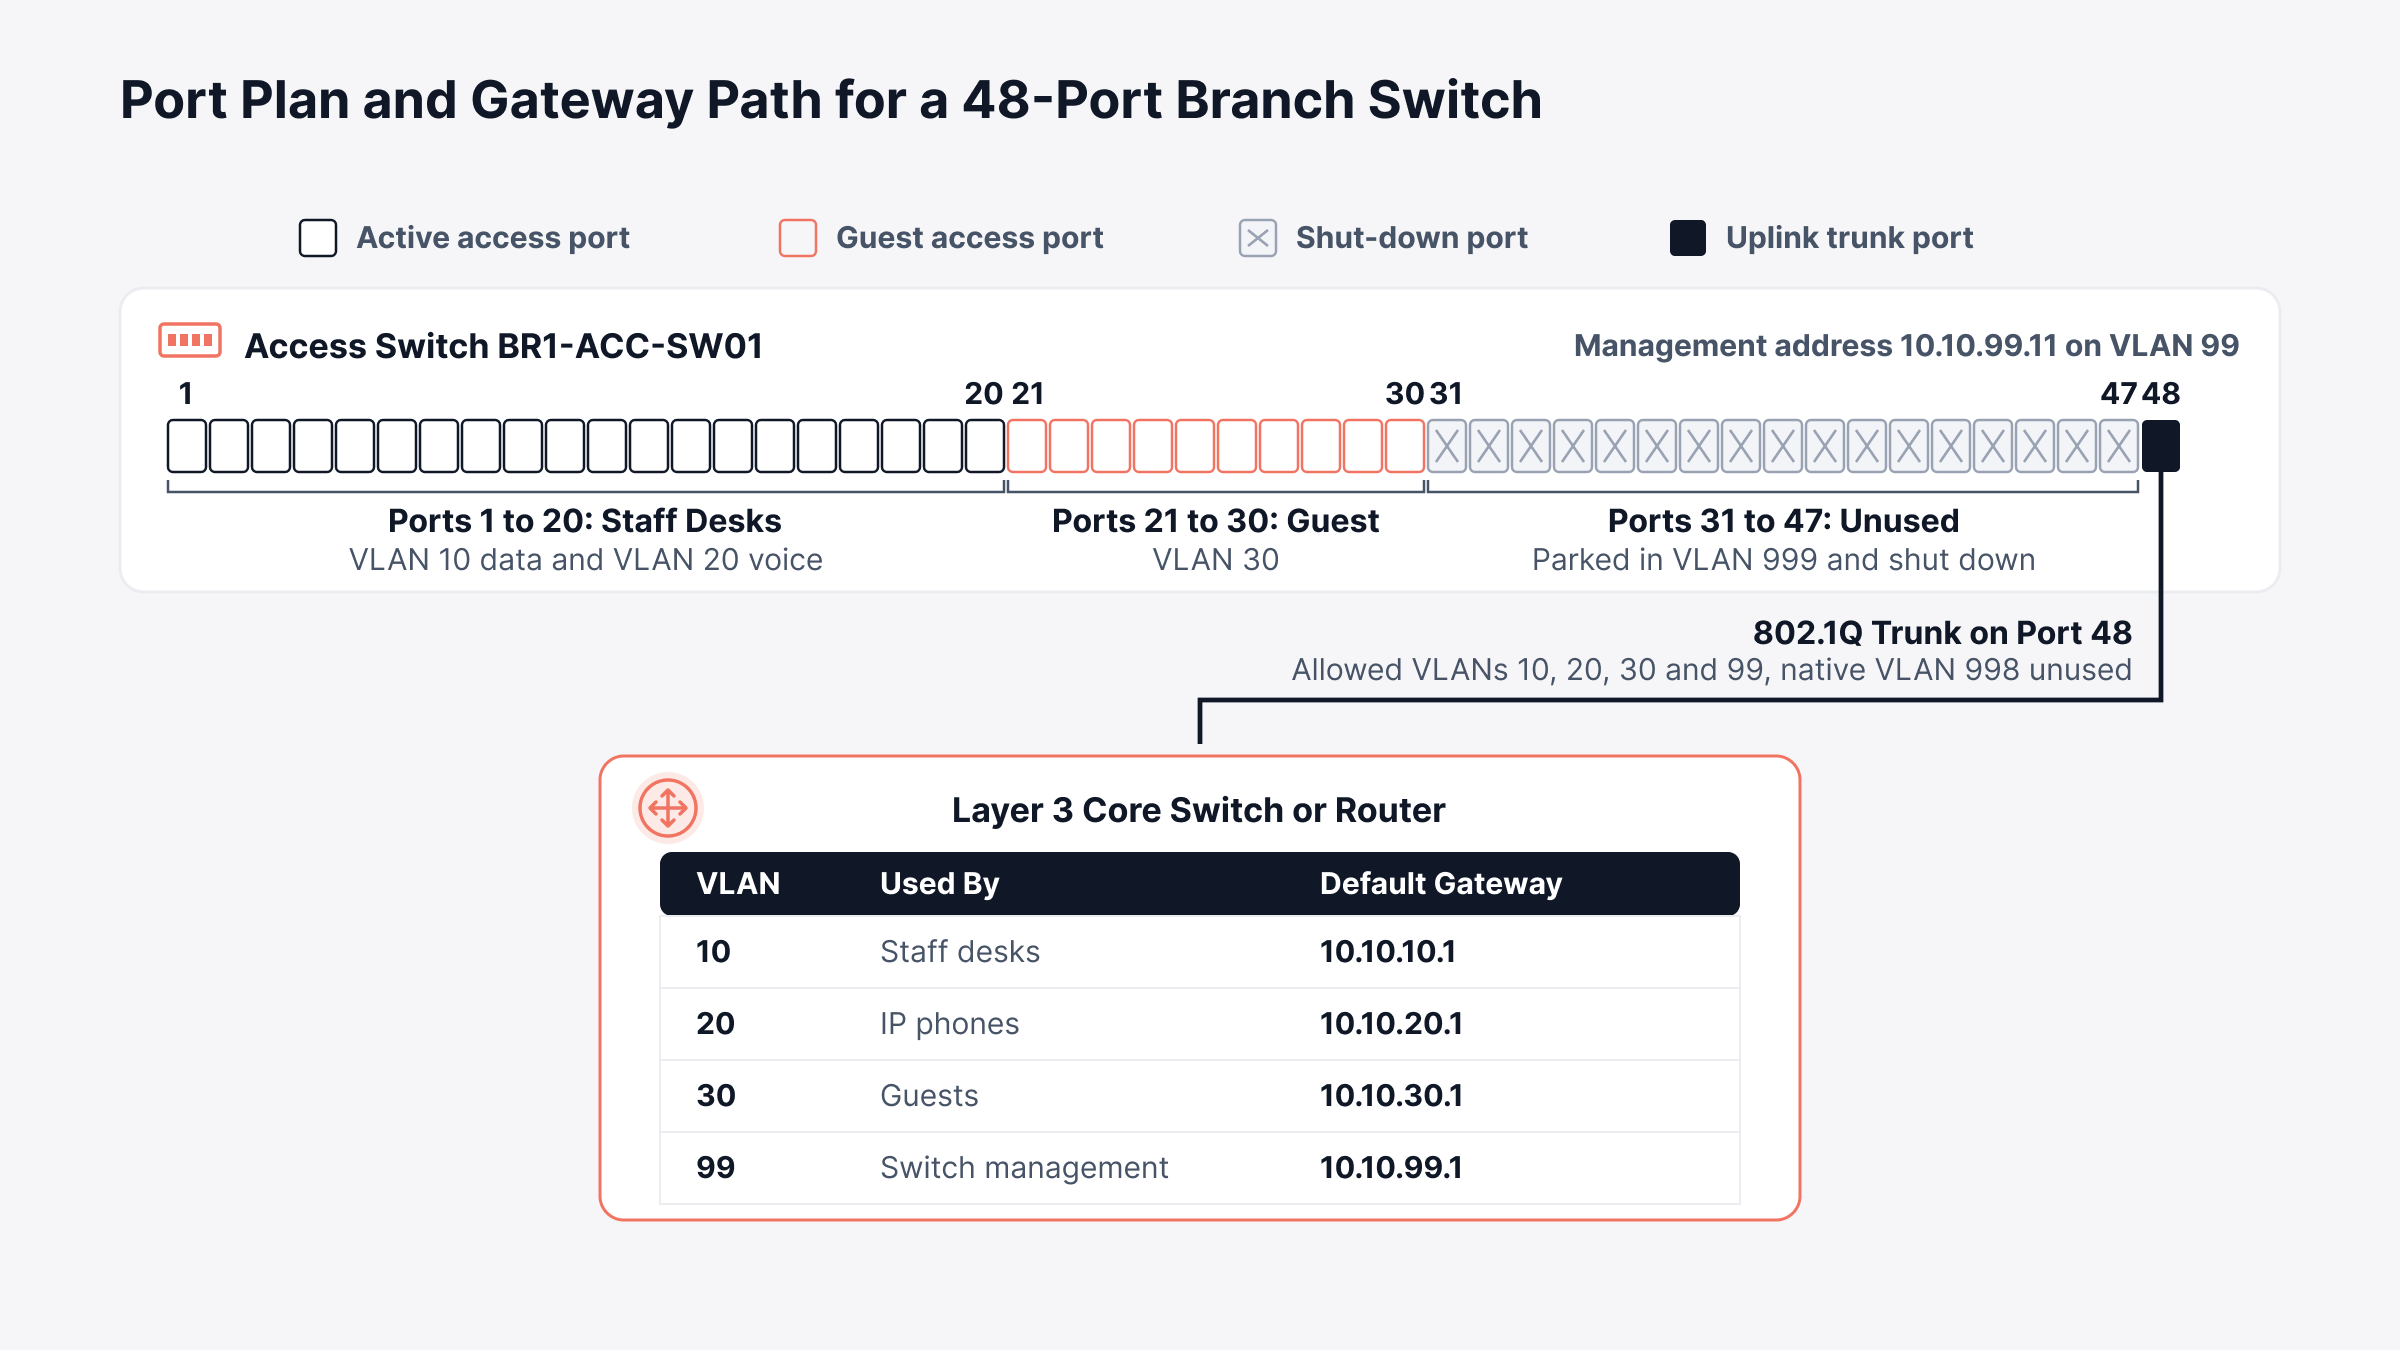
Uplinks and trunks: Every upstream port (port 48 here), with the VLANs it carries
Access and security: Local accounts at first, RADIUS or TACACS+ later. Banner wording agreed with legal
Shared services: Time server, syslog server, SNMP poller, backup target
Change ownership: Named approver, single source for the standard
Our examples use one hypothetical switch. It is a 48-port access model at a branch office: VLAN 10 for staff, 20 for voice, 30 for guests, 99 for management, port 48 up to the core. Sound boundaries here also give your wider network segmentation design a solid base.
What are the Steps to Configure a Switch?
To configure a switch, start at the console and finish with a save. Login security, the management address, VLANs, trunks, port protection and logging come in between, in that order. Steps 1 to 5 and step 10 alone give you the basic configuration of a switch; the switch configuration commands come with every step.
1. Connect to the Switch Console Port
First, the cable. Console ports are RJ-45 on most switches and USB on many newer models. The terminal settings rarely change: 9600 baud, 8 data bits, no parity, 1 stop bit and no flow control, in PuTTY, Tera Term or similar.
A new switch may offer an initial configuration dialog. Answer no; the manual steps give you full control. Then check the hardware and move into configuration mode:
Command | What It Does |
enable | Moves from user mode to privileged EXEC mode |
show version | Shows the model, operating system version and uptime |
configure terminal | Opens global configuration mode for changes |
end | Returns to privileged EXEC mode from any configuration mode |
Check the show version output while you are there. An outdated operating system is easier to upgrade now than after the build, when it costs another maintenance window.
2. Set the Hostname and Domain Name
Give the switch a name you will recognize in logs and monitoring tools. Add the domain name too; SSH key generation needs both.
Command | What It Does |
hostname BR1-ACC-SW01 | Names the switch using your naming convention |
ip domain-name example.com | Sets the domain used for SSH key generation |
3. Lock Down Local and Privileged Access
Default or blank passwords are the first thing an intruder on the internal network tries. Lock down privileged mode and the console before the switch is cabled to anything.
Command | What It Does |
enable secret STRONG-SECRET | Sets a hashed password for privileged EXEC mode |
username netadmin privilege 15 secret STRONG-SECRET | Creates a local admin account with full rights |
service password-encryption | Hides remaining plain-text passwords in the configuration |
line console 0 | Selects the console line |
login local | Local username and password required at the console |
exec-timeout 10 0 | Ends idle sessions after ten minutes |
banner motd #Authorized access only# | Shows a legal warning before every login |
One caution: Password encryption is weak, and it only masks older password types. The hashed enable secret and user secrets do the protecting. Bigger networks route admin logins through RADIUS or TACACS+ and tie every change to a named person.
4. Enable SSH Version 2 for Remote Access
Skip Telnet. Passwords cross it as readable text. SSH encrypts everything.
Command | What It Does |
crypto key generate rsa modulus 2048 | Creates the RSA key pair, 2048 bits |
ip ssh version 2 | Accepts only the more secure SSH version 2 |
line vty 0 15 | Selects the remote login lines |
transport input ssh | Accepts SSH on those lines and refuses Telnet |
login local | Checks remote logins against local accounts |
Line counts vary by model; some switches use line vty 0 4. Cover every line the switch has. Miss one and Telnet stays open there.
5. Configure the Management VLAN, IP Address and Default Gateway
The management IP is how you reach the switch over the network; the default gateway is how it answers admins on other subnets. Both go on the management VLAN from your plan, with the address and subnet mask assigned to that VLAN.
Command | What It Does |
vlan 99 | Creates the management VLAN |
name MGMT | Labels VLAN 99 for management traffic |
interface vlan 99 | Opens the virtual interface for the management VLAN |
ip address 10.10.99.11 255.255.255.0 | Management IP of 10.10.99.11/24 |
no shutdown | Brings the management interface up |
ip default-gateway 10.10.99.1 | Default gateway for the switch itself |
Those six lines are how to configure the default gateway on a switch working at Layer 2. A routing-enabled Layer 3 switch ignores ip default-gateway; give it a default route (ip route 0.0.0.0 0.0.0.0 10.10.99.1).
One more detail: The management interface stays down until an active port carries VLAN 99. In this build, that happens in step 7, when the uplink trunk comes up.
6. Create VLANs and Assign Access Ports
Next come the VLANs, and this is how to configure VLANs on a switch. Guests get their own VLAN (a separate broadcast domain), staff get another and phones a third.
Command | What It Does |
vtp mode transparent | Stops the switch from accepting VLAN updates from other switches |
vlan 10 | Creates the staff VLAN |
name STAFF | Labels VLAN 10 for staff devices |
interface range gigabitethernet1/0/1 - 20 | Selects ports 1 to 20 in one step |
description STAFF-DESK | Labels the ports so the next engineer knows their purpose |
switchport mode access | Locks the ports to access mode |
switchport access vlan 10 | Staff VLAN on these ports |
switchport voice vlan 20 | Adds a voice VLAN for IP phones |
We set VTP (VLAN Trunking Protocol) to transparent on purpose. A neighbor with a newer VLAN database can't overwrite this one. VLANs 20 and 30 go in the same way, and you configure switch ports 21 to 30 as guest ports.
Hard-code access mode. A negotiating port can end up trunking to a desk device that should never see other VLANs. Leave speed and duplex on auto; mismatches show up as slow links with error counters climbing.
7. Configure Trunk Ports Toward Other Switches and Routers
Uplinks become trunks. One cable then carries several VLANs, with an 802.1Q tag (a small VLAN label, named after its IEEE standard) on each frame.
Command | What It Does |
interface gigabitethernet1/0/48 | Selects port 48 |
switchport mode trunk | Turns it into a trunk |
switchport trunk native vlan 998 | Native VLAN moved to 998, an empty VLAN |
switchport trunk allowed vlan 10,20,30,99 | Permits only VLANs 10, 20, 30 and 99 |
switchport nonegotiate | No DTP trunk negotiation |
Older switches that offer two encapsulations want switchport trunk encapsulation dot1q before anything else. A native VLAN mismatch between the two ends is the classic trunk fault. Untagged traffic lands in the wrong VLAN.
Router on a stick uses the same trunk. For how to configure a switch to a router that holds each VLAN's gateway, keep the trunk above and give the router one subinterface per VLAN:
Command | What It Does |
interface gigabitethernet0/0.10 | Creates a router subinterface for VLAN 10 |
encapsulation dot1Q 10 | Links the subinterface to VLAN 10 tags |
ip address 10.10.10.1 255.255.255.0 | Gateway address for VLAN 10 users |
A Layer 3 core switch can do this instead, with ip routing and one VLAN interface per gateway. Either way, each VLAN gets exactly one gateway address.
8. Protect Access Ports and Shut Down Unused Ones
Spanning Tree Protocol blocks redundant paths. One cable plugged into two wall jacks then can't turn into a broadcast storm that takes down a whole floor. Port security caps how many devices can connect through one jack.
Command | What It Does |
spanning-tree mode rapid-pvst | Switches to Rapid PVST+ (faster per-VLAN spanning tree) |
interface range gigabitethernet1/0/1 - 30 | Selects the user-facing access ports |
spanning-tree portfast | Lets user ports start forwarding without the usual delay |
spanning-tree bpduguard enable | Shuts a user port that receives spanning tree messages from a switch |
switchport port-security | Port security on |
switchport port-security maximum 3 | Room for a PC plus an IP phone (phones can show up in both VLANs) |
switchport port-security violation restrict | Drops traffic from extra devices and logs the event |
storm-control broadcast level 1.00 | Caps broadcast traffic at 1% of port bandwidth |
We keep PortFast and BPDU Guard on desk ports only. An uplink with PortFast skips the loop checks between switches. That is exactly where loops start.
Unused ports are an easy way in for a device nobody approved. Park them in a VLAN of their own, label them and shut them until someone files a request.
Command | What It Does |
interface range gigabitethernet1/0/31 - 47 | Selects the unused ports |
switchport mode access | Prevents the ports from forming trunks |
switchport access vlan 999 | Moves the ports into an unused parking VLAN |
description UNUSED | Labels the ports for the next engineer |
shutdown | Disables the ports until someone requests one |
Pause here and compare the switch with your VLAN plan. The diagram below maps all 48 branch switch ports to their VLANs and follows the trunk to each VLAN's gateway.
9. Set Up Time Sync, Syslog and SNMPv3 for Observability
Three things make a switch observable: Accurate time, central logs and secure polling. Clocks come first. Without NTP (Network Time Protocol), log lines from two switches won't line up during an investigation.
Command | What It Does |
clock timezone UTC 0 | Uses one timezone across all devices |
ntp server 10.10.99.5 | Points the clock at the internal NTP server |
service timestamps log datetime msec | Adds date and millisecond time to each log entry |
logging host 10.10.99.20 | Sends log messages to the central syslog server |
snmp-server group NMS-RO v3 priv | SNMPv3 group, encryption required |
snmp-server user nms-poller NMS-RO v3 auth sha AUTH-KEY priv aes 128 PRIV-KEY | Monitoring account with SHA authentication and AES encryption |
Central logging matters the day someone types "clear logging" on the switch; the syslog server still has every line. Older SNMP versions used plain community strings. SNMPv3 adds authentication and encryption, and your observability platform still gets interface, CPU and error data.
10. Save the Switch Configuration and Back It Up
Saving copies the running configuration into startup memory, and it survives a reload. A backup goes further: A copy off the switch, often on a secure copy (SCP) server, that survives a hardware failure too.
Command | What It Does |
copy running-config startup-config | Saves the active configuration to NVRAM |
write memory | Older shortcut that performs the same save |
copy running-config scp: | Sends a copy to an SCP server off the switch |
Keep two copies, one in NVRAM and one on a server. The diagram below traces where each lives, the command that creates it and the failures it survives.
Manual copies work for five switches. At fifty, scheduled network backup jobs are the practical option, and the age of the newest copy decides how fast a failed switch comes back.
Which Commands Verify a Switch Configuration?
Verifying a switch configuration means running show commands before the switch carries production traffic. Each one confirms a setting is active; a step that looked fine at the prompt can still fail in practice.
Run these from privileged EXEC mode:
Command | What It Tells You |
show running-config | Lists every active setting |
show startup-config | Shows what loads after a reboot |
show vlan brief | Lists VLANs and their access ports |
show interfaces trunk | Shows trunk ports, native VLAN and allowed VLANs |
show ip interface brief | Shows each interface address and whether it is up |
show ip ssh | Confirms SSH is on and which version runs |
show spanning-tree summary | Shows the spanning tree mode and protection defaults |
show port-security | Lists secured ports, device limits and violations |
show ntp status | Clock sync state |
Then test the switch the way users will. SSH in from the management VLAN; Telnet should be refused. Ping the gateway, plug a laptop into one port per VLAN, and use our troubleshooting guide if anything breaks.
Can You Configure a Switch in Cisco Packet Tracer?
You can configure a switch in Cisco Packet Tracer with the same IOS commands shown here. Packet Tracer is Cisco's free network simulator. Add a switch and a PC, link them with a console cable, then open the PC's terminal.
It is useful for rehearsing a VLAN plan before a cutover. Some commands won't behave the way they do on hardware, though, since Packet Tracer emulates only part of IOS.
What are the Most Common Switch Configuration Mistakes?
The most common switch configuration mistakes are small omissions. Each one works on day one and causes an outage or a security gap later. Post-incident reviews keep finding the same ones:
Changes left unsaved: New work in running config, old work in startup, and a reboot that wipes the difference
Management left on VLAN 1: Switch login one hop from any user port
Native VLAN mismatch: Two trunk ends, two different untagged VLANs, and traffic in the wrong segment
PortFast on an uplink: Loop protection skipped exactly where loops form
Trunks that allow every VLAN: A fault in one VLAN reaching switches that never needed it
A VTP update from an old switch: A spare from storage, carrying a higher revision number, overwrites its neighbors' VLAN lists
Clocks out of sync: Logs from different switches that can't be matched, and a much slower trace
Watch the neighbors too. These faults often surface on a different switch, and continuous switch monitoring flags the early signs (spanning tree topology changes, interface errors on the rise).
Why is Keeping a Switch Configuration Correct Harder Than Building It?
Keeping a switch configuration correct is harder than building it. The build happens once; changes happen every week. A VLAN added for an urgent ticket, a port opened for a contractor: Neither one tends to reach the documentation.
Outage data puts a number on it. According to Uptime Institute's Annual Outage Analysis, IT and networking issues made up 23% of impactful outages in 2024; the report tied the rise to change management problems and misconfiguration. A few configuration management habits keep that risk down at any scale:
Keep one golden configuration per switch role: An approved template each for access, distribution and core switches, copied by every new build
Back up on every change and on a schedule: A copy after each approved change, plus scheduled copies for the changes nobody announced
Compare against the baseline: Scheduled diffs that catch drift early
Approve risky changes before they run: A second sign-off on restores and firmware upgrades
Check compliance continuously: SSH on, Telnet off, spare ports shut, every week
All of this is easy to describe and hard to sustain with a terminal and a spreadsheet. A careful engineer can manage ten switches. Across hundreds, undetected configuration drift grows faster than anyone can review it.
How does Motadata ObserveOps Keep Switch Configurations Consistent?
Motadata ObserveOps keeps switch configurations consistent through its Network Configuration and Compliance Management (NCCM) module. Backups, comparisons, approvals and compliance checks for every switch run from one place, and we built NCCM around the same lifecycle this guide describes. That way, the work from steps 1 to 10 stays correct after go-live.
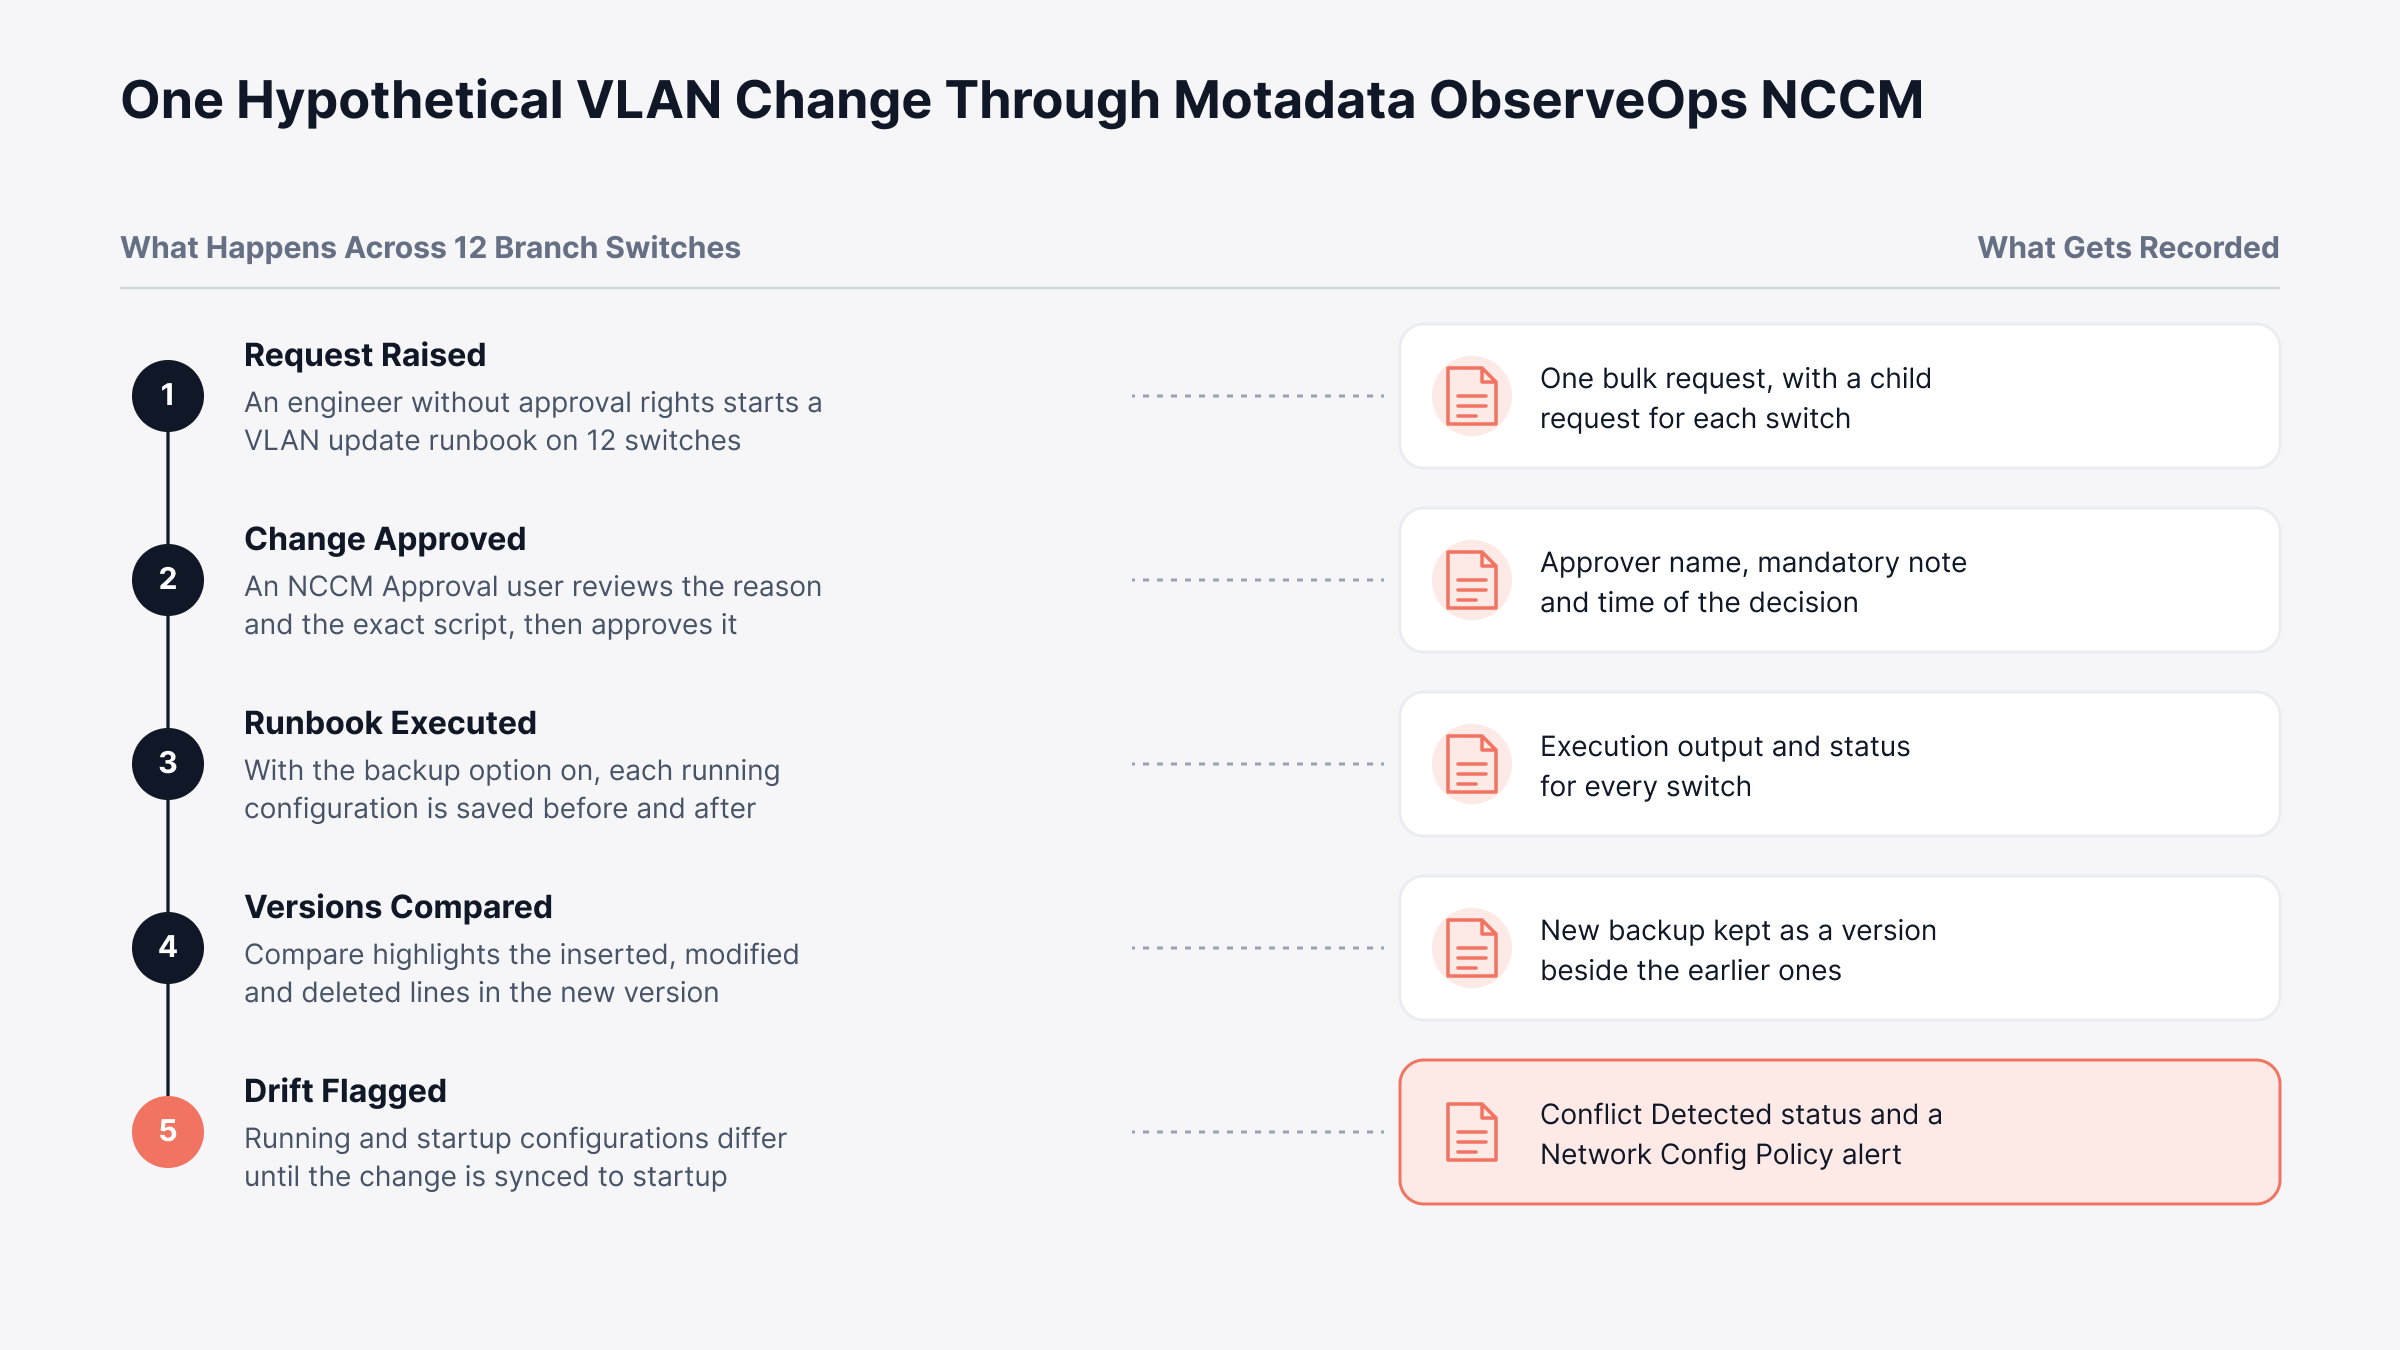
Every switch change should leave a record you can show an auditor, from the request to the final state of the device. The diagram below follows one hypothetical VLAN update across 12 branch switches and shows what each stage records.
1. Device Templates That Match Each Switch Model
Each switch gets a device template, matched by its system object identifier (OID), the model ID the device reports. The template holds the exact commands, prompts and timeouts for backing up running and startup configurations, restoring, syncing and reading hardware details. For commonly supported Cisco devices, a suitable template may already be in place.
Other models need a custom template: Vendor, OS type, protocol and commands. That keeps Cisco switch configuration and every other vendor in one workflow, and our page on Cisco switch management shows the Cisco families covered.
2. Scheduled Configuration Backups and Side-by-Side Comparison
We back up running and startup configurations weekly or monthly on a schedule, or on demand with Backup Now across many switches at once. Each backup becomes a version, and a storage profile can send a copy to an external destination too.
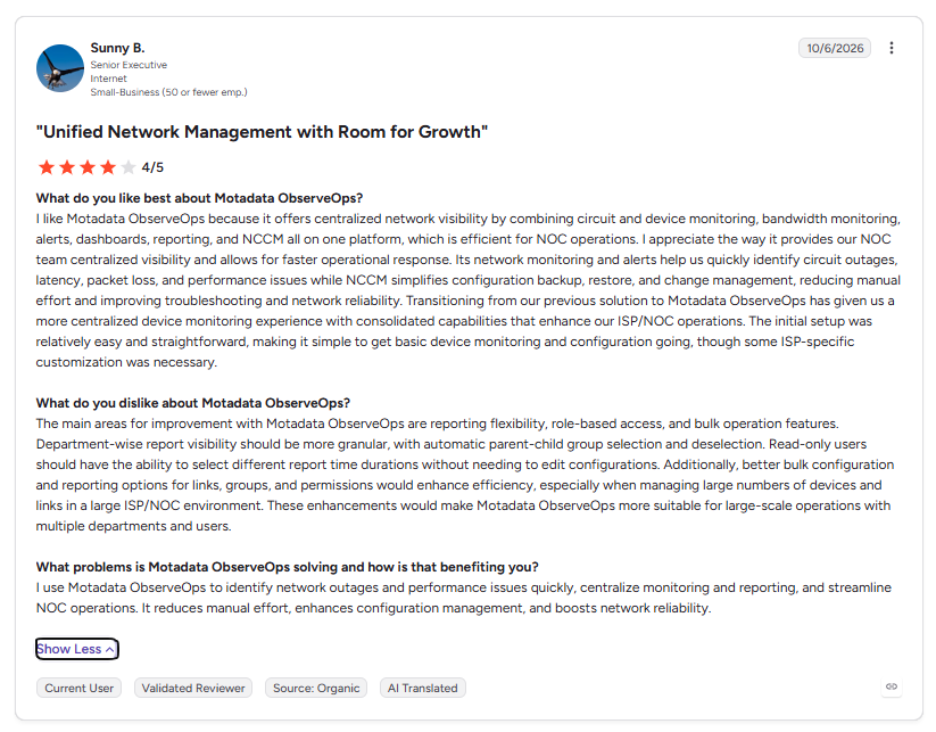
This is what one of our customers says about Motadata ObserveOps on G2.
Compare then puts two versions side by side, with inserted, modified and deleted lines highlighted. Any version can be set as the baseline; a restore rolls a switch back to its baseline or its latest version.
3. Alerts When Running and Startup Configurations Drift Apart
The unsaved-change problem from step 10 gets its own signal. If running and startup configurations stop matching, NCCM Explorer marks the switch Conflict Detected and opens a comparison of the two files.
A Network Config Policy turns that into an alert. It fires on baseline-to-running or startup-to-running conflicts and on failed backups, at Critical, Major or Warning severity. With syslog integration on, changes are picked up within moments of being made, and scheduled checks become a backstop.
4. Approvals Before Restores, Syncs and Firmware Upgrades
Take a junior engineer (a user without approval rights) queuing a restore on a core switch. With the NCCM Approval role we built, that restore waits for a senior engineer's sign-off, and so do syncs, runbook runs and firmware upgrades. The approver sees who asked, why and the exact change, and has to leave a note either way.
Approver name, timestamps and each device's output all go into the record. Auditors usually ask two things about a switch change: Who approved it, and what did it do? This record answers both.
5. Runbooks and Compliance Rules for Fleet-Wide Fixes
Runbooks handle the repeat jobs. One run can push new interface descriptions or updated SNMP settings to dozens of switches, with an optional backup of the running configuration before and after. For repetitive changes, that is how network change automation replaces switch-by-switch SSH sessions.
Compliance checks work from rules such as "SSH version 2 is enabled" or "no Telnet on remote login lines". Rules are grouped into benchmarks and run on a schedule; each run returns pass or fail per rule with an overall score. A failed rule can be fixed with its attached runbook, and the whole setup supports configuration compliance against benchmarks aligned with CIS, HIPAA and SOX.
6. Switch Health, Logs and Topology in One Observability Platform
Configuration is only half the picture. We also observe the switches themselves; for Cisco switches, that covers VLAN status and member ports, spanning tree blocking ports and topology changes, interface errors and discards, plus CPU, memory, temperature, fans and power supplies.
Syslog messages from the same switches can be collected, parsed and searched in ObserveOps log management. Topology mapping draws Layer 2 links from CDP, LLDP and switch port mapping. After an engineer pushes a change, the configuration comparison, the interface errors and the log entries that follow can be reviewed in one place, as our switch management page shows.
Move From One-Off Switch Builds to Approved, Backed-Up Configurations With Motadata ObserveOps
Switch configuration rewards order and discipline: Plan, secure access, build VLANs and trunks, protect the ports, verify, then save in two places. After go-live, manual changes, unsaved sessions and missing backups slowly pull switches away from their standard.
No configuration platform, ours included, can decide your VLAN plan or security policy; that judgment belongs to the engineers who know the site. What Motadata ObserveOps does is hold every switch to the baseline those engineers approved, with backups, comparisons, approvals, compliance checks and switch observability in one place. Our NCCM setup guide is the place to start.
FAQs
What is the basic configuration of a switch?
A basic switch configuration sets a hostname, secures console and privileged access, enables SSH, assigns a management IP address and default gateway, creates VLANs and assigns ports, then saves the result to startup memory. Most organizations also add time sync, central logging and SNMPv3 so the switch can be monitored.
How do I configure a managed switch for the first time?
Connect a console cable, open a terminal at 9600 baud and decline the setup dialog if it appears. Then set the hostname and passwords, enable SSH, give the switch a management address, create VLANs, confirm each setting with show commands and save the configuration before connecting user devices.
How do I configure the default gateway on a switch?
On a Layer 2 switch, enter global configuration mode and run ip default-gateway followed by the router's address on the management subnet. On a Layer 3 switch with routing turned on, that command is ignored, so add a default static route that points to the next-hop address instead.
How do I connect and configure a switch to a router?
Configure the switch port facing the router as an 802.1Q trunk that allows only the required VLANs. On the router, create one subinterface per VLAN with matching dot1Q encapsulation and an IP address that becomes that VLAN's default gateway, then test by pinging hosts across VLANs.
How often should switch configurations be backed up?
Back up after every approved change and on a regular schedule, so a recent copy exists even when a change goes unannounced. Platforms such as Motadata ObserveOps schedule backups, keep running and startup versions and flag when the two no longer match, which exposes unsaved changes before a reboot does.
Author
Poonam Lalani
Content Strategist
Poonam Lalani is a B2B content strategist and writer with a background in computer engineering and experience across enterprise technology domains, including AI, cloud, DevOps, data engineering, and IT operations. She specializes in creating research-driven content that simplifies complex ideas and supports product education, thought leadership, and business growth.