Motadata Docs

Creating a Service Catalog Template

A Service Catalog Template allows you to define a service. You can define a Template in a particular Service Category. A Template is defined with respect to the following:

  • Form fields that will capture the custom data.
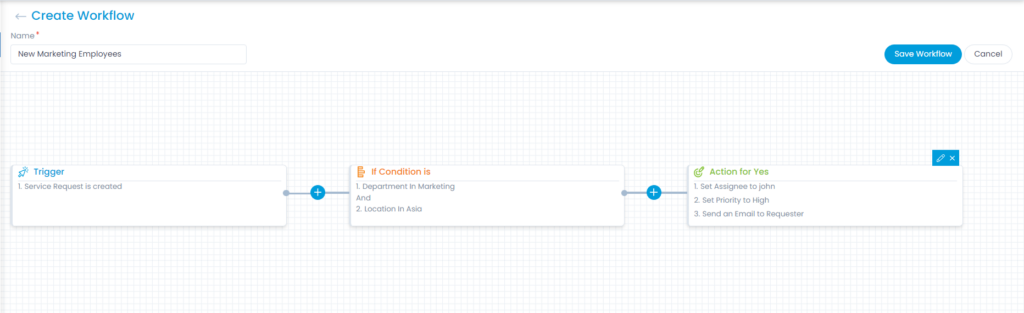
  • Specific workflow to automate the handling of the life-cycle of the Requests created using the Template.
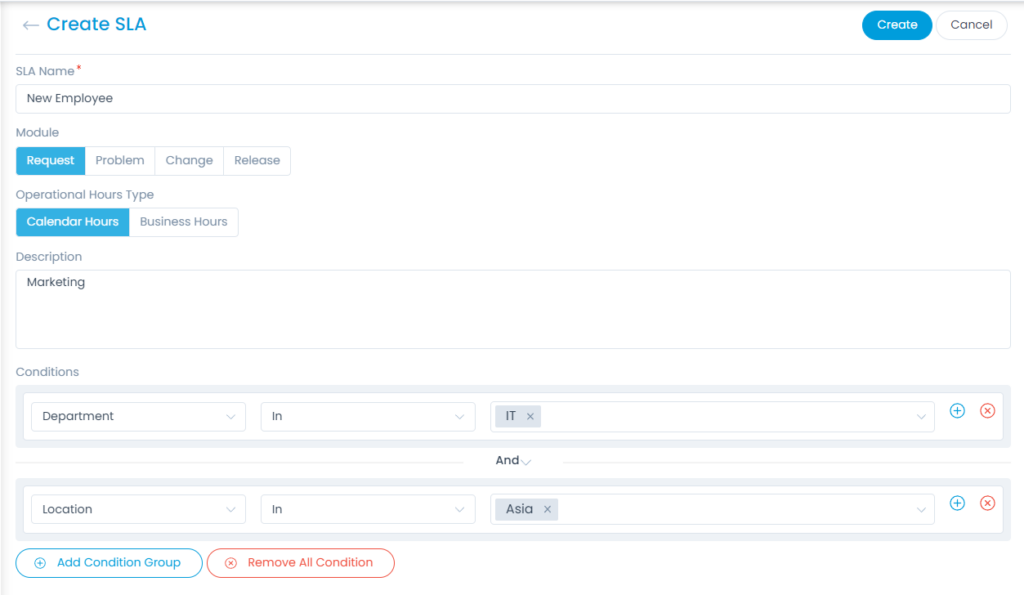
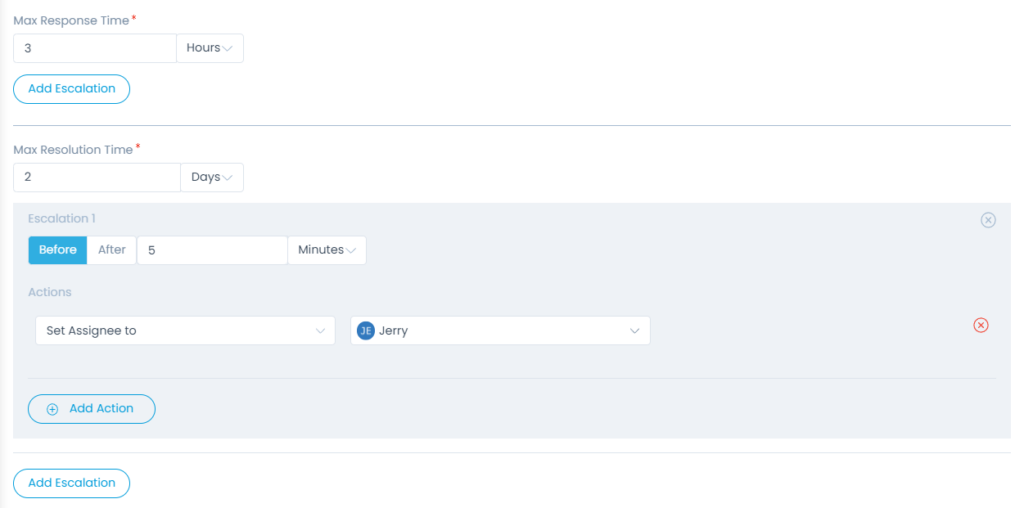
  • Specific SLA to control the response and resolution time, and escalation.
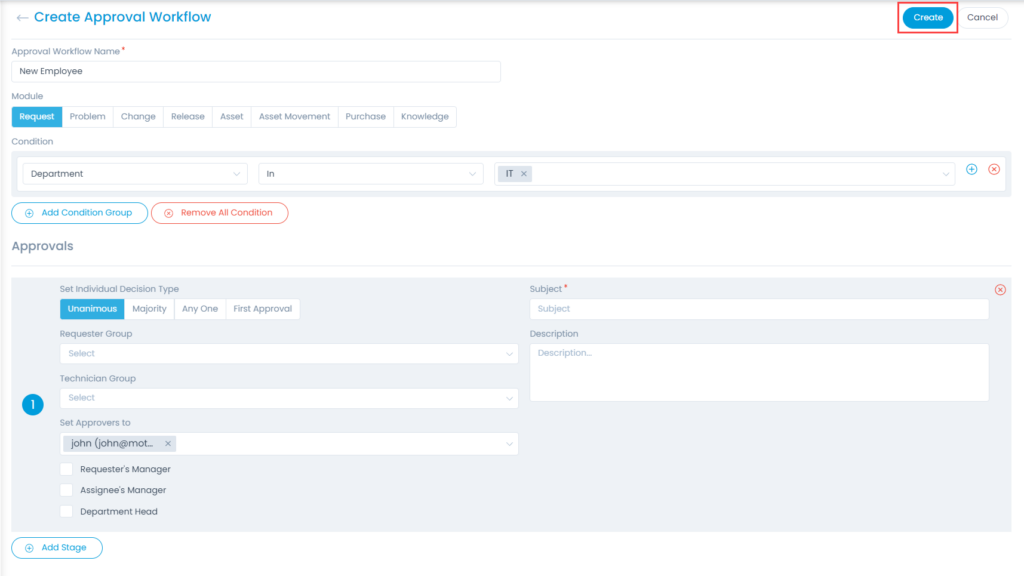
  • Specific Approval workflow to add supervision.
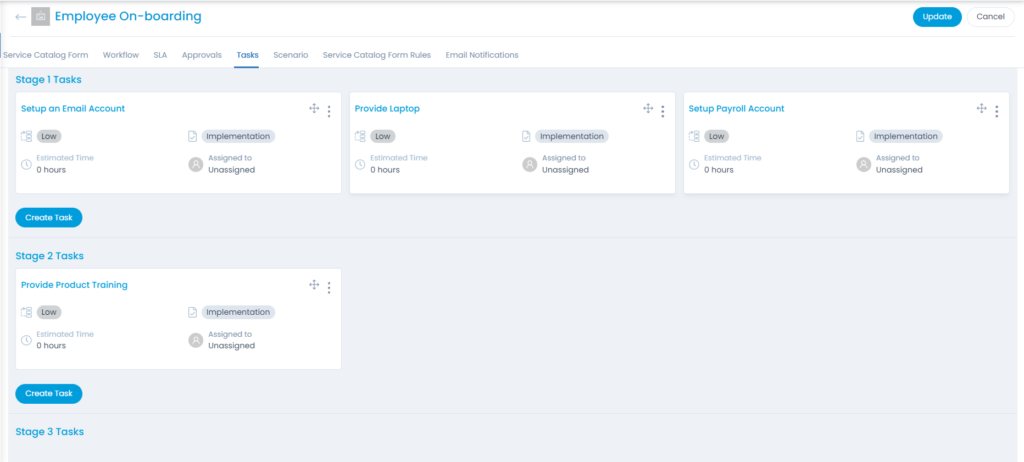
  • Create associated task for Requests using the Template.
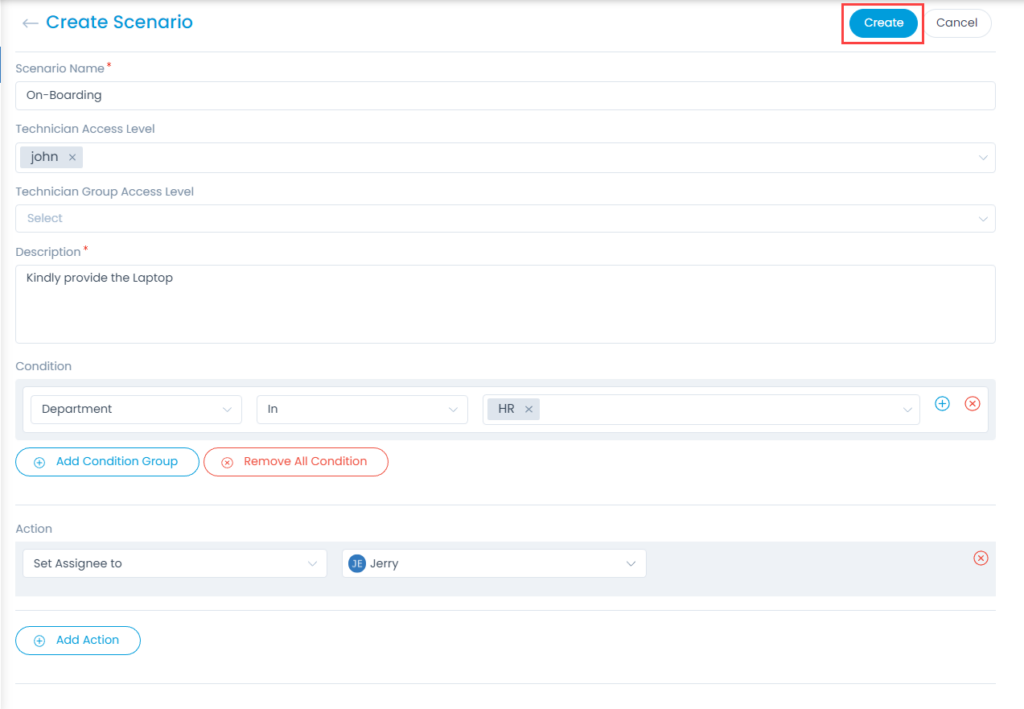
  • Create scenario to perform a task for requests using the Template.
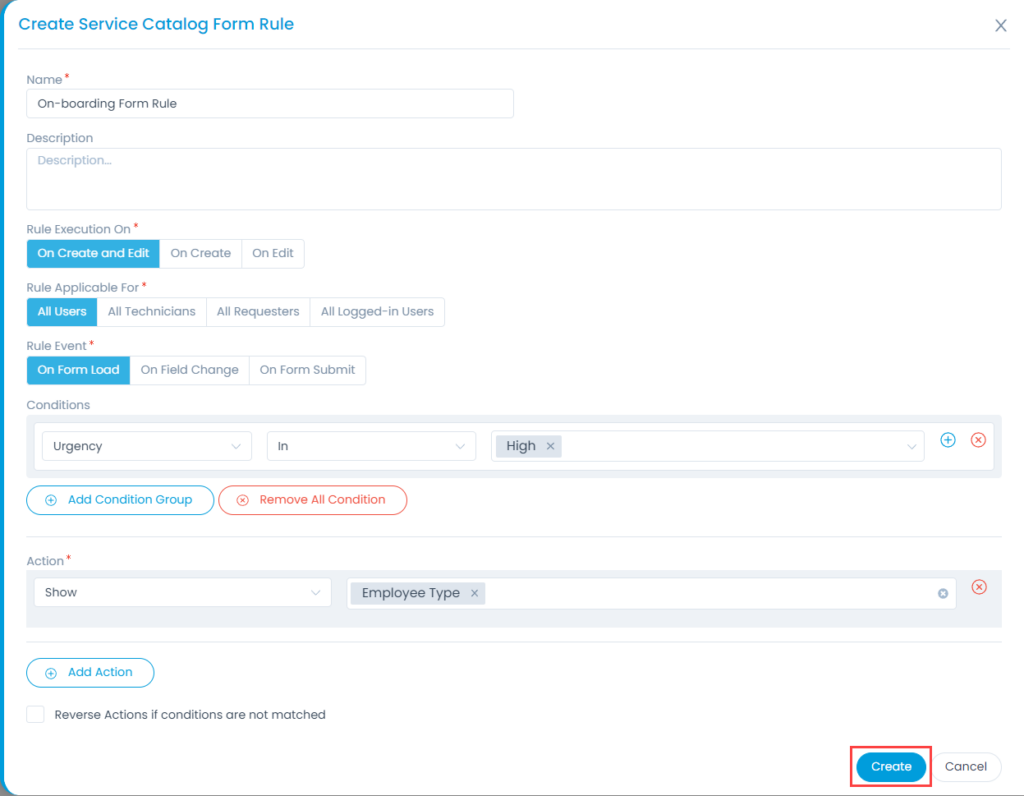
  • Form rules that will show/hide, mandate/non-mandate, enable/disable the required fields in the service catalog form.
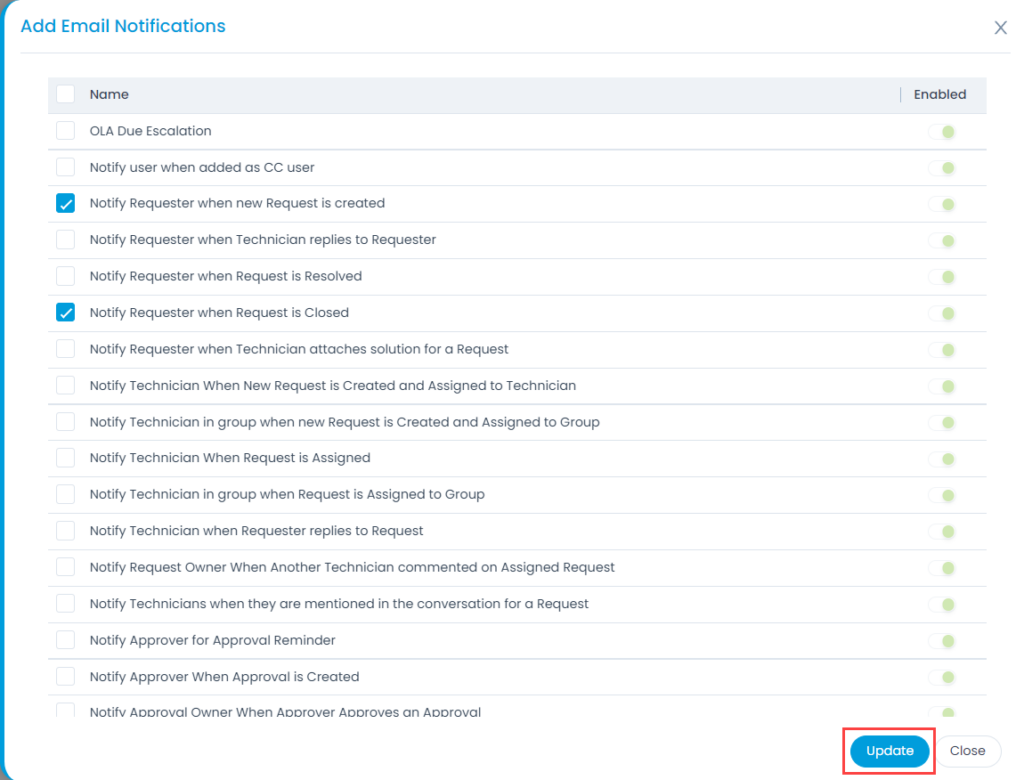
  • Specific Email Notification for Requests using the Template.

For Example: A Template called On-Boarding is used to create a Service Item. The HR department will use this to create a Service Request for the on-boarding of new employees in the Marketing department. Learn about the Use Case.

Service Catalog Form

You can create a Service Catalog Form by dragging and dropping the required fields on the form from the left sidebar.
The tab displays two types of fields:

  • Custom Fields: These are the fields that can be added, edited, renamed, and removed from the form if not required. For more details on the fields, refer to the link Request Form.
  • System Fields: These are the fields that cannot be renamed. But, you can add, edit, and remove them. Once these fields are used, they are not available in the pallet for reuse.
Service Catalog Form

Once the fields are added to the form, you can re-order, expand/collapse the width, create a duplicate field based on the existing ones, edit, or remove them if required. The duplicate field option is available only for the custom fields.

Workflow

Workflow automation enables the Administrators to channel tickets through a funnel with the predefined rules. Administrators set the rules that interact with the ticket details (Department, Type, Support Level, etc.) and even change them if required.

Implementation Behavior:

  • The Workflow created here will work specifically for Requests created using an On-Boarding Template.
  • The Workflow created here works parallel with the generic in Admin. Both the Workflows might get initiated together and perform their own actions after checking their conditions.
  • The Template Workflow is initiated based on the Trigger Event of a workflow.

Here, clicking on the Workflow tab, displays all the Workflows specific for that Template, if any. To add a new Workflow, click on the Create Workflow button, and the page appears.

Enter a name for the Workflow, add trigger events, add conditions, and select actions. For more details, refer to the link Create Workflow.

Create Workflow
Create Workflow

The above Workflow will work on the Service Requests satisfying the parameters: Department equals to Marketing and Location equals to Asia.
The following actions are taken when a Request satisfies the parameters:

  • Request is assigned to a Technician.
  • Priority is set to High.
  • An Email is sent to the Requester.

SLA

Service Level Agreements (SLAs) define the commitment between Requestors and the IT service provider in an organization. SLAs determine the level of urgency, response time, and the time required for the tickets to get resolved. They also govern the escalation rules when tickets are not resolved or responded within a stipulated time frame. SLAs can be set for a department and a sub-department.

Implementation Behavior:

  • An SLA created here will work specifically for Requests created having the On-Boarding Template.
  • Template SLA will decide the Response and Resolution time of Requests created using the On-Boarding Template.
  • The system SLA will not work along with the Template SLA.

Click the SLA tab and a list of already created SLAs specific to the template will appear, if any. To create an SLA, click on the Create SLA button, and the page appears.

Enter the Name, set Operational Hours Type and Description. Set the condition as Department no equals to IT and Location equals to Asia. For more details, refer to the link Create SLA.

SLA Conditions
SLA Conditions

Then set the Maximum Response and Resolution Time, and Escalation in case of violation. Here, the Maximum Response time is set as 3 hours. The Maximum Resolution time is set as 2 days and on violation the assigned Technician is changed.

SLA
SLA

Approvals

The Approval Workflow helps to automate the Approval process for a Request. An Approval Workflow, when initiated, creates an Approval and adds approvers to it.

Implementation Behavior:

  • An Approval Workflow created here will work specifically for Service Requests created using the On-Boarding Template.
  • The generic Approval Workflow in Admin does not work in Requests created using a Service Item.

Click the Approvals tab and a list of existing Approval Workflows specific to the Template will appear. To create an approval, click on the Create Approval Workflow button and the page appears.

Enter a name, add condition(s), and set approvers in the Approvals section. For more details, refer to the link Create Approval Workflow.

Approval Workflow
Approval Workflow

Any Request (made using the template) having the Department IT will have the below output:

  • A single stage Approval will be created and the stage of the Approval will have a single Approver.

Tasks

You can pre-define tasks that will be added to the Request. You can break the tasks stage wise; meaning tasks at one stage has to be completed to move to another stage. You can add tasks up to 5 stages.

Click the Task tab and a list of already created tasks will appear. To create a task in stage 1, click the Create Task button in the same section and a side popup appears.

Enter the Name, Assigned To, Task Type, Technician Group, Priority, Notify Before, Estimated Time, and Description. For more details on fields, refer to the link Creating a Task.

Tasks
Tasks

You can create five stages (you define a stage by adding a task to it) with each having one task.

Notes:

  • The Task thread created here will not be disturbed by a Task created manually in the Request.
  • Tasks of one stage is visible at a time.

Scenario

You can create scenarios specifically for Requests created using the Template. A scenario is a set of actions when applied that can modify a ticket. You can create n number of scenarios in a template each with its own set of conditions.

Click the Scenario tab and a list of already created scenarios will appear. To create a Scenario, click on the Create Scenario button and the page appears.

Enter the Scenario Name, Technician Access Level, Technician Group Access Level, Description, Condition, and Action. For more details on fields, refer to the link Create Scenario.

Create Scenario
Create Scenario

Service Catalog Form Rules

The Service Catalog Form Rules enable you to make fields mandatory/non-mandatory, show/hide, or enable/disable based on certain conditions in the Service Request Form.

Click the Service Catalog Form Rules tab and a list of already created form rules will appear, if any. To create a form rule, click on the Create Service Catalog Form Rule button and a side popup appears.

Enter the Name, Description, set the required configurations, and click Create. For more details on the fields, refer to the link Request Form Rule.

Create Service Catalog Form Rule

Email Notifications

You can add the email notifications specific for service requests created using the template. These are the default email notifications that can be added, modified as per requirement, and used in the template.

Click the Email Notifications tab, and a list of already added notifications will appear, if any. To add an email notification, click the Add Email Notifications button and a side popup appears.

  • Select the required notifications from the list and click Update. It displays all the active email notifications.
  • Once added, you can click on the required email notification and edit it as per your need. For more details on fields, refer to the link Email Notification.
Adding Email Notifications